

Introduction: Super Simple Sumo Bot


Hi all!
I am a robotics teacher and I like to make my students think. I teach them how to build robots, but I don’t give them all the answers. Sometimes they have to design by themselves a piece of the robot, sometimes is the size of an element that needs to be calculated, and sometimes, like this one, I tell them EXACTLY how to build a robot, but the code I give them, although it is good and will make the robot perform as expected, it can be improved to make your robot more competitive.
Oh! I forgot to tell you! Yes, these are competitive robots. They will fight on a ring, and the best of my students will win a price!
Supplies
- Ring: SNUDDA lazy Susan from Ikea: 6 €
- 2 Continuous rotation servos with wheels from Aliexpress: 3,5 €
- 2 rubber bands: look around. Best ones are those that come with the fresh asparagus you buy at the grocery store
- IR Sensor from Aliexpress: 1 €
- Ultrasound sensor form Aliexpress: 1,5 €
- Arduino Nano from Aliexpress: 2,2 €
- Small breadboard from Aliexpress: 1,85 € for a package of 6
- Battery connector + 9v industrial battery: About 1 €
- Wires (7 male-female and 6 male-male): About 0.1 €
- 3D printed chassis: Download it from HERE: About 0.2 €
- Add all this up and you will see that for less than 30 € you have 2 robots and the ring.
Step 1: Sumobot???


Have you ever seen those Sumobot competitions where 2 robots fight for
their life on a circular ring? No? then watch this video: Youtube Video
To win a match, you need to be the last on the ring. That easy. Either you run away from your enemy till he gets of the ring, or you can push your enemy out.
I wanted that my students build Sumobots and then make a competition between them, but to do that, I had to modify a bit the rules, so it was a fair play for every student:
All robots have to be strictly identical. Same chassis, same motors, same sensors, same controller, battery... you get the picture. By doing this, I am managing the budget, and I simplify big time the rules.
The ring has to fit in my car, and I have a VERY small car, so we used a Lazy Susan that we bought in IKEA (Google SNUDDA and you will see how it looks like before painting). It is 38 centimeters in diameter, and you have to paint a 8 cm black border.
The only thing that can (and should) be different is the code of the robot. (yup, this whole thing is just an excuse to make my students code!!).
Step 2: Putting Together the Sumobot


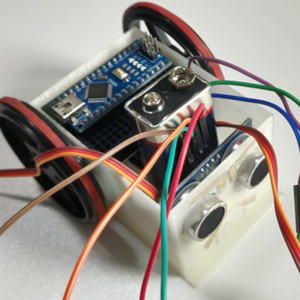


- Print the Chassis (Link in the part list)
- Clean the chassis with a small file till the sensors fit snuggly
- Insert the 2 servos. It is a very tight fit. Look at the pics!
- Put the cables to the IR sensor and put it as shown on the pics.
- Put the ultrasound sensor with the pins facing up. Insert a bit of foam or a piece of cardboard between the 2 sensors to hold them in place
- Insert the Arduino on the breadboard as shown on the picture (4 holes on the VIN side)
- Peel and stick the breadboard on the servos
- Wrap the battery in paper or in electric tape to prevent short-circuits with the sensors.
- Put the rubber bands on the wheels. Use some glue if needed but not now. Test different rubber bands till you find the one that has the best grip.
Next step: The wiring
Step 3: The Wiring


Wire the whole thing up. (See the chart).
Use the shortest wires that you can find. Put the battery before shoving the wires in the bot, because it will not fit after that.
- Infrared D0: Arduino D8
- Left Servo Orange: Arduino D9
- Right Servo Orange: Arduino D10
- Ultrasound Trig: Arduino D11
- Ultrasound Echo: Arduino D12
- All positives (Vcc from Sensors or RED cables form Servos): Arduino GND (any of the 2 GND)
- All negatives from sensors (GND from Sensors or BROWN cables form Servos): Arduino 5V
- Battery Positive: Arduino VIN
- Battery Negative: Arduino GND (any of the 2 GND)
Put the cover on top and paint the face for a dramatic effect!
Step 4: The Code

This is just an example of the code you can use. This code makes your robot mildly aggressive and not very fast.
To upload the code, insert the USB cable as shown on the pic.
Use this code as an example and make it better.
#include <Servo.h>
#include <NewPing.h>
#define trigPin 11 // HC-SR04 trigger pin.
#define echoPin 12 // HC-SR04 echo pin.
#define MAX_DISTANCE 100 // Maximum distance to ping for in cm, 400 max.
NewPing sonar(trigPin, echoPin, MAX_DISTANCE);
//pin digital de los sensores IR
const int pinIR = 8;
int IRvalue;
Servo servodcha;
Servo servoizda;
void setup() {
pinMode(pinIR, INPUT);
pinMode(trigPin, OUTPUT);
pinMode(echoPin, INPUT);
int duration, distance, pos;
Serial.begin(9600);
servodcha.attach(10);
servoizda.attach(9);
servodcha.write(90);
servoizda.write(90);
//valores digitales de los sensores
IRvalue = digitalRead(pinIR);
Serial.print("delay 3000");
delay(3000);
}
void loop() {
//valores digitales de los sensores
IRvalue = digitalRead(pinIR);
//empieza código para medir la distancia del módulo de ultrasonidos
int duration, distance, pos = 0;
digitalWrite(trigPin, LOW);
delayMicroseconds(2);
digitalWrite(trigPin, HIGH);
delayMicroseconds(10);
digitalWrite(trigPin, LOW);
duration = pulseIn(echoPin, HIGH);
distance = (duration / 2) / 29.1;
//acaba código para medir la distancia del módulo de ultrasonidos
if (distance >= 15)
{
//NO ENEMY ON SIGHT
IRvalue = digitalRead(pinIR);
Serial.print("Digital IR Reading =");
Serial.println(IRvalue);
Serial.print("NO ENEMY IN cm=");
Serial.println(distance);
if (IRvalue == 0) { // NO ENEMY IN SIGHT AND I AM ON WHITE AREA
servodcha.write(0);
servoizda.write(180);
delay(300);
servodcha.write(90);
servoizda.write(90);
delay(200);
}
if (IRvalue == 1) { // I AM ON BLACK AREA (ENEMY ON SIGHT OR NOT)
delay(300);
servodcha.write(90);
servoizda.write(90);
delay(500);
servodcha.write(180);
servoizda.write(0);
delay(200);
}
}
else
{
// ENEMY in sight
IRvalue = digitalRead(pinIR);
Serial.println("ENEMY IN SIGHT");
Serial.print("Digital IR Reading =");
Serial.println(IRvalue);
Serial.print("ENEMY AT cm=");
Serial.println(distance);
servodcha.write(90);
servoizda.write(90);
delay(2000);
servodcha.write(0);
servoizda.write(180);
delay(300);
}
}
Step 5: Making a Better Code


You can program different behaviors. For example, the code that I put as example has this behavior you see on the first table (image)
The other table shows a code that is slightly better than the one I have put as an example.
Step 6: How to Play


- Place your robot in any place of your side of the ring (you chose your place on the ½ ring that is in front of you)
- Both players connect the battery.
- The robot will wait 3 seconds before start moving.
- Fight starts.
- First robot that falls off the ring loses the fight.

Runner Up in the
Robotics Contest


![Tim's Mechanical Spider Leg [LU9685-20CU]](https://content.instructables.com/FFB/5R4I/LVKZ6G6R/FFB5R4ILVKZ6G6R.png?auto=webp&crop=1.2%3A1&frame=1&width=306)


