

Introduction: Sweet Little Souls Hot Coco Bombs


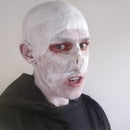


My family is doing a Halloween food challenge this year and I have to say, I am related to some pretty darn good cooks, so I knew I had to come up with something really good. While picking up my kids toys one afternoon, I came across a doll that was falling apart and the idea came to me- creepy doll head hot coco bombs! What could be better? Not to mention, I love hot coco almost year round, so any excuse to start drinking it before the Christmas season is an added bonus!
It's not even October yet and these have already started turning heads around here (sorry for the pun, I couldn't help myself). But seriously, even my husband- who isn't as big into Halloween as he should be, thinks these are pretty great. I can't wait to bring them to the party and I hope you love them as much as I do!
Supplies

For this project you will need:
Coco mix
Add-ins. I went with some pumpkin spice flavored caramels and red hots, but anything Halloween-ish, or whatever you like, is great.
Chocolate candy melts in black, white, and orange. Or other colors if you want them to look different, like maybe green if you want zombie heads?
Doll mould. I wouldn't be too surprised to find that you could get a doll head mould online, but if you have a good doll lying around, they are easy enough to make. There are a number of tutorials online for making silicone moulds of everyday objects, either with a kit or simply using water, dish soap, and a standard tube of silicone, like this; https://www.instructables.com/Silicone-Mould-of-Anything/
Containers for melting chocolates in
Toothpicks or other fine tipped object for adding details.
Funnel for pouring coco mix into heads.
Wax paper or similar material for placing the bombs while they cool.
Step 1: Make the Shell


If you don't already have a mould of a doll head, then technically the first step is to buy or make the mould, either using the tutorial in the link in the last step, or another method of your choosing. Just keep in mind that dolls with hair or protruding details will not work well, and you want to pick something that is about the size of normal hot coco bombs- too small and you will have to add several to taste good and too big and it wont fit in your mug.
Anyway, once you have the mould, the first step is to make a hollow shell of chocolate using that mould. Most tutorials for making hot coco bombs instruct you to make two half circles and 'glue' them together with melted chocolate. That is fine if you like it that way, but the problem I have with it is that you can only fill it half full of coco powder and mix-ins, which always makes for a rather diluted drink that you invariably have to add more coco mix to. I prefer to make one solid shape with a small hole that you can fill using a funnel and then simply cover with a dab of melted chocolate, resulting in a coco bomb that is completely full of flavor.
The obvious place for leaving a hole was where the neck should be, which also makes it easy to get a flat surface for setting them out for display later. So start out by melting small amounts of white chocolate and black chocolate, in separate containers, and use a toothpick to dab in the details of the eyes and cracks if you want to, being careful not to smear them or cause them to crumble away from the mould with rough handling. Once the smaller details are thoroughly hardened, scoop in a heap of your skin colored chocolate, close up your mould, and rotate the mould until the entire inside (minus a small hole in the neck for later) is completely coated. Wait until it is completely cooled before carefully removing the chocolate from the mould. Keep in mind that sometimes there will be a little bit of leakage; that's not a problem, just carefully trim off any large chunks with a knife and then simply use your finger to smooth out any casting lines.
As for the color, I used one square of white chocolate to four orange melting chips, but you could do something else if you want a darker or paler shade, it all depends on the look you are going for. Also, keep in mind that the amount of chocolate you will need to use will depend on the size of head you end up using, so it might take a little trial and error before you get it right, but for mine it was about 2 tablespoons.
Note: If you draw the cracks too thick or if the skin chocolate is too hot when you pour it in, the details will smear, so be careful with that part.
Step 2: Fill It Up


Once it is nice and cold and hard, carefully take the hollow chocolate shell out of the mould and enjoy your creepy creation for a moment before also making it a delicious creation. Add whatever mix-ins you like; my favorites are mint chocolate chips, butterscotch chips, caramel, Nutella, and marshmallows, but for Halloween I did some with red hots(I thought about doing those heads red and putting horns on them), and some with pumpkin spice caramels. I wanted to also do caramel apple flavored candy corn, but couldn't find any, so if you find some, make one and enjoy it for me please!
I like to do about two teaspoons of mix-ins and then however much hot coco powder I can fit into the bomb, which usually ends up being about 4 tablespoons- I like mine strong :) I fill them up using a piping bag as a funnel, but I have also made a funnel out of paper and I'm sure a plastic one would work great as well.
Once it is filled to your liking, dab some melted skin colored chocolate over the hole and place it upright on some wax paper, or any surface you can easily remove it from, really, and let it cool and harden. You don't have to set the head upright to cool if you want to, but I like to so that it can stand upright later as well.
Step 3: Finishing Touches


When my kids got home from school they asked where I got all the doll heads and totally thought they were real, which I loved! But they didn't think they were all that creepy, which I didn't love. So I figured they needed a little something else, and what I came up with was making them look dirty by rubbing a little coco powder all over them. I think it turned out really great, and then when I filled a jar of them that upped the creepy factor a bit as well. But I have to say that my favorite part is watching them melt in the mug; it really is a sight to see the face pop up over and over, getting more disfigured each time!
Added bonus: These are an awesome decoration aside from being a great treat, so you can make them ahead and enjoy them for days leading up to your party! Just don't display them anywhere too warm or you'll get a trick rather than a treat!

Participated in the
Halloween Contest


