

Introduction: Tessellated Wooden Art


Inspired by a couple of Reddit posts, this recreation of a photo of our old dog is a gift I made for my wife's latest birthday.
Lying at the clichéd intersection of "A picture's worth a 1000 words." and "It's the thought that counts.", this project requires a pretty intensive effort but the results are quite striking and are sure to be unique, whether on your wall or another's.
Step 1: Materials & Tools


Materials
- 3/16" Wood Panel [Mosaic Pieces] - The exact lumber used is up to you. Mine was scrap from a shiplap project I did awhile back so other than the thickness and the fact that it comes in 8'x4' sheets I don't remember exactly what it is. Using scrap is highly encouraged.
- 7/16" Sanded Plywood [Background] - I bought a 2'x2' section and then cut it down to my exact size. Again the exact wood used is really inconsequential so if you have an appropriate scrap piece lying around, use it!
- Furring Strips [Frame] - These are typically 1"x2" cheap pine strips. Take the time to sort through to find the straightest, split-free pieces.
- Spray Adhesive [Template] - Easy way to attach the template pieces to the wood panel.
- Primer [Mosaic Pieces, Frame] - This is optional but I didn't want to have to apply two coats of paint or live with an uneven finish.
- Paint [Mosaic Pieces, Frame] - I used spray paints for the main colors and some acrylics I had lying around for the eye and nose.
- Wood Stain [Background] - Optional but it provides that "next level" polished look.
- Polyurethane Coating [Background, Mosaic Pieces] - Totally optional but I like the sheen it gives stained wood.
- Wood Glue [Mosaic Pieces] - There are lots of options for a glue, some probably better than this but this is what I had on hand and so far it's worked well.
- Wall Hanging Hardware [Finished Work] - For me this was simply a screw. The frame design accommodates easy hanging, but you may need/want to use another method or skip it entirely.
Tools
- Photo Manipulation Software - I used the open source Paint.NET and Background Eraser Android app but Photoshop, GIMP, Pixlr.com, or even plain ol' MS Paint could get the job done.
- Printer - or access to one. Public libraries are a good free/cheap option in most places.
- Saws - I used a scroll saw for the mosaic, a jig saw for the background, and a miter saw for the frame. You could of course use a wide variety of other saws to get the job done depending on skill/access. You may have to adjust how you print your templates for different saws though.
- Heat Gun - Can make removing the template pieces much easier. A hair dryer is possibly a convenient substitute.
- Sanding Equipment - For me this was some mid-range grit (300-500) paper and a sanding block. Access to a bench-top belt sander will save you a lot of time and elbow grease.
- Personal Protective Equipment (PPE) - "Safety First" is a cliché but your vision and hearing is not easily replaced so... Safety First. Also gloves are an absolute must while sanding or you will shred your fingers.
Step 2: Photo Prep


First you need to choose a picture to replicate. A pet or favorite animal is a great choice but don't limit yourself, there are lots of other subjects that will work just as well. That said, a distinct outline and a decent amount of color variance will produce the best results.
With your image in hand you'll want to start by removing the background. Special apps, like Background Eraser, and high end software will make quick work of this but getting stuck in with the erase tool in Paint is also a viable option. When the background is gone you can begin dividing up your subject.
Start by tracing the outline with straight lines. Next, if your subject has distinct color sections trace those, otherwise use the vertices of the outline as starting points and begin drawing triangles. Be conscious of your mesh size as too small of triangles will cause your piece count to soars, along with your workload. On the other hand, go too big and you lose too much fidelity, making it harder to interpret the final image. You can see in the animation below how my initial mesh (green) was very tight and I ended up redoing it to it's final, 109 piece, size (yellow).
Now that you have a mesh it's time to choose your colors. While I could have gone with a couple more shades of grey to get an even closer match I instead decided to really push the image's high contrast, one of the reasons I chose our dog as a subject in the first place, by only using three main colors. How much time you want to spend mixing paint and how you want to paint (by-hand, spray, etc) should all be considered when choosing colors. The picking itself can be done manually with the software's color wheel or by using a built-in or plug-in "Average Color" tool for each segment.
Finally you need to print your template. You will need at least two copies, one for cutting and one for assembly/reference, but unless you have a large format printer or a small image you will probably need more. This is because you will need to Poster Print the file, if it's over 8.5"x11", and pieces falling on the seems will need their own printouts to be cut. Just make sure all prints are at the same scale!

Edit: Thank you to user AlexA214 for asking for the full scale template. I should have attached it from the start but better late than never. The .zip file contains both a .bmp and .pdf version of the full size template ready fro printing.
Attachments

Step 3: Cutting


Before you make any cuts you need to get organized. You're going to have a bunch of same-ish wooden pieces and if you don't have a system you'll be playing a jigsaw puzzle of your own creation. At this point that basically means identically numbering the pieces on ALL of your templates.
Having saved future you a headache, use some sort of adhesive to stick your cutting template pieces to your mosaic wood, remembering that you will need to get the paper back off later. As soon as the glue dries, fire up your saw and start cutting.
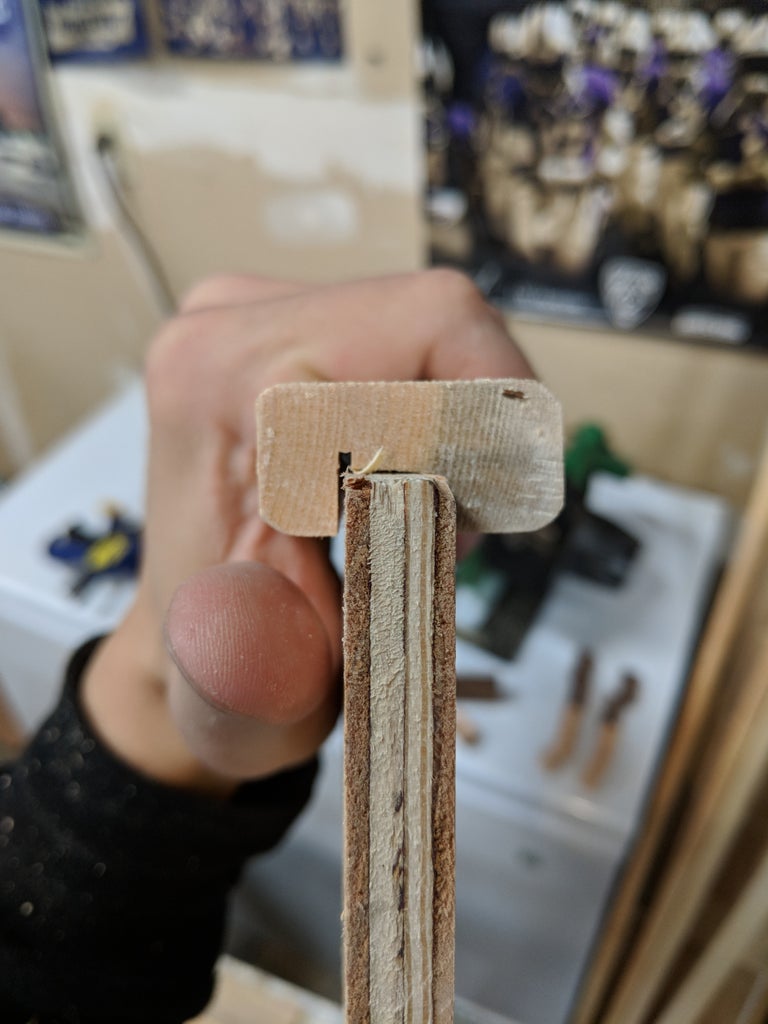
Once the pieces are cut you will need to transfer the number from the template on the front, to the back of the piece and then remove the template scrap. A few seconds in-front of a heat gun did the trick for me to loosen the adhesive.

Step 4: Sanding & Painting


Welcome to the grind. I suggest finding a way to listen to a podcast or put a show you've been meaning to binge on in the background because sanding all of the pieces is this projects most time consuming yet monotonous task. You'll need to clean up the front face and all three edges first and then round off the top edges and all three corners to give the pieces a more polished, even look.
When the sanding is done you'll want to clean the pieces of any leftover dust before moving on to priming/painting. If you're using spray paints chances are you'll run into this little paradox: The force of the spray is enough to blow smaller pieces around but once the paint dries, even a little, it can stick to the base and when you go to remove them it can peel and damage your finish. I tired painting on an old silicon mat for a few of the smaller pieces but only had limited success. My best advice is to just be patient, spary small pieces from a distance, using more passes to get full coverage. Also if you prime and paint each batch successively the dried primer will typically hold the pieces in place a little better than friction alone while you paint. Just be gentle when removing pieces or the afore mentioned peeling could ruin your day.
One extra step I had to take was spraying the acrylic painted nose and eye pieces with a semi-gloss polyurethane coating I happened to have around. Reason being, I used semi-gloss finish paints for the main colors but the acrylics were flat and just didn't look right without that little bit of reflection from the shinier finish.
Step 5: Background


This step and the next could probably be their own mini guide (and maybe they should, let me know if a slightly deeper dive would be helpful and I'll try to oblige), so I'll try not to get slogged down in the details here but feel free to skim or even skip if you have a different plan for presentation.
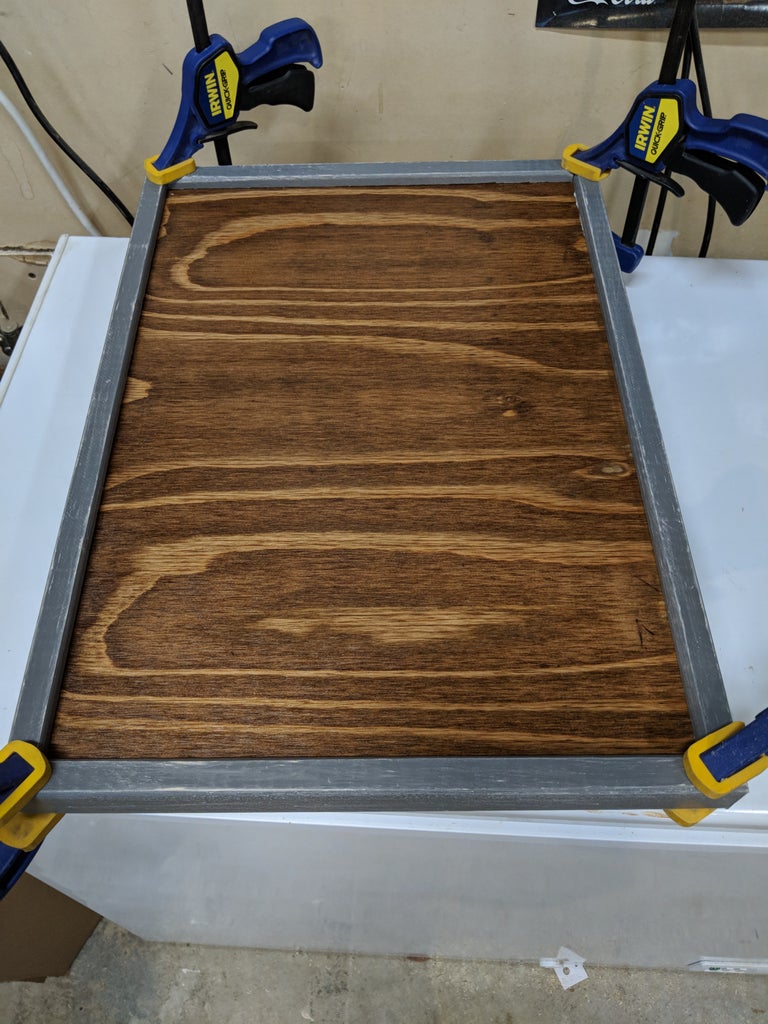
I sized my background board by measuring the assembled mosaic and adding ~1/4" as free space and ~1/4" for the frame to cover for a 1/2" total. I don't have a table saw so I clamped a straightedge down as a rail and used a jigsaw to rip the edges. The plywood I got was sanded on one side but I still gave it a quick once-over with the sanding block, especially to clean up the fresh cut edges.
With the board cleaned of any sanding dust, I finished it with a single coat of stain and a couple coats of polyurethane. I find that at least two coats of the poly, and a light, fine grit sanding in between, are almost required to get the super smooth finish I like. It also should go without saying that the color and depth of stain and finish, or even just using them at all, are options best decided for your individual project and subject.
Step 6: Frame


Disclaimer: This is an overly complicated way to build a frame like this, especially without a table saw, so feel free to use your favorite/easier method or just skip the frame entirely.
The idea is to use a circular, or table if you have it, saw with the blade set to a ~1/4" depth to cut a blind slot in the frame pieces that the background board will sit in.
Start by cutting out four furring strips to rough lengths. You'll then need to do some math to relate where you want the slot to run in the strips and the distance between your saws guide and the blade. Don't forget about the kerf (the width the blade cuts, essentially) or you'll end up cutting too wide. Once you know where you're cutting you'll need a way to hold everything in place while you cut. I cut a few sets of offset blocks (see the second picture above) that gave me cuts at the extremes of the slot and twice in between.
At this point I used a screw driver and wood chisel to break, cut, and scrape out the tabs left by the saw. Don't worry if it's a little wider than the background board or if the "floor" of the slot isn't perfectly flat. As long as it's relatively close it should all come together in the end.
Once the slot is cut it's a simpler job to cut miters in both ends. (Watch your directions!) If everything matches up then it's off to paint/stain/finish. My initial plan was to just to prime and then paint the frame the same grey from the mosaic but after I started sanding the first coat I really liked the distressed look it was giving me so I just rolled with it.
Finally I fit checked the pieces in the different positions to see what combination was the most square and had the smallest gaps in the miters. With the positions decided I used wood glue in the slot and on the mitered faces to stick everything together. Later I did come through and add a pin nail to each joint with a nail gun but that was just for piece of mind.
Step 7: Mosaic-ing

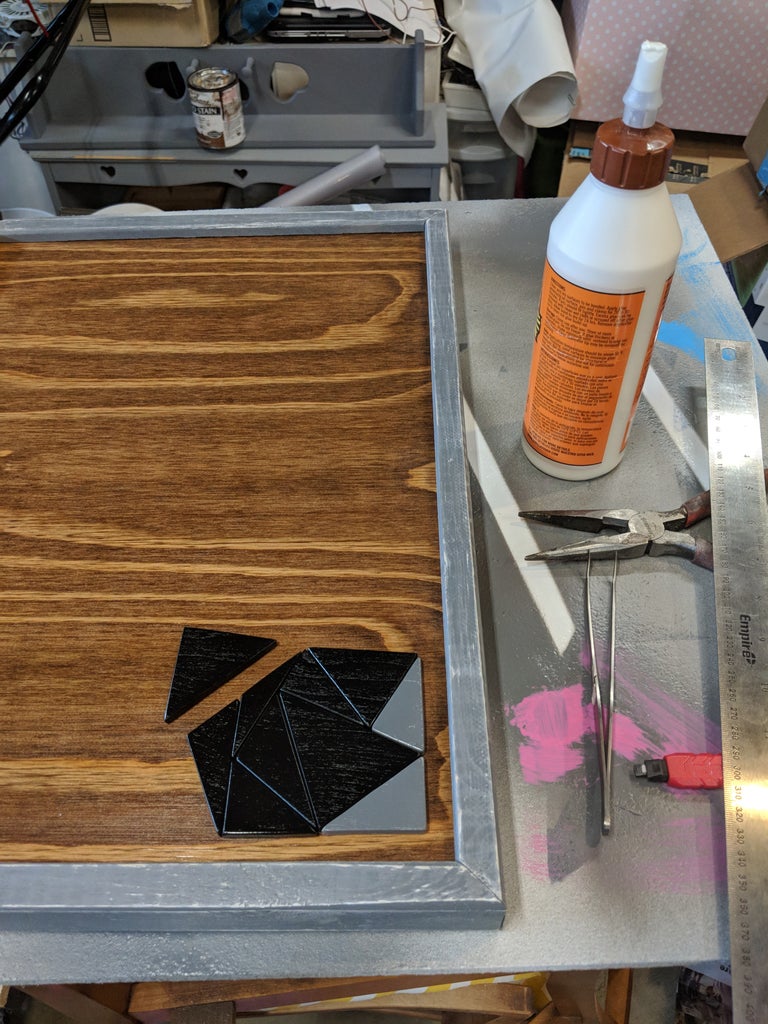


We've had the tedium, now it's time for the stress.
Because of the very narrow gap between my pieces and deadline pressure (i.e. finishing the night before the big day) I didn't attempt to come up with a clever way to transfer the pieces to the frame so I was placing them by sight. Knowing I couldn't backtrack if things didn't come together in the end was more than a little nerve-wracking.
Instead I just assembled everything on the template, next to the frame, and then moved several pieces over at a time, without glue, and got them in position. Working from the unglued piece that was most constrained, I applied a thin glue layer then pressed it into place and tweaked it's position until it looked right compared to the pieces around it.
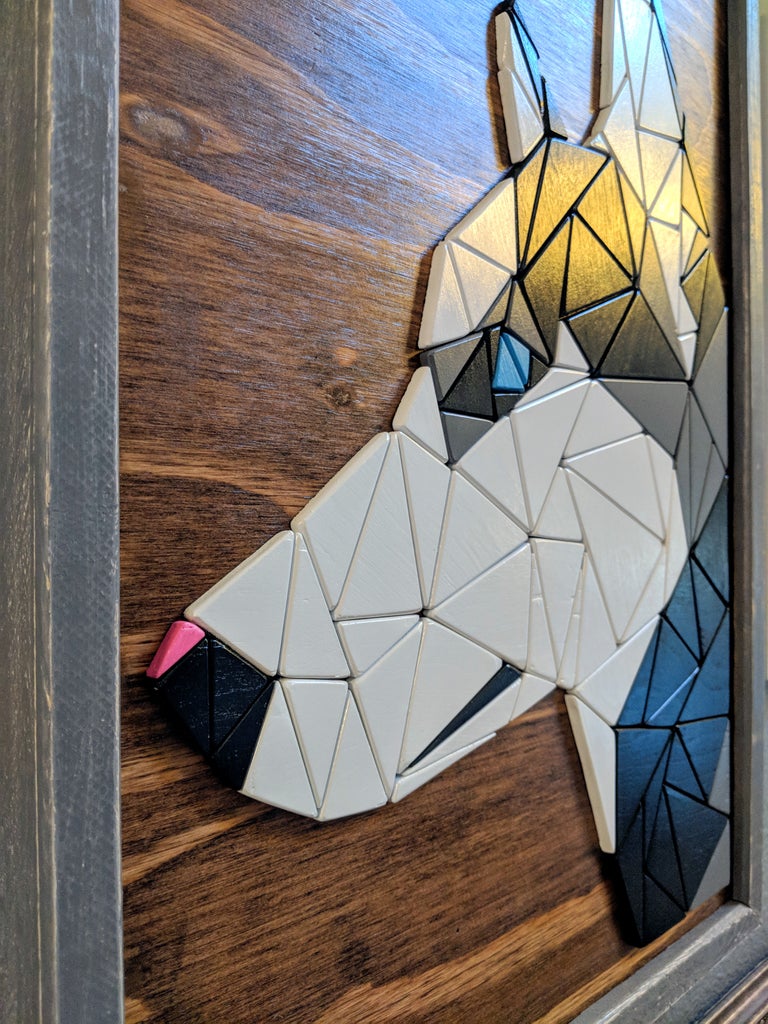
In the end you may have to do a little jockeying, as I did with the small pieces around the eye, to get everything to fit. Once everything does fit though and the glue is dried all that's left to do is choose a place of honor, or a gift wrap.
Step 8: Thoughts & Lessons Learned

Congrats and thank you for slogging through my head-scratchingly verbose guide. I hope you found at least a couple nuggets of useful or interesting info. As always feel free to ask any questions and post any feedback or suggestions. And finally, if you make your own versions, please post pictures in the comments. Word is there could be treats for any who do. ;D
If somehow you just haven't had enough of my dull prose then continue on for my final thoughts and some stuff I'd do differently next time, otherwise, thank you again for reading.
Post-mortem
I know some of my methods probably caused minor strokes among the more professional and skilled woodworkers out there. That said I'm quite proud of the results and think anyone with even a little experience with their tools (this was my first real attempt at using the scroll saw) and a moderate level of equipment (e.g. I do have a scroll saw but not a table saw) should be able to produce pieces of similar quality.
I'm very happy with how the limited, high-contrast color palate works. Especially how it really makes the blue of the eye pop. I think the finish on the background and the frame sort of wrap the whole package up and give it a nice clean, "elevated" look. On the other hand I wish I had gone with slightly larger mosaic pieces throughout and had a wider gap between pieces. Also if you're up close you can see the texture/finish difference between the eyes and nose pieces and everything else.
Lessons
- When I was gluing pieces and made it up through the neck I started working up the back of the head and down towards the mouth at the same time. Working in two directions at once is a mistake. This is the reason I had to spend twenty minutes jockeying the last set of pieces around the eye into place. Luckily I was able to make it work but it's not perfect, even though I'm probably the only one that can tell. It could have been a small disaster though, requiring prying most, if not all, the prior pieces off.
- Doing this again I'd probably lightly sand the area where the pieces are glued. It hasn't been a problem yet but it's possible the glue isn't bound well with the polyurethane and pieces might need reattached later.
- A belt sander is the one tool I didn't have that I would seriously recommend. Sanding 109 pieces by hand was exceedingly tedious, rough on the hands and wrists, and wore through the finger on my glove.
- Thanks to user spystealth1 for reminding me: This would be an absolutely perfect project for those lucky folks with easy access to a laser cutter. It certainly would be easier but might lose some of that hand worked charm from the imperfect cuts, if that's a consideration to you. You could probably get some of that back by hand sanding the edges though.

Participated in the
Woodworking Contest


