

Introduction: The Art of Making Junkbots


“In the not-too-distant-future, when the war between man and machine is over, the junkbot will be king”.
Becoming a junkbot maker (a Junkbotter if you will) doesn’t take much skill or technical knowledge. What you will need however is a good imagination and a collection of junk parts. Junk parts can be anything from vintage electronics like old radios and sewing machines to broken mike stands and vacuum tubes. To a non-junkbotter these things are just rubbish to be thrown away and discarded. To the Junkbot maker, they’re pure gold.
Junkbots have a personality all of their own and each one is unique. You will probably never be able to duplicate one that you have made as each in is built from parts unique in themselves. Junkbots can be as simple as a tin can with fork arms or as complex as a mechanical behemoth that lights up. It’s up to the junkbotter (and the parts available) to decide on the type of junkbot they want to make.
This ible’ is designed to be a guide on what you will need, and how to get started building your own Junkbot. I’ll take you through what to look for when your hunting for parts and ideas on how to put your junkbot together.
I've also included a step by step guide in the middle section of the ible' on how to make your own, small Junkbot.
Step 1: Where to Start? - Inspiration


The internet is a great place to start. Just type in “robots made from junk” and a world of amazing and unique Junkbot designs will be revealed.
Take note on the types of parts Junkbotters use for body parts. The first thing you will notice is the parts usually have some resemblance to a real body part (albeit sometimes a loose one). This is important to remember when scavenging parts for your own Junkbot.
When searching for parts, are really only 2 types that you need to find; parts that look, or could be changed to look, like body parts and interesting bits and pieces to add to your Junkbot (layering - more later on this). A lot of times I come across some parts and then suddenly see something that reminds me of an arm or torso. It’s from that point onward that you start to think about what else you could add to the part to build it up into a Junkbot
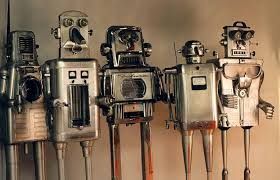
Check out some of my favourite Junkbots below. You can see that their body parts have a resemblance to the real thing. Maybe the artist found an electrical meter that looked like a torso? Maybe it was a light bulb or motor that reminded them of a head! Whatever it was, I bet that each Junkbot started with a part that reminded them of something, and from there they built up their Junkbot.
Here's a couple of my favourite sites and artists to get you started
Step 2: Saving Images for Inspiration


As you start to find Junkbots that appeal to you and designs you like, you should save these for inspiration later. I set-up a Pinterest page so I could save any images of junkbots I loved. It’s a great place to keep all of the images you find, and others might also get some inspiration from your own page.
I also save images of parts that would work well on a Junkbot on the page as well. Any images of gauges, volt meters, springs etc that I think could be used on a Junkbot, I make a note of and save the image. Whether you actually use them or not doesn’t really matter, it’s the sourcing of ideas and inspiration which counts.
Getting inspiration from someones design and build will definitely help you get started on your own.
Step 3: Finding Parts


Now that you have been inspired, the next step is to go out and find parts. Remember, the parts that you are looking for are the things that most people throw away, so getting your hands on the cool bit and pieces isn’t hard – you just need to know where to look. Below I have listed a few of my favourite places to hunt.
Op-shops (thrift stores)
- There is always plenty of interesting and unique parts available from your local op-shop. Check out the electrical section if they have one or even the bric-a-brac section. I have found some fantastic copper bowls that I have used to make heads and bodies out of .
Tip and Recycle centres
- This would have to be my favourite place to scavenge. My local tip has a shop which is like a goldmine when it comes to vintage parts. The best bit is nothing is over $5 and every time I go there I find something I have never seen before. My last visit I found a box full of vintage potentiometers, all different sizes and shapes. These make great shoulders and have a lot of interesting bits you can use to help layer up your Junkbot.
Hard Rubbish
- Where I live, every 12 months the council allows you to get rid of any hard rubbish (treasure). This is put on your nature strip where garbage men come along and clear it for you. The rubbish is left out the front for a couple of weeks which gives you plenty of time to find the treasure within. Plus it’s all free! Last year I found 5 vintage sewing machines (2 that worked perfectly and 1 that I kept) which yielded up a treasure trove of amazing parts that I could use for arms and legs, torso’s etc, etc.
Friends and Family’s home
- Most of us have some vintage electrical gizmo hidden away in some cupboard. If not, then I bet someone you know has a piece of useless technology just gathering dust. Ask if you can have a scout around their garage or attic and I bet that you'll find something unique. They will probably be happy to give it you as most people don't even realize they have it or have no use for it any more.
Step 4: What Should You Keep and Sorting


As you start to amass parts, you will need to decide what to actually keep and how to store. Over the course of sourcing parts I have managed to find a wide variety of the weird and wonderful. Sometimes I've been lucky and have found a box full of vintage resistors, or a whole bunch of relays. It definitely makes it easier than de-soldering the parts off circuit boards. I just keep these gems in the boxes that they usually come in.
There will come a time though when you think "How am I going to store all this beautiful junk?
As you start to amass, you will need to get rid of some to make room for the new. I do a clean-out once a year and throw away anything that has a layer of dust on it. Murphys law though means I will need that one brass knob that I just got rid of. It all comes down to how much room you have to store your parts and how well they are organised.
I try and keep like parts together as much as possible. The springs are all kept together, same with the motors etc, etc. It definitely helps knowing where to find that one part when your deep in the moment.
I know all this is pretty obvious, But just sticking everything you have into one big box will drive your crazy when it comes to building your Junkbot.
Step 5: Pulling Things Apart.


Once you have a few pieces, it's time to start to pull them apart. Remember, there are many parts that could be used, so make sure you really have a good look at each bit and make the decision to either keep or discard. Many a times have I pulled something apart and discarded parts which I wished I had kept. It's better to be safe than sorry and keep too many parts than throw away. If your garage starts to look like your a hoarder though, then it's probably time to clear out some of the parts you haven't used.
Some of the hardest pieces to decide on are the limbs. When you do find something you could use for a leg say, you inevitably need another for juxtaposition and symmetry. Golf clubs make great arms and/or legs. They are cheap (op-shop), hollow, come in different designs and are easy to cut. I have also used old mike and drum stands as good sources of limbs.
Step 6: Baby Steps


Making your first Junkbot can be a little daunting. You might have all of the parts that you need but the next step is trying to work out how to put everything together. You might be lucky and have some parts fit together without much, if any modification. Most of the time though you will find that you have the think laterally to work out how to attach all the parts together. Sometimes you will need to abandon what seemed a great idea as there is just no way to join up the parts you have.
Sometimes it's best to start simple and small. It's much easier to put together a mini Junkbot as most of the parts can be electrical components and soldered together. Soldering is probably the easiest way to connect any small metal pieces and electrical components make the perfect parts.
The following steps show you how to put together a Junkbot with parts from an old video of DVD player and a couple of spare parts from your junk bins.
This idea was inspired by JunkBOTJon who has done a stella job designing and making miniature Junkbots. Check out his blog below to see the rest of the collection.
If however you think your ready to tackle something larger, you can just skip the next few steps and go to step "Ways to Connect the Parts"
Step 7: Your First Junkbot - Parts


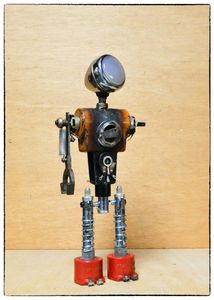
This Junkbot was inspired from one I found on-line (see below image). As with any Junkbot, mine ended up different but still similar to the one below.
Steps:
1. Gather the following p;arts:
- Small motor or voltage regulator. This will be the body
- Video inputs from an old DVD or video player. You can scavenge these from DVD or video players
- Resistors
- small capacitors
- Some type of stand (I used a volume knob from an old radio)
Step 8: Start to Assemble


Steps:
1. At the back of the video input, there is a couple of biuts of wire, bend one of these down and straighten. This will be the neck and will be attached to the top of the motor.
2. Solder the neck section to the top of the motor
Step 9: Attaching the Arms and Legs


Steps:
1. The capacitors have to wires coming out of them. Make a loop and cut off the excess
2. Grab the resistors and trim the ends so about 10mm is left on each end. Solder one end to the motor body and the other attach to the loop on the capacitor.
3. Next again, make a loop on 2 other capacitors and solder the ends to the motor terminals
Step 10: Attach the Junkbot to a Stand


Steps:
1. Find something suitable to attach the junkbot to. I was going to use a volume knob but decided to go with a heat sink I found. As I only had some superglue handy I used this to glue him to the heat sink. It would have been better to have used some epoxy but as this little Junkbot is pretty light, superglue will do the job just fine.
Done! I've also added a few images of others that I have made with just a few electronic odds and ends.
Step 11: Ways to Connect Your Parts


So you have a bunch of interesting parts, scavenged from all different materials and objects. The next steps is to start to assemble your junkbot. I've never really had a finished design in my mind, it usually starts with one object and then I build on it from there.
Connecting parts together which were never meant to be connected can be a bit of a mission. I find this part of the build the most frustrating and also the most inspiring, creative and satisfying part of making a Junkbot. Having a variety of ways to connect will help you keep your sanity.
Soldering:
Soldering parts together is definitely a great way to connect parts. You can use a soldering iron on small parts or a mini blow torch on larger parts. Don't forget flux if you are connecting larger parts together.
Welder:
I have a mig and tig welder and I find that they come in handy when connecting larger parts together. Using a welder can be a little heavy handed though, especially on parts that are old and fragile.
Epoxy
Using epoxy is definitely a great way to attach parts together, especially if made from different materials. Epoxy is a very strong glue and makes an incredibly strong bond between 2 parts. \make sure though that you clean and scuff the areas that are going to be glued together
Hot Glue and Superglue
Unlike epoxy, hot or superglue are ok to use in a bind but I don't recommend using them as a primary way to attach parts together. Superglue can get brittle and doesn't form a great bond, and hot glue is good on certain materials but not on metals etc.
Screws and Bolts
This would have to best the best way to attach the parts together. Unfortunately, it's not always possible to screw parts together. Drilling holes and making modifications will allow you though to bolt parts together and also means that you can pull apart bits if needs be.
Forcing Parts Together
Some parts seem to be make for each other and can be pushed together will a little force. You might need to grind, sand or enlarge slightly to make them fit correctly.
Step 12: Texturing


A Junkbot can be whatever you want it to be. What I mean is, there is no clear definition on what constitutes a Junkbot so you are only limited to your imagination (and the parts you have!). Ageing your Junkbot can give it a real apocalyptic feel which really appeals to me. Considering most of the parts that you find are usually old and worn, adding texture to a Junkbot gives it a unique and aged look which really appeals to me.
Below are a few ways that you can age your robots to give them that war torn look
Heat
Using a mini blow torch to remove paint always look effective. You can also melt plastic or colour metal to give it a damaged look
Welder
Welders are a great way to really add some serious damage to your junkbot parts. I have used one in the past to pit and de-face some chrome poles I was using for legs. It worked really well and gives a great finish to something that you want to look damaged. Also, using a welder to join parts can have an adverse effect of making the part discolour. This happened to me recently on my last Junkbot whist joining 2 sections together to make the torso.
Dirt and grime
Many parts that you will use for your junkbots are going to be already dirty from years of storage. Don’t remove or lean the parts. Leave the dirt where it is and incorporate it into the Junkbot
Paint
I have never really got into air brushing but if it is something that you are able to do, then you can definitely create some great effects. If you want to learn more on air brushing junkbots, then check out this link
Bashing
One of the easiest ways to make something look damaged is to bash it with a hammer! You would obviously only want to do this on parts that can handle it. Using a nail punch and adding a few holes is also a good way to get some damage happening. Scratches, dints, and bends can also be effective and are easy to do with vices, hammers and screwdrivers.
Step 13: Layering


Layering is where you add small, odd parts to build up interesting layers on the Junkbot. It's a fine line between adding too much layering and stopping with just the right amount. Layering helps make your Junkbot turn from a bunch of parts joined together, to something that genuinely looks like a robot. I usually leave this to last as I like to take my time and test out what each layer will look like before committing it to the Junkbot.
Any interesting part placed in just the right spot can really bring your Junkbot alive. There is now real method on what to add where, It really comes down to what you have in your spares bin.
Below are some samples that I've done which show some layering. The best advice I can give you when you are adding layers is to not over do it, and try and test before attaching to the Junkbot.
Step 14: Junkbot Army


Getting started on a larger Junkbot starts with one part. That part usually jumps out at you as a perfect torso or head or some other body part. Then it's just a matter of going through your parts bins and finding the next piece to add. The process can take some time, but a little patience and imagination and you will start to see your Junkbot come to life.
I've posted a couple of other ibles' on Junkbots which you can find at the below links if your interested.
Good luck with your own Junkbots.
If you have any questions, I'm happy to answer in the comments section.

First Prize in the
Before and After Contest 2016


