

Introduction: The Wooden Bobcat Toy


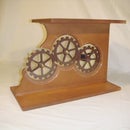


I was going through Instuctables and saw some amazing stuff. I just wanted to do something that was just as amazing. Hopefully I have a file you can use. I used my Epilog laser engraver (Epilog Mini 12x24 45 watt). This project took 12 hours to design, 60 minutes to cut out, and 30 minutes to glue together. This project is geared towards someone with access to a laser engraver or CNC machine.
Supplies:
1) 2 sheets of 12x24x1/8" of press board
2) 1/4" wood dowel 18"
Tools:
1) Super Glue
2) Razor Knife
3) Laser Engraver (ideal)
4) Corel Draw x4 (ideal)
also check out the MPG file video

Step 1: Drawing Plans


Pick or print out the file you prefer to use.
Cut out the pieces by whichever means available to you (laser engraver or CNC is ideal).
Step 2: Assembly of the Base


Here is the fun part! It's like a puzzle. Remember to glue the edges of the cut pieces.
1.) Attach base-1 to base-4
2.) Attach base-2 to the oppitsite side of base-4
3.) Attach base-3 to the small end between base-1 and base-2
4.) Attach base-5 to the rear of base-1 and base-2
5.) Attach base-6 to the bottom of base-1, base-2, base-3, and base5
6.) Attach base-7 to side of base-5
7.) Take base-9A and place on top of base-1, base-5, and base-7 to connect all three
8.) Attach base-8 to other side of base-5
9.) Take base-9B and place on top of base-2, base-5, and base-8 to connect all three
Step 3: Assembly of Cage


1.) Take cage-1 attach to cage-4
2.) Attach cage-2 to cage-4
3.) Attach cage-3 to the tops of cage-1, cage-2, and cage-4 connecting all three sides
4.) Once step 3 is completed attach the cage to the base
Step 4: Assembly of the Woodraulics


1.) Take w-1A and attach to w-2A
2.) Attach w-1B to w-2A
3.) Attach w-2B to the bottom of w-1A and w-1B thus creating a four sided block
Repeat steps 1 through 3 to complete the other three blocks for a total of four Woodraulics
Note: w-3 will be installed later
Step 5: Assembly of the Bucket


1.) Attach bucket-4 to the inside nitch on bucket-2 and bucket-3. Repeat this step for a total of four times.
2.) Attach bucket-5 and bucket-6 to the outside of bucket-2 and bucket-3.
3.) Attach bucket-1 to the bottom of bucket-3, bucket-5, and bucket-6. This completes the bucket
Note: the support arms will be addressed later
Step 6: Assembly of the Tires


The tires are fairly easy. I used the 1/4" dowel to line up and attach the four parts to create the tire. Be sure to overlap/alternate each part so that the end result looks like tread (see photo).
1.) Place the dowel through the center of tire-4.
2.) Place the dowel through the center of tire-3 and place tire-3 over tire-4. Alternate the groves to begin creating the tread. Glue tire-3 to tire-4.
3.) Place the dowel through the center of tire-2 and over tire-3. Glue them together, again alternating the groves to continue with the tread process.
4.) Finally, place the dowel through the center of tire-1, place over tire-2, and glue them together.
Repeat steps to create four tires.
Step 7: Installation of the Tires


1.) To create the axels, cut 1/4" wooden dowel into two 1/4" x 3.5" pieces.
2.) Take one completed tire and glue to one end of an axle.
3.) Slide the axel through the bottom of the base.
4.) Take a second tire, place on other end of axel and glue.
Repeat steps to complete the second axle
Step 8: Assembly of the Bucket to the Base


now we attach the support arm to both sides of the base using the 3/8 dowls
install the woodraulics to the bottom part of the the support arm for both sides
on top install final two woodraulics
now install the push rod(w-3) in woodraulics an connect them to the support an the others to the bucket(see photo)
look at the video to see it work mpg file
Attachments
Participated in the
Epilog Challenge
Participated in the
Holiday Gifts Contest


