

Introduction: The Paper Pen


I thought you might like to see this little pen made today for my wife to be (its only 3 weeks until we do the I do's). Its made from paper and resin.
I have been told the technique I have used to make the blank is known as Micarta by knife makers.
Pen making is fairly common among wood turners with kits and specialist tools becoming readily available at a relatively low starting price. (Pen making tools such as a pen makers mandrel can be used for other things very easily and vastly adds to your possibilities as a maker). With this tutorial I am using a slimline pen kit.
Rachel has problems with her joints and finds an ergonomic pen shape helps a lot in preventing pain which is why I incorporated a large bulb towards the tip.
If you are inspired to take up turning or to make a pen for yourself or a loved one because of this instructable or you have an idea of alternative uses for the manufactured paper wood I would love to see what you get up to.
Step 1: Cutting the Paper for the Pen Blank


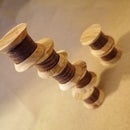
I found some large sheets of paper in different but complementing colors (cream and dark green) and folded these sheets of paper together before Cutting them on the band saw I ended up with a large selection of 1 in.² pieces of paper.
As always its important to be safe whilst working. I found the safest way to cut this paper included using some sacrificial strips of wood to help hold the paper in place.
You could use scissors or a knife to cut out your paper. What ever you use please be safe.
Step 2: Makeing the Pen Blank Jig


I created a small jig which would help guide the 1 inch square paper squares into alignment whilst being glued.
This jig is 3 pieces of wood to form an L shape on a board glued and tacked into place.
Step 3: Gluing the Pen Blank


Heads up this is the part of the process which took a long time.
I used West System 105 with 205 epoxy resin to glue each individual sheet.
The surface tension of the paper and the resin kept the paper from slumping during the glue up.
My main worry was the resin curing before I could finish the process of gluing up. Luckily the open time varies somewhat and the resin stays open for longer when it is in small quantities so I got away with it.
I think experimentation with different glues and resins would result in faster easier glue ups than I experienced.
Step 4: Cut Your Brand New Blank


This is where the fun time starts.
Once you have separated your pen blank from the jig (I used the saw to get mine out) Its time to work out where to cut.
I have in the past used a long drill bit on the lathe to cut through the entire blank which is useful if you have beautiful wood gran and you want it to line up perfectly. But for most occasions its far easier to use the drill press.
I used the brass tubes to inform where to cut before using the band saw.
Step 5: Drill That Beautiful Blank


I held the blanks in a vertical position before drilling a hole through the center.
For my kit I used a 7mm drill bit but your kit might require a different size.
Step 6: Glue It Like Its Hot


I like to sand the brass tubes to increase the surface area the glue can stick to and to remove dirt and oil which could stop the glue from being as effective as it could be.
I used a medium thickness CA/ superglue in the blanks drill hole as well as on the brass tubes which came with the kit.
The trick to inserting the brass into the hole is not to stop. When the brass is moving there is lubrication but when it stops the glue is likely to set fast. Ideally you will end up with the brass tube completely inserted into the blank.
You might want to use a pencil or something to help push the tube into place.
Top tip from the comments.
@Scanner2 says:
After you've glued the brass tubes into the blank, you might have some glue inside the tube. I use a1/4 inch drill bit, turning in reverse, to ream the inside of the tube. Running the bit in reverse prevents it from catching the brass and ripping through the tube.
(This is a great tip - I would add depending on the kit you have and the method you use to flush the blanks to the brass tubes it might be worth running a hard peace pf metal around the sharp edge of the brass tubes which will reduce any possible burr and result in the pens fitting together easier when it comes to that stage)
Step 7: Face It Off


My pen making kit came with a facing tool.
I hold this tool in my pin jaws on the lathe and allow the locating pin to enter the brass tube before the blades can remove the parts of the blank which are not surrounding the brass. This results in a completely flat surface for the bushings to rest against later.
If you do not have a tool like this you could sand or carve the surface flush with the brass tube.
Step 8: Install and Start to Turn


Put your prepared pen blanks onto the pen makers mandrel with appropriately sized bushings between the pieces.
For me the appropriate bushings are slimline bushings though there are many styles to chose from.
I started to shape and refine the shape using different tools.
If you would like to know more about the wood turning tools I used I produced a quick guide for Make Magazine a little while ago talking about the tools and what they tend to be used for.
http://makezine.com/2015/08/13/quick-guide-7-basic...
Step 9: Refine the Shape and Then Start to Finnish


I like to make sure the shape is as perfect as I can get it before applying any finish.
Once I was happy and had sanded to 1000 grit I applied a layer of thin CA/ Super glue spreading it to ensure an even coat with my finger.. The key to doing this is use plenty, not enough and the glue will not lubricate as you spread it.
I coated the pen with around 4 layers of super glue before sanding to 1500 grit and using burnishing cream to bring out a mirror like shine. Cabinet makers call this process rubbing out and it results in a flawless finish for those happy to put in the extra work to achieve it.
Step 10: Putting the Parts Together


The components to a kit like mine are friction fit but could easily go wrong if you are not paying attention.
I find it is best to set out the project in a dry state to see where things should go and work out an order.
Here if the tip of the pen is not fitted before the mechanism problems could occur. I used a vice to apply pressure to the parts and ensuring a good fit.
I would advise the addition of getting high quality inks for your pens as the standards tend to be just OK rather than the best ever. And all Cross style pens essentially use the same mechanism so you might as well use the same ink as the people who spent a lot more than you on their pens and have the added cool points of having yours as a one of a kind pen you made yourself.

Second Prize in the
Papercraft Contest 2015

Participated in the
Epilog Contest VII


