

Introduction: Lamp Making Tools


In this 'ible, I go over the basic tools and supplies needed to make lamps.
Step 1: What's in a Lamp Making Tool Kit?
Most of the tools you'll need for this class are things you'd find in any toolbox or workshop, but there are a few specialized items that are necessary – and some that will just make lamp building a whole lot easier.
When buying new tools, I recommend leaning towards quality brands. They don't have to be the most expensive, but I wouldn't look to the dollar store to find them. Poor quality tools are frustrating to work with and can slow down the process.
I'll provide links to the exact tools I suggest investing in, but of course feel free to go with whatever tools look good to you. Especially if they are found in your grandparent's tool box. (They don't make 'em like they used to!)
TIP: Ordering specialty tools and parts from the online lamp suppliers can take up to 2 weeks, so I recommend reading through the whole class before placing an order, so you can purchase all parts and any tools you need at the same time.
Step 2:
Mandatory Tools & Supplies
- manual OR automatic wire stripper
- small wire cutters
- large wire cutters
- box cutter
- scissors
- 4.5" Channellock pliers
- 6.5" Channellock pliers
- small flat head screwdriver
- phillips head screwdriver
- needle nose pliers
- continuity tester OR multimeter
- electrical tape
- masking tape
- ruler
- measuring tape
- Elmer's glue
- cutting mat
Optional Tools & Supplies
The following tools are handy to have when making your own lamps – especially when turning found objects into lamp bases or shades. You'll see the below tools used in the pendant and table lamp projects I link to in Lessons 7 & 8.
- hand drill
- safety glasses
- grip mat (I use spongy shelf liner)
- 2 clamps
- 2 pieces of wood (2x2" or 2x4" by 12")
- center punch
- hammer
- 25/64" drill bit
- circle compass
- 1 9/16" multipurpose hole saw with arbor and pilot bit
- half round file
- sandpaper
- 3' ball chain
- self adhesive felt (circles or sheets)
- utility scissors
- T-Handle Reamer
- Step drill bits
- Silicone squeeze tube
- 5 minute epoxy
Step 3: Mandatory Tools of the Trade
Wire Stripper
There are two main types of wire strippers available on the market: manual and automatic. The manual versions require some wrist action + elbow grease and come with a built in cutter. If you don't plan on making a ton of lamps, this is the one I'd recommend getting, as it's the least expensive. If you think you'll be making all of your relatives lamps for the holidays, do yourself a favor and invest in an automatic stripper. Your wrist will thank you.


Wire Cutters
I like having two sizes of wire cutters. The larger pair is for the grunt work of cutting the cord and the smaller one is for the finesse work of cutting the wire. If you end up buying the manual wire stripping tool, it will already have a wire cutter built in which will be adequate for the cord cutting, so in that case, I would just get the smaller pair and not both.


Box Cutter & Scissors
For general purpose good measure.

Box Cutter With Fresh Blades
Channellock Pliers
I like having both of these sizes of pliers in my toolbox, but if you only want to invest in one, I would go with the smaller (4.5) pair, as it the perfect size for the size of nuts that are most commonly used in lamp making. For securing the center rod on table lamps, you will need two tools for tightening (one for each end), but an adjustable wrench or vise grips will work in place of the larger Channellock pliers if you already have one of those in your tool box.


Small Flathead Screwdriver
This is one of the most important tools in a lamp making tool kit. I use it to tuck twisted wire ends around socket screws, separate caps and shells (socket housing) for repairs, and so much more! I would definitely recommend investing in one of these little puppies.

4.5" Flathead Screwdriver

Phillips Screwdriver
This is another mandatory tool. It's used to tighten the socket screws and to take apart and reconstruct line switches and old fashioned style plugs. Make sure you buy one that fits comfortably in your hand and is easy to maneuver. A 6.5" - 8" one will work, depending on your hand size.

6" Phillips Screwdriver

These are super helpful for getting into hard to reach places. Whether you're making lamps from scratch (raw materials) or using found objects, you never know when you're going to need to use these versatile pinchers.

Needle Nose Pliers

Continuity Tester OR Multimeter
It's important to have a way to test whether or not you've wired your lamp correctly BEFORE you plug it in, so you don't risk blowing a fuse or scaring yourself with the spark incorrect wiring can generate when plugged in. Either of these tools will do a great job of helping you discern this.
The continuity tester's only job is to test non-energized circuits, fuses, switches, wiring, etc. It's the simplest and cheapest of the two options and is perfectly adequate for all portable lamp testing.
The Multimeter, also known as a VOM (Volt-Ohm meter or Volt-Ohm-milliammeter ), is an electronic measuring instrument that combines several measurement functions in one unit, like measuring voltage, current, and resistance. It is way more than we need for this class, but if you already have access to one, it will definitely work for our simple testing purpose. Just set its switch to the setting pictured in the bottom right image below.


Continuity Tester in Action

Multimeter

Multimeter Set To Continuity Test
Electrical tape, also known as insulating tape, is used to insulate electrical wires and other materials that conduct electricity. For our purposes, it's used to secure wire nuts in place.

electrical tape
Ruler & Measuring Tape

Elmer's All Purpose Glue(not pictured)
Cutting Mat (not pictured)
Step 4: Optional Tools
The following tools are not needed for this class, but are handy to have when making custom lamps:
I prefer to use a cordless hand drill, but a corded one will also work.

Cordless Hand Drill

It's important to keep your eyes safe from any flying bits that may occur during drilling.

Grip Mat, Clamps, & Wood Pieces
These items will help stabilize pieces for drilling. The grip mat is simple drawer liner and any type of clamps will do as long as their deep enough to be able to fit the work table edge and the wood pieces.

Grip Mat

Two Wood Pieces (2x2" or 2x4") and Two Clamps
This, along with the hammer, is used to create a small hole in wood, metal, and some plastics that gives a drill bit a starting point and helps it stay put and not wander as you drill.

Center Punch

Used by Thor AND by us to make drilling center punch marks in future shades and lamp bases.

Hammer

This drill bit is the size I use to drill holes in lamp bases to accommodate a center threaded rod. I find it's the best hole size for 1/8 IP parts.

25/64 Drill Bit

For this class, this tool is used to draw circles that help find the center of round bottomed shades.

1 9/16" Multipurpose Hole Saw w/ Pilot Bit
This multipurpose hole saw works well on all kinds of materials. It is the perfect size to accommodate the threads of a phenolic socket. This one has a built-in arbor (= the part that goes into the chuck of the drill). NOTE: Must buy both the hole saw and the pilot bit. Links to both above.

Hole Saw w/ Pilot Bit

This file smoothes out rough metal edges and removes burrs.


Sandpaper
I'd recommend getting one sheet of 220 grit and 400 grit.

I use ball chain to help guide lamp cord through tricky interior paths. For instance, if you've drilled a hole in the side of an object and you want the cord to go into that side hole, up through the object and out the top, sometimes it can be impossible to direct the cord or it may get caught on something inside. Instead, I would suggest, securing the end of the cord to the end of the ball chain and feed the ball chain through first, which will allow you to use gravity and tilting to find the path using the chain and then once the chain is out the top, use the chain to pull the cord through. Presto!

3' of ball chain
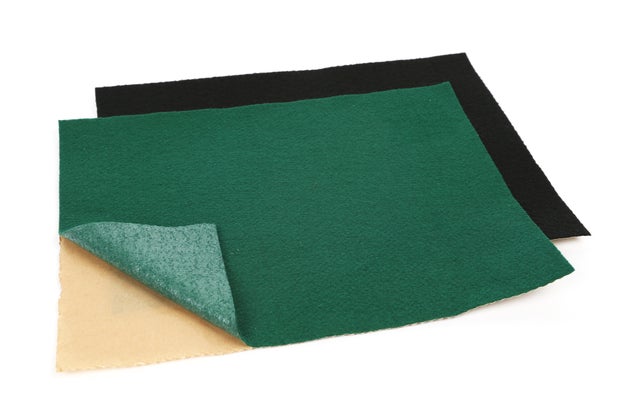
Self Adhesive Felt
Adding felt to the bottoms of table lamps is the best way to ensure that the lamp doesn't scratch the table.

These are good to have for cutting out center-finding templates and general making-ness.

Sharp General Purpose Scissors
This tool isn't mandatory (read: 100% optional), but it can be very useful. I use it to slightly enlarge holes I've drilled in metal, if necessary, to fit the lamp parts or to clean burrs from the inside of lamp rod that might injure me or the cord.

T-handle Reamer

Not pictured here, but super useful to have:
Step 5: Tool Shopping List PDF
Here's a handy tool shopping list for you to download and print.

Step 6: What's Next?
Before you place an order for the tools you need, please read through the next few lessons. Each practice cord set requires specific parts and you'll save time and money if you get them all together!
Once all your tools and parts have arrived, it's time to dig into Lesson 3, where we'll learn and practice proper wiring techniques!


