

Introduction: Travel Emergency Flash Drive


This is how I set up a thumb drive to wear when travelling. It contains your medical and emergency contact information in case some sort of accident happens to you and everything you need to get home and prevent someone from using your bank and credit cards if you have your wallet or bag stolen. This project was heavily inspired by Andrew Tarantola's emergency flash drive .
Materials and Equipment
-A thumb drive:
Choose one that is waterproof and relatively small physically, but not so small that you won’t have enough space to paint. The capacity and speed isn’t that important since I wouldn’t recommend using it for anything else. Silicon power has a decent one for under $10.
-Necklace/lanyard/dog tag chain
-Red nail polish
-Sticker
-Tape
-Encryption software:
I would recommend Veracrypt. Although it is not exactly user-friendly, it is incredibly secure, has the ability to encrypt an entire partition, can be used with Windows, OSX, and Linux, and, my favourite part, is free. There is also a portable version that does not require installation for Windows computers (but still needs admin privileges).
-Photoshop, Gimp, or other photo editing software
-Utility knife
-Pen
-Scanner
-Windows computer if creating a Veracrypt Portable drive
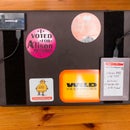
Step 1: Drive Painting


Mask off the portion of the drive that is inserted into a computer with tape. Create a cross of life stencil out of a sticker and paint the flash drive with red nail polish. You can buy flash drives with a cross of life icon however they’re normally of questionable quality and abuse resistance.
Step 2: Partition and Encrypt


Reformat the thumb drive with two FAT partitions.
Using VeraCrypt reformat one of these as an encrypted partition. You will need Creating a separate encrypted partition instead of using an encrypted keeps the main partition tidy as possible and slightly reduces the chance of the someone noticing that the drive contains encrypted data.
Note to El Capitan users: The new version of Disk Utility has been dumbed down quite a bit and you will have to create a single partition with Master Boot Record as the Scheme and then use Terminal to split the partition. The Terminal command is:
diskutil splitPartition /dev/disk2s1 2 fat32 UNENCRYPTED 14G fat32 ENCRYPTED 14G
Note that you may want/need to change the partition names, mount point, and the partition sizes.
This is the breakdown of the command:
diskutil splitPartition [MountPoint|DiskIdentifier|DeviceNode] [numberOfPartitions] [part1Format part1Name part1Size part2Format part2Name part2Size]
For more detail paste ""diskutil splitPartition" into Terminal and hit enter.
Attachments

Step 3: Text Files
I would recommend using plain text (.txt) files since they seem to be the file type that almost any computer can understand. Using a UNICODE encoding will preserve characters that are not found in the English alphabet.
Since typing out the full text would make this Ible a little too dense, I've attached a sample file structure with template files.
“EMERGENCY.txt”
This document contains your basic information and the contact information of your emergency contacts. “Emergency Contacts” should be translated into English and the most common local languages (preferably by someone who speaks the language). It also wouldn't hurt to translate it into Spanish, Chinese, and French since these languages show up in quite a few different countries.
The translations I have so far are:
Simplified Chinese: 紧急联系人
Traditional Chinese: 緊急聯繫人:
German: Im Notfall, kontaktieren Sie bitte:
French: En cas d'urgence:
If you speak a language that isn’t on this list let me know and I'll updte the list.
“Payment Cards.txt”
This document contains information to cancel each of your cards if they are lost or stolen. Do not put the card number CVV, or expiration date of the card in this document. That information will be encrypted.
“Medical.txt”
This document lists your medications, blood type, and allergies and has information about your travel insurance and your primary care physician's contact information.
The exact formatting will vary depending on which of these apply to you, but should be put in the order listed with insurance information and your physician's contact information each separated with a double line.
“Accounts and Cards.txt”
This document has two sections: One with more detailed information for cancelling your credit cards and one for transferring money from or freezing your bank account
Attachments
Step 4: Scan Documents


Scan front and back of each ID, Payment Card, insurance card, and any other similar card or document that you are bringing with you.
Combine the scanned front and back of each card into a single image for each card
Step 5: Setup File Structure and Populate

The FAT volume contains text documents with non sensitive information, medical information, and copies of VeraCrypt for Mac and PC. The file structure can be seen in the screenshots or downloaded from the .zip file in step 3.
“EMERGENCY.txt”
“Payment Cards.txt”
“Medical.txt”
Scanned Insurance Documents
A folder titled “Software” that contains copies of VeraCrypt for OSX and Windows (or VeraCrypt Portable for Windows if you have access to a windows machine when you are creating the drive) and OSXFuse.
The Encrypted contains documents and files containing information that could be used for identity theft or to make purchases if someone else accessed them.
“Accounts and Cards.txt”
A folder titled “Payment Cards” that contains scanned copies of your cards
A folder titled “IDs” that contains scanned copies of all your IDs.

Runner Up in the
Travel Tips Contest

Runner Up in the
Safety Challenge


