

Introduction: Turning Wood Turning Tools


If you are interested in taking up wood turning or if you already turn and want more tools because more tools means more possibilities.
In this instructable I will show you how to make: a 3 point tool, a circle skew and a round profile scraper.
Some of these tools are available commercially, some are slight variations of what can be found at much higher prices and I would encourage anyone to try the variations because in a lot of cases the sound high speed steel allows the turner to make more artful cuts.
What you will need is a lathe or access to a lathe with some turning tools, ink a Jacobs chuck with drill bits.
Some wood (I tend to have scraps around but the blanks here were made from a 2x4 left over from another project)
High speed steel , (Its available fairly readily through online auction sites as well as from some outlets. (If your googleing or using Bing a good search term would be "hss round bar")
Not necessary but I recommend some copper pipe and a method of cutting it for the ferrule (the copper part at the end of the wooden bit) I used some pluming stock left over when the plumber came to fix a broken pipe.
A grinder
Some water to make sure the HSS doesn't get too hot.
A nut from a screw and nut and some glue to temperately hold the nut onto the HSS.
Not needed but I think it looks good some wood stain and wood finish (bare in mind its a tool so French polish is probably not the best in this instance)
Step 1: Turn It Round and Put a Hole in It


For the following steps I repeated the process 3 times in order to end up with 3 tools.
I cut the blanks before putting them onto the lathe and turning them to round. I then cut a chucking point onto one end so I could hold the blank tight and drill on the lathe on the other end.
I used a Jacobs chuck to hold a drill bit which was the same thickness as the HSS I acquired for the project (Different thicknesses will be better for different jobs) I Added some tape to the drill bit to help all 3 tools look like a set, This isn't needed but I like my tools to look good.
My dad visited the workshop and helped out by checking the fit of the HSS in the new hole.
Step 2: Ferrule That Beast


I cut my ferrules from pluming pipes left behind by a plumber and used a pipe cutting tool to cut it to around 1 inch bits.
I measured the inside dimension of the ferrules and cut this dimension onto the ends of my tools before using CA glue to permanently attach the ferrules to the handles. I used a vice to help with one ferrule which was proving a little tricky. I think this was due to the pipe stock having a slight burr which I could have avoided by preparing the peace a little better before fitting.
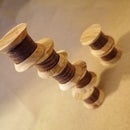
Step 3: Shape It Real Nice


I remounted the handles onto the lathe and shaped between centers.
I have been using tools for a long time and find this shape to be comfortable in use.
Once I had the shape replicated 3 times I sanded the wood flush with the ferrule and then went upstairs to show off the handles with a bit of HSS in the handle.
Step 4: Work That Mettal


I love being able to work to a datum edge or to a flat point I know is correct so temporarily gluing a nut onto the HSS made me very happy. My dad helped be showing what grinding looks like for the photos, it would be difficult for me to photograph otherwise.
The shapes I was looking to grind are a tri point tool, a scraper and a skew. For the tri point and the skew it was important for the angles to be equal to each other so resting on the nuts faces made this a lot easier. The scraper only needs one flat surface grinding and the nut proved useful in maintaining a flat surface.
When grinding HSS its important to keep it cool. Having a cup of water to dip every now and again is very useful in this regard.
Incidentally it is very much recommended that you use eye protection in this step and most of the other steps.
(at the time my nieces visited and thought the sparks were magical)
Once you are happy with your grinding glue the tools into their handles. I used West System because I find it ridiculously easy to work with but if you have a preference or anything in stock i'm sure it will work for you.
(Just make sure its not likely to come back out any time soon Safety is a big thing.)
Step 5: Make It Look Pretty


So technically you have your tool an you can use it all you want.
But why not make it look super pretty?
For mine I used black wood die waited to it to cure and then used a melamine finish before buffing it to a nice gloss.
If you make some tools I would be interested in seeing them. I hope you enjoy this instructable and others I have made.

Participated in the
2x4 Contest

Participated in the
Full Spectrum Laser Contest 2016


