

Introduction: Turtle Barbecue: the Cleaner,healthier Barbecue


We love Barbecue, what we don't love is the time it takes to cook the food. Me and couple of friends tried attaching a computer fan to barbecue for making it efficient and cleaner, it worked, and we had a surprise barbecue party at our makerspace, The Maker Asylum, Delhi!
It actually didn't cost more than Rs 900/ $14 for building this!
I am calling it the "Turtle Barbecue", because of the form! It needs improvement in terms of aesthetics and can be refined more, I ll keep posting updates.
Step 1: Materials and Tools Required


1. Two pans/woks, must be weldable , I used a cheap pan used for gardening, avoid using pans made out of GI sheets.
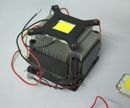
2. A Fan from an old PC, or you can even get it off the shelf, in case it comes with an aluminum heat sink, you can remove the fan and put it here.
3. A mesh made out of steel for making the grill, preferably stainless steel, though I have used one used for making fences which is made of mild steel.
4. A steel tube, diameter around 100mm and 300 mm length.
5. A finer mesh to prevent the coal to come into the air tube.
6. Steel tubes for making the legs, I have used rods, but they are not stable, so I am thinking of removing and putting tubes.
7. Hand tools, welding equipment, hand grinder, Cut off saw, marker, snip etc.
Step 2: Preparing the Edge and Welding


1. Grind the tube to match the profile of one of the pans, this takes a bit of skill!
2. Weld the tube to the pan, first put 4 tacks along the periphery, and then weld it all the way.
3. A welding seam would appear on the other side of the pan, increase the current of the welding machine so that it melts through the metal, this would make our air tube.
4. Cut out the steel mesh by placing the pan on it and marking with a marker, you can use welding, a snip or a grinder to do this step.
Step 3: Installing the Fan


1. Insert the fan into the other side of the tube, you can use some insulating material like sandpaper to fill up the space, after using the grill, I realized that the tube is not getting hot, you the fan can even be directly mounted on the metal tube.
2. Place it on a stand, try using tubes instead of rods, they are more stable.
3. Cut out a piece of fine mesh and put it inside the other end of the tube,inside the pan.
4. Weld a handle on the other pan/wok.
Step 4: Barbecue Is Ready!


1. Connect a 12V power source to the fan.
2. Put some charcoal and fire.
This barbecue burns much faster and better due to the fan,We loved cooking on it, I hope you enjoy making and using it too!
Step 5:

Runner Up in the
Host with the Most Challenge


