

Introduction: USGS TOPO Maps - Downloading, Printing, Assembly & Protection


This tutorial will show how I download, print, assemble/fold and protect USGS TOPO maps (free).
US Geological Survey (USGS) maps have been a valuable source for mapping, and most hikers & rescue personnel won’t hit the trail without the maps and a compass as a backup to their GPS devices. The maps also come in handy when I’m asked to shoot photos towards specific geographic locations (peak-to-peak shots, locations on a specific bearing from the peak, etc.)
This Instructable has four steps:
.....Step 1 – How to Download USGS TOPO maps using the USGS topoView application
.....Step 2 – How to Accurately Print the 24” x 29” USGS TOPO maps to Scale
.....Step 3 – The Method I Use to Assemble and Fold the Printed Maps
.....Step 4 – Low Cost Map Cases To Protect the Maps
Note: To view photos original size in Instructables when uploaded, you need to select a photo, position the cursor near the bottom left of the photo and you should then see a "Download Original" icon. Simply press it and the photo will open to it's original size. If the photo is white in the bottom left corner, you may not be able to see the icon, but you should still see the "Download Original" pop up.
Step 1: How to Download USGS TOPO Maps Using the USGS TopoView Application

Although there are other applications that can create TOPO maps such as CalTOPO, I’ll be using the USGS topoView online application for this tutorial.
There are numerous reasons to download and print maps directly from the USGS web site:
.....Foremost, they are free
.....They are always up-to-date
.....There are usually older versions of maps for comparison that may show critical changes
.....They can be printed on short notice and they are always available
TopoView highlights one of the USGS's most important and useful products, the topographic map. This interface was created by the National Geologic Map Database project (NGMDB), in support of topographic mapping program managed by the National Geospatial Program (NGP).
An introduction to the USGS topoView application can be found here (https://ngmdb.usgs.gov/topoview/), but the actual USGS topoView online application (https://ngmdb.usgs.gov/topoview/viewer/#10/35.7058/-83.8483) is where the maps can be downloaded.
To download maps, first start the USGS topoView online application and it should look like figure 01. The basic steps thereafter are:
.....a. Reposition initial map (figure 02) and start zooming-in (figure 03)
.....b. Zoom-into the general location you want (figure 04)
.....c. Set the following options on the screen to
..........1. USGS TOPO (top left blue icon)
..........2. UTM (bottom center blue icon)
..........3. 24K (top righthand red circle that shows 24K which stands for 1:24000 scale maps)
..........4. Adjust 'Years' slider to most current year (top right shows 2014 through 2019 in this figure)
.....d. Before selecting the quadrants to download, I usually take a screenshot and save with the maps
.........(I refer to the screenshot if I need to download and print an adjacent quadrant later)
.....e. Select quadrant by pressing the left mouse button once. Several options become available:
..........1. Set 'Date' icon so that it looks like figure 05 (right middle)
..........2. Select the newest of the ‘Filter Records’ (TOPO maps) listed
..........3. Download map as PDF using 'GeoPDF' (see figure 05)
.....
f. Continue selecting maps for download until finished (figure 06)
Step 2: How to Accurately Print the 24” X 29” USGS TOPO Maps to Scale

The easiest way to print the Topo maps to scale is to use the free Adobe Acrobat Reader:
.....a. Select the map you want to print
.....b. Open with Adobe Acrobat Reader (figure 07)
.....c. Select ‘Print’ (refer to figure 08)
..........1. Set 'Pages to Print' to ALL
..........2. Uncheck 'Print on both sides of paper'
.....d. Select 'Poster' (refer to figure 09)
..........1. Set ‘Tile Scale’ to 100%
..........2. Select ‘Orientation’ to 'Portrait'
..........3. Set 'Overlap' to 0.005 in
.....e. Print the nine pages
You should end up with the map printed on 9 sheets of standard typing paper as in figure 10.
Step 3: The Method I Use to Assemble and Fold the Printed Maps


At this point, you could just tape all of the sheets together and start folding any number of ways. And there are videos on Youtube, etc., that explain how to cut the folds of purchased Topo maps so that they can be displayed more conveniently. I’ve integrated the last concept into the following method that works the best for me:
Trimming:
Start with the original stack of printed sheets (figure 11), place the top 4 sheets on the bottom of the stack, so that the center section of the map ends up on top (figure 12). Next, carefully trim off the white borders (I use a Fiskars Mixed Media Procision Trimmer).
Assembly:
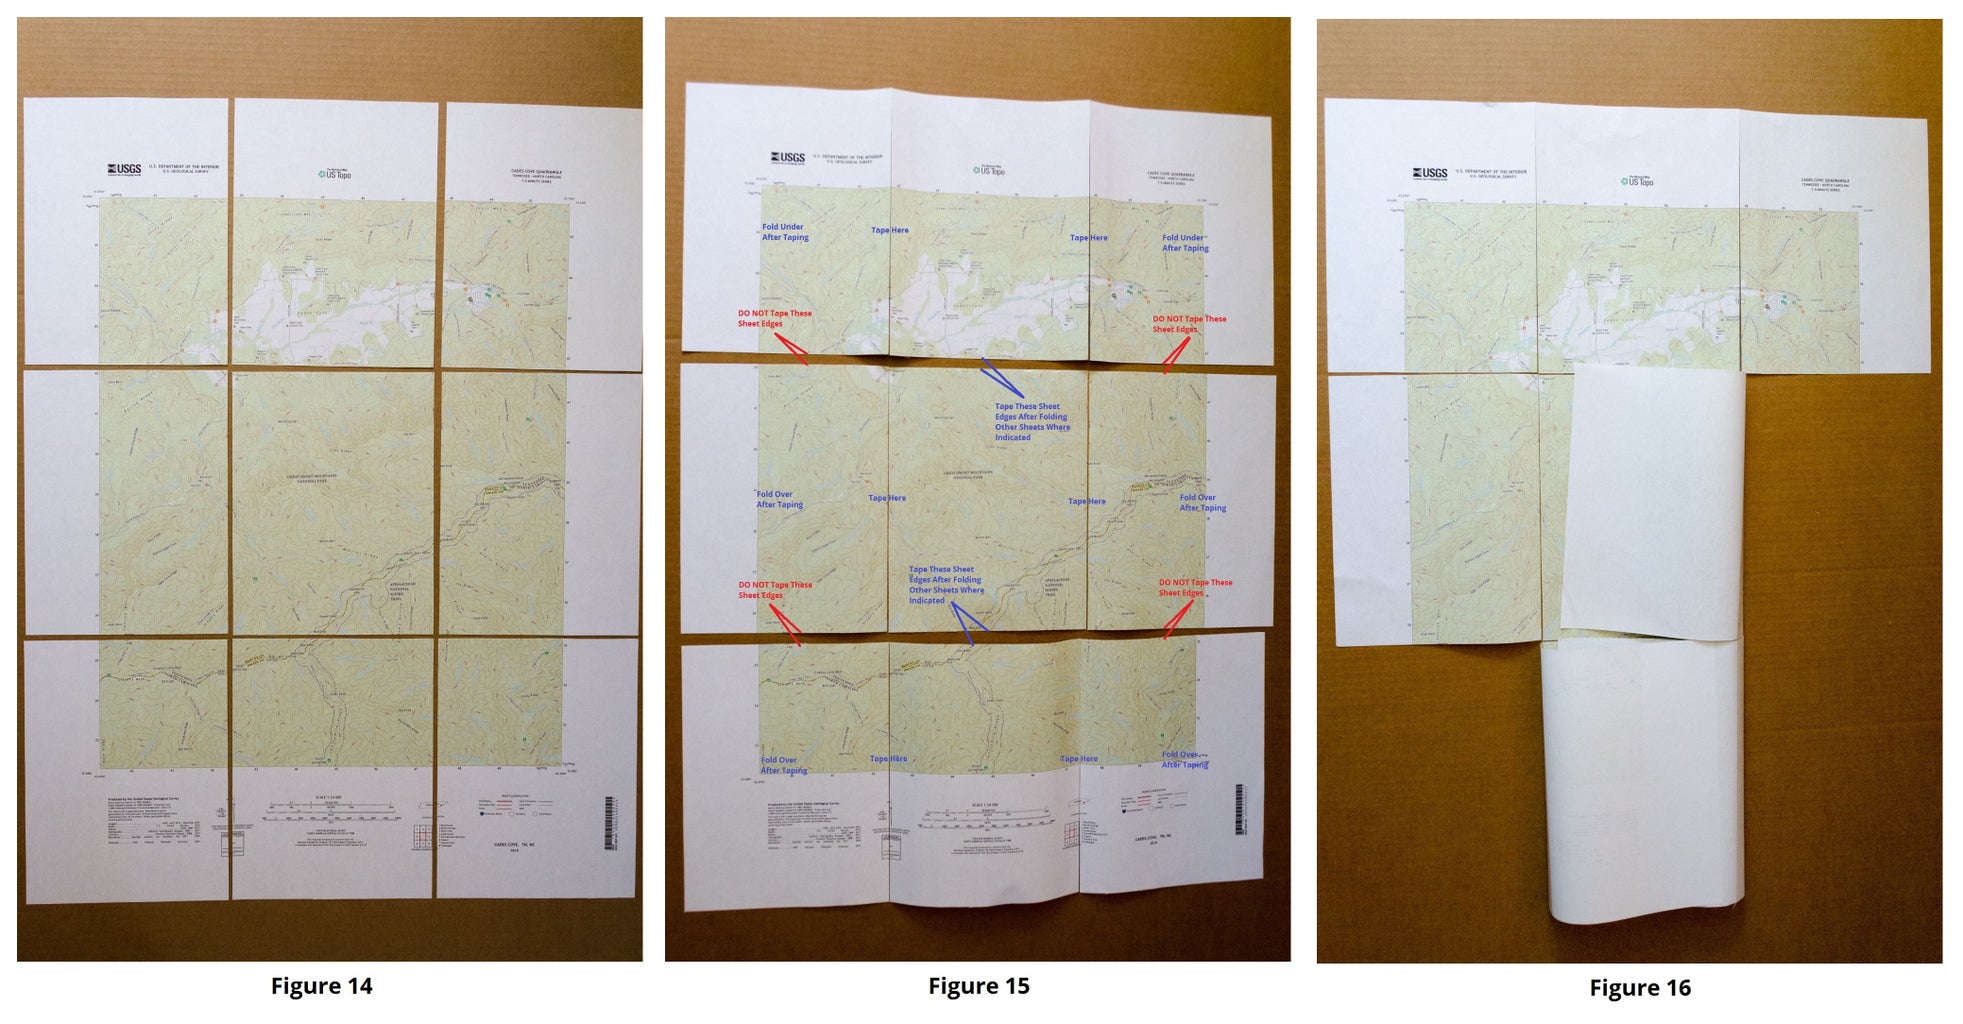
Lay out the map pieces in the proper sequence (figure 14). Refer to Figure 15 for the rest of this process. Tape the three sheets in each row together (see note below). I use T-Rex packing tape (or equivalent) since this tape lasts a long time. Bend the sheets of each the bottom two rows over/inward and bend the sheets of the top row backwards (figure 15). Now tape the rows together using only the three middle sheets.
Note: I always tape the three sheets in a row together, however I don’t always tape the individual rows together. If the trail/path I’ll be taking traverses two diagonal sheets, I don’t tape the rows together so that the diagonal sheets can be displayed back-to-back in my map case. Figure 15 shows the individual rows unconnected from each other so that diagonal sheets in different rows can be shown back-to-back in a map case.
Final Folding:
Fold the sheets of the bottom two rows closed (figure 16). Fold the closed bottom row onto the middle row, and then fold both under the top row (figure 17). Fold the left hand sheet of the top row under (keeping the bottom folded sections inside) and then fold the right hand sheet under (figure 18). The top side now will show ‘USGS TOPO Map’ and the bottom side (figure 18) will show the quadrant name of the map (figure 19).
Flatten/press the folded maps over night:
Since the newly folded maps are usually bulky, I compress them over night to flatten them. I use to place weight on them over night, but I’ve found that vacuum sealing them in Foodsaver bags over night (figure 20) works much better. The maps end up flatter and with perfect folds each time (compare Figure 16 to Figure 21).
The next day, I remove the map from the vacuum sealed bag (figure 21), place the TOPO map in a protective map case (figure 22) and store with my other maps (figure 23).
Step 4: Low Cost Map Cases to Protect the Maps

Finally, you’ll need a good way to protect and use the maps when outdoors, etc. I’ve used various map cases over the years, but I’ve found that C-Line zippered holders (figures 24 & 25) make the best map holders for me – less expensive and less bulky.
I first found mine at a local stationary store, however a box of 15 C-Line #82911 Industrial Zippered Shop Holders costs about $28 (around $1.90 each) on Amazon. They are described as “Super heavyweight vinyl holders...zippered seal guards against dirt and moisture...in even roughest environments.” There is a slightly larger version – the C-Line #82912 for about the same price on Amazon.
Because they are economical, I store my maps in the holders until needed and only pack the maps I need that day. They fold easily and fit nicely in all of my packs - whether a day hike or over night hikes. I no longer use the old bulkier map cases. The map cases are large enough to carry two topo maps (quadrants) back-to-back – convenient when your trail traverses two different quadrants. There is a molded hole on the holder that allows you to secure the map inside you pack or to the outside outside of your pack for easy reference.
I hope you have find this Instructable useful.


