

Introduction: Using SketchBook Pro to Design a Fuzzy Hoodie


I've always wanted a fuzzy hoodie! You know, made out of plush fur? Like you skinned a muppet?
I've also always wanted a hoodie with cute ram horns. You know, like little plush ram horns?
The BetaBrand contest is a perfect it for me to try and make my design real. I'm going to work from the provided contest flats to make my hoodie! You can download those here!
Step 1: Editing the Lineart


Pullover hoodies always mess up my hair!! I want to add a zipper.
I'm going to use the pencil tool in black to add a zipper. I'm going to make sure Y symmetry is turned on - either by pressing the "Y" key on the keyboard, or hitting this button in the top toolbar:
Then I'm going to take my pencil and run in down the middle while holding the SHIFT key. This makes the line I draw stay perfectly straight! Bam! My zipper looks good.
Then I'll zoom in using the SPACEBAR key, and erase some of the original lines to make my zipper look like it really belongs. I'll even draw a little pull.
Then I'll draw my ram horns!! Since symmetry is still on, SketchBook will mirror my horns on the other side perfectly.
Step 2: Using Multiply Blending Mode to Make the Lineart Transparent

I want to color underneath the lines because it'll be easier to make it look nice- but the background is solid white! AUGH!
Not to fear- the "multiply" blending mode is here to save the day. Multiply will make everything that is white transparent! At the same time, it'll keep the nice black lines the way they are.
Make sure your layer panel is open. If you don't see it, you can use the top menu "Window -> Layer Editor" to bring it back up.
You should just see one layer- that's the contest lineart. Use the arrows on the blending mode selector to cycle through the different modes. You want to use "multiply". 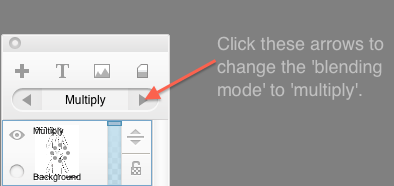
Once it's set, use the + button to add a new layer. We'll put our colors on the new layer!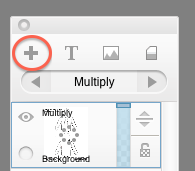
Use the arrow button to grab & drag the new layer underneath the lineart.
Now I'm going to lay down my base colors underneath the lineart! Hooray! I'm using a big paintbrush to lay down grey and brown.
Step 3: Make the Fluff Look Fluffy!


I want the hoodie to look like it's made out plush fur- so I'm going to use SketchBook Pro's synthetic brush tools! They leave really nice brushstrokes behind that kind of look like fur.
I love how much time the Copic marker library saves me. I just keep it open and select the same colors out of it to use in my drawing.
Step 4: Details, Details, Details!

Now that my design is looking good, I want to describe the special details to BetaBrand so they totally understand my excellent vision.
I'm using the text tool to point out the special features of my design. I'm being really specific- listing things like color, type of fabric, and anything else that might be special.
I'm all done and ready to enter the contest! Whee!

Participated in the
Dream It, Draw It, Wear It Contest


