

Introduction: Using an Industrial Sewing Machine, From a Wheelchair


I'm a volunteer with the Tetra Society of North America.
We are a group with a wide variety of Maker minded people, who love the challenge of coming up with creative solutions to unique problems, that can arise from the day to day challenges of living with a disability.
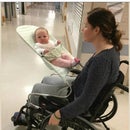
This project, was to create a device, that would allow Diane, to take an Industrial sewing class, from her wheelchair.
When sewing, there is a need to have both hands free, to work the project. The pedal of an industrial sewing machines are integrated into the table.
This leaves limited parts of the body, to activate the controls.
Diane, is able to bend forward at the waist, so we could try to use this motion to engage the machine.
We first had her lean forward, onto a cane, that was pushing on the pedal. This was promising, but there were a few issues regarding stability, on both ends of the cane.
This idea evolved into a belt around her middle, that would accept the handle of a modified crutch. The other end would be inserted into a receptor, on the pedal, at her feet.
Another challenge was to make this project transferable to other machines, and to be easily removed, so others, could use the machines.
This Instructable will show how we managed to work around these issues.
Step 1: The Crutch


Start with adapting the crutch.
Remove the rubber pad on top of the crutch.
Drill out the 2 rivets that attach the plastic top to the aluminum sides. Measure the length needed, and cut off the top of the 2 tubes, at the top of the crutch. This does not have to be accurate, because the end of the crutch has an adjustable portion.
Start your measuring, with the adjustment in the middle position. With it in the middle position, your final length will allow you to adjust it either longer or shorter.
Once your happy with the length, put the plastic cap back on the crutch, and rivet or drill through and use a nut and bolt, to attach.
Trim any extra plastic from the handle, and flatten the armpit curve as much as you can, as in photo 3.
Sculpt and sand the plastic to suit. The idea is to make it comfortable against the tummy.
I added a slight curve to the upper part of the crutch, to give a better angle over her knees. Photo 5.
Step 2: The Belt


I found a 2" luggage strap, 2 for $5.95.
To this, I needed to add a receiver cuff for the top end of the modified crutch, that would be removable.
I didn't manage to get photos of the construction process, but I'll try to explain.
I first cut 2 pieces of heavy duty nylon fabric to the width of the inside measurement of the crutch handle, plus a seam allowance, and long enough to loosely wrap around the belt and the crutch handle, and overlap a few inches, to allow for the Velcro to catch.
After I stitched around 3 sides of the nylon and turned it right side out.
Cut a piece of an empty milk jug, to the size of the outer shape, to fit inside the pocket, sleeve, you just made. This is to create a stiffener that is flexible yet strong, and shape-able, easily stitch-able, and will fold and crease nicely.
Insert the trimmed plastic, into the pocket, and top stitch around the 4 sides.
Before you add the Velcro, sew it to the belt, about in the centre of the pocket. Photo 3.
Attach it, close to the buckle end of the belt. You want the buckle to be just to the front of the armpit and behind the breast. This will allow it to be fastened and adjusted by the seamstress.
Fold and crease the flaps, toward the centre of the belt. Top-stitch
about 1/2" from edge to create a permanent fold, and support the crutch handle in place. Zoom in on Photo 5 to see this detail.
Now you can try it out on the crutch to see where your Velcro needs to go.
Sew on the Velcro with a good inch to overlap, and fasten. You don't want it to be fastened too tight. The crutch end should freely move and swing up and down, when fastened. See the second photo in "The Crutch" step.
Step 3: The Cup


Finally, the cup, that will stabilize the bottom end of the crutch.
I used a small stainless steel measuring cup, 125 ml/ 1/2 cup, I got at the dollar store.
I cut a piece of stainless steel plate, to a shape that would allow me to clamp the cup securely to the pedal.
I had it spot welded to the cup.
Cut a piece of 3 mm / 1/8 " thick, rubber, to the shape of the bottom, and used contact cement to glue it together. Photo 3.
The rubber keeps the cup from moving once clamped to the pedal with a 2" C clamp. $3.49.
Step 4: Finale


Put it all together, and give it a try.
Don't forget to put on the brakes.
This project cost less than $10, not including the milk.
Please post a comment if you make this project.
I'd love the feedback.
Check out The Tetra Society in your area, and think about volunteering.


