

Introduction: Vending Machine With the Arty


As a kid everyone wanted to get a quarter from their parents to use at the candy and prize dispensers in the mall. We happen to have one laying around and decided to use an Arty and PmodSTEP to turn the analog interface into a digital one.
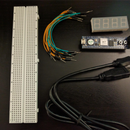
Materials Required:
Tools Required
- 3d-printer
- Laser Cutter
- Soldering Iron
- Screwdrivers
Software Required
- Vivado Design Suite
Step 1: Humble Beginnings


We started out with a simple capsule vending machine that we ordered online.
After disassembling it, we found that it was mostly constructed with sliding panels that we could replace, so we came up with a plan to replace the front panel with a laser-cut acrylic one.
Because of the width of the grooves the panel would slide into, we chose 1/4" acrylic, which we also happened to have a scrap piece of.
Originally we planned to use a coin counter for the triggering mechanism, but that was later replaced with a simple button, as you'll see.
Step 2: Designing the Front Panel


My favorite toy right now is Onshape. It's on online 3D modeling software, made by the same people who made SolidWorks. It's powerful, well put together, and has great UI. Best yet, the website has its own interactive tutorials that can teach you how to use all it's tools. As a mechanical engineer, I would heartily recommend you try it out!
I used Onshape to model a front panel, then created several models to represent the hardware I needed to fit in and on the panel. By rearranging these, I came up with a design that would fit everything I needed.
Then, by right-clicking on my front panel, I exported that face as a DXF file, that I could then convert to something the laser cutter could use.
IMPORTANT! Before I cut my acrylic, I made a test cut on a piece of cardboard. This was a good move because the hole I had originally made for the dispenser opening was too small. I never would have known that if I hadn't made a model to test out first.
Step 3: Designing the Gear


The vending machine operates by rotating a lower platform with sections in it. These sections can fit one capsule each, and push, one by one, over a chute which delivers them to the user.
This lower platform is is moved using a set of gear teeth along its outside rim. The normal front panel has a gear that meshes with these teeth, and is rotated by a crank on the front of the machine.
In order to motorize this gear, I designed a matching gear that fit onto the shaft of a stepper motor we had lying around. Once again, I used Onshape to design it, and 3D printed the finished part.
In order to ensure a tight fit, I tapered the shaft of the gear. Unfortunately, I didn't taper it enough, and the gear would slip slightly, so I eventually just used epoxy to glue the gear in place. Sometimes the best answer is the simplest one.
Step 4: Custom Zuno Clips


Step 5: Hole Guard


For power, we're using a custom (read: mutilated) 7 volt power supply. To clean up the design, we drilled a hole in the back panel of the box. In order to keep the metal from cutting into the power cord, I designed a small guard that would plug into the hole.
Step 6: Assembly


Assembly of the whole contraption was pretty stright forward from that point on.
Because the front panel had to slide into place, each of the components had to be screwed into place after the panel was in place. After that, the boards were put into place, everything was wired up, and the top section was put back on.
Step 7: Wiring


Wiring the machine starts with soldering some wires to the switch and power supply. The switch is set up in a normally open configuration. The power supply is 7V, center positive with an extra pair of 7V/Ground wires spliced on the output.
The connections can then be made with the barrel jack going to the Arty, the extra 7V/Ground pair going to the PmodSTEPs H5 connector, and the switch wired to Vdd and pin 1 on Pmod header JD.
The stepper motor is connected to the four pin stepper motor header of the PmodSTEP. Finally, make sure the the 5V Select Jumper (J13) on the Arty and JP1 on the PmodSTEP are set to REG and V_EXT respectively.
Step 8: Uploading the Code to the Arty
Now that everything is wired up, the Arty needs to be programmed. The necessary source files are attached. Once downloaded, open Vivado and create a new project. Import the downloaded files into the project and generate the bitstream. Once that completes, plug in the power supply and follow the Arty Programming Guide to finish programming the Arty.
That completes the build for the Vending machine, now fill it with goodies. The button will dispense one item from within, no quarter required!
If you want to know more about the Arty, or find other related resources see the Arty Reference Center.
Attachments


Participated in the
Makerspace Contest


