

Introduction: VortoLight - Internet of Things Lamp With Spark.io


Hi fellow makers!
Always wanted to control your lights, and the color of your lights over the internet? This is the instructable for you!
VortoLight is a open source Internet of Things lamp with personalised light conditions and notification. Automatically perfect lighting conditions for a cozy night or preparing for an exam. It can show all kinds of notifications (mail, motion, temperature, socialmedia, calls, an astronaut enters space (i'm totally serious), etc) by different colours.
VortoLight is like a DIY PhilipsHue. The Philips Hue is super nice. You can change the colors of the lamp or set it in a particular mode (Light personalisation they call it). The only problem: $$$. So I thought - "that could be better!" (or at least more fun than screwing in the light bulb and done ;) ).
Therefor I created VortoLight (Vorto means 'word' in Esperanto). It's really simple to make - even for the non-coding-and/or electronics people!
VortoLight is controlled by Twitter. When you tweet a filter (#VortoLight) and a trigger (e.g. Red) the lamp turns red. That's already pretty cool, right? But here is the spark: why shouldn't you let things tweet automatically? So your lamp can respond accordingly?
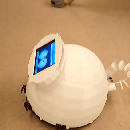
[Play Video]
This version (v7) features;
Lighting modes:
• Cozy (static)
• Study (static)
• Reading (static)
• Romantic (static)
• Industrial (static)
• off
Notifications:
• Red (static)
• Green (static)
• Blue (static)
• Purple (static)
• Pink (static)
Step 1: Go Insane About the Possibilities!


As VortoLight uses Twitter to control it's color, you can control in many insane ways! Just make things tweet and the rest happens automatically.
> Have you heard of "If This, Than do That" (IFTTT.com)? Its a free cloud service which let you connect many other services with each other.
• Let's say you want to turn your VortoLight orange when you receive a sms. Just enter your phone number in IFTTT, connect your twitter account and it works!
• Do you want your Vortolight blink when somebody tag you on facebook? Just connect facebook and it will happen!
• Want to have a light go on when you come home in the dark? Or/and you want the lights turn off when you leave home? Let IFTTT check your phone's location!
• Let IFTTT check the weather - is it gonna be rainy today? VortoLight turns blue!
• Let IFTTT check the time. Is it bedtime? Vortolight brightness turns down... good night!
• Come back from school and have to study? The VortoLight turns automaticly in "study" mode. Giving you the perfect lighting conditions for studying (or gaming ;) ).
> Another way is by "tweeting sensors" like these I found on instructables: [Why should I reinvent the wheel? ;)]
• Tweeting Pet Bowl by cmonaco3
• The Twittering Office Chair by randofo
• Tweet-a-Pot: Twitter Enabled Coffee Pot by frenzy
• [yours]
Ow and by-the-way; VortoLight (controlling leds this way) is just an example. Why don't you hook up some servos and let it do stuff?
OMG Mark! That's so cool! How did you do that?
Step 2: Get Your Stuff Together


It's quite simple. As all the hard work (the coding) has been done in collaboration with a friend of mine. You only have to get some stuff (nothing too fancy).
- A spark core (you will need a WiFi connection)
- A twitter account, thingspeak account & optional a IFTTT.com account
- Neopixels / WS2812B leds (they are the same thing). You can get them from Adafruit or eBay. I bought "pads" - but the smart thing to do is getting a strip of them.
- regulated 5v adapter (almost any modern 5v adapter is regulated ) or make one yourself! The main component you will need is an 7805 voltage regulator and some capacitors. See step 5 for both methods.
- 5.5mm socket of the adapter
- Wires, solder, solder station, pair of pliers etc
For the the case you need:
- access to a laser cutter
- 3mm opal acrylic
- 3mm plywood
- four 16mm long M3 screws and bolts
If you have a spark internet button - then you wont need the soldering stuff and the extra leds.
Step 3: Hello Spark

First thing to do is get your core working. Spark.io has done a good job with documentate this.
What is a spark core? Its a wifi micro controller from spark.io and it runs on 'arduino code'! Its designed to make the internet of things. So that's what we're going to do! More on http://www.spark.io
Tip: instal the node.js spark module. To the beginner it may look scary... but it is so handy! If you have a problem running the code, you have to debug through the serial monitor.
Have you your spark core up and running 'blink'? Great! You spark core is properly connected. Now its time for the sole of this project.
Step 4: Connect to Twitter

As I told you earlier - VortoLight is based on twitter. It uses a sparkcore and some free cloud services. If you don't want to, you have not to code anything. You just have to connect some things on your own tingspeak.com account and upload the code to your spark core.
One of those free cloud services is Thingspeak. Thingspeak is a free cloud services which allows you to get, store and post data through their API.
The way it works:
The free service Thingspeak scouts (your) twitter for a filter and trigger word. In this case "VortoLight go red!" Here is "VortoLight" the filter, and "red" the trigger. When Thingspeak finds a trigger word on twitter; it sends the word to your personal spark core.
You give Thingspeak the task to get the latest tweet with a trigger word in it and store that word in a database. The other task you give Thingspeak is to post the latest entree of that database to you spark core. You sparkscore is every 30 seconds ready to receive a trigger word. Thanks of Thingspeak - it receives one.
A conversation:
You tweet "VortoLight, go red!"
Thingspeak: "mmmh what do we have here? It's the trigger word "red!"
Thingspeak; "Hi, spark core! I've got a word for you; 'red'. Here you go!
Your spark core: " Thanks....mmhh 'red' did you say... mmmh... ah here it is! If trigger word = red, then turn the led red! Done!"
How to get this working:
My friends instructablewill show you how to connect your spark with thingspeak and twitter. Or for the people who are dutch and like a brief 'how-to'; go to my Github. You have to get a twitter.com account and a thingspeak.com account. Still have questions? Don't hesitate to ask her or me!
Have you got that instructable up and running? Is the build in D7 led going insane? Great; you are allowed to proceed to the next step :).
(ps; I like to call it 'Magic (twitter) Words'. But she didn't like the joke... So if I use anywhere "Magic Words' - its the same as the read-a-tweet-thing.)
Step 5: The Code

I've modified the code from my friend (step 4) to make it work with the the leds.
I took great care to make the process of the code understandable for somebody that hasn't so much knowledge of coding.
To get this code working you have to do the following additional things to get it up and running.
- Enter your channel ID in the code
- To include the neopixel library: go to the spark IDE > search in the libraries for "neopixels" > open it > click "use in app".
- Add the following 'trigger words' in the 'tweet control' app in Thingspeak.
Cozy, Study, Reading, Romantic, Industrial, off, Red, Green, Blue, Purple, Pink
Upload / flash the code to your core and you're done! When you power your core it could take a few minutes to find its first tweet. Open the serial monitor if you want to see what it is doing.
Now - do a small victory dance.
How to add colors/triggers
Here I will explain how to modify the code to add your own colors / modes.
On line 86 you see the start of a bunch if/else statements.
Let's look closer at one:
else if (MagicTwitterWord == "green"){
    Serial.println("VortoLight is now green!");
    SetLedColor(strip.Color(0, 255, 0));
  }
The first line of code is the following:
else if (MagicTwitterWord == "green"){When the trigger word form Thingspeak is green it executes this if/else statement. You can change 'green' to another word if you want to execute this statement with another trigger word.
In this case the statement contains two things:
Serial.println("VortoLight is now green!");This is just for the serial monitor when you debug. You don't have to include it.
SetLedColor(strip.Color(0, 255, 0));
This gives the function "SetLedColor" a specific value. In this case "strip.Color(0, 255, 0)".
The first number is the amount of RED
The second number is the amount of GREEN
the third number is the amount of BLUE.
When you combine different values of those numbers, you can make all the colors there are!
Like for some cozy lighting:
strip.Color(250, 105, 45)
More about how to program the leds on the Adafruit NeoPixel Überguide.
The great thing about the core is that you can update the code through wifi. Theoretically you never have to use the usb cable. Just give you VortoLight an update OTA (over the air).
For those with some coding knowledge will see there is also the option to use case switching.
Attachments

Step 6: The Electronics


Disclaimer: There are many things to learn about Neopixels/ws2812 leds. These leds can be very power consuming. So do not get too excited with the amount of LEDs in this configuration.
The best thing is you have a 5v power supply with at least 1 Ampere (for 10 leds). If you are gonna use many more leds, you wanna look in to level shifting because the spark core runs on 3.3v and the leds asks for the 5v data line.
If you don't have a 5v power supply you can make one from a max 12v power supply. For this you need some additional components.
- L7805 voltage regulator
- 100uF capacitor (optional but advised!)
- 220uF capacitor (or at least something between 100uf en 470uf . As Long the rated voltage is higher than 12v)
- 47uF capacitor (10uF is also okay as long the rated voltage is higher than 5v).
The scemetings for the versions with and without pre-made 5v power supply you can find here ^.
Hooking things up:
Just to warn you upfront - make 10 time sure to get the polarity ( + and -) of every wire right.
- Measure with a multimeter which pins of your 5.5mm plug is the + and are the -.
- The + goes to the VIN/RAW pin on your core and the 5v / power / Vcc / Vdd of the leds
- The - goes to the GND pin on your core and the GND / Vee / Vss of the leds.
- Connect pin D6 to the DATA IN (Din) of the leds.
WARNING - DON'T PLUG IN THE POWER SUPPLY AND THE USB CABLE AT THE SAME TIME.
Also: when you have the power supply disconnected and power the core through the USB cable - the leds will light up. It is possible your pc won't like this (the leds can drawn a lot of current). Just disconnect the leds before connecting your spark through usb. Your are safe to power the leds from your pc if you use less than ~10 leds.
Step 7: The Case


This is pretty straight forward. The lamp consists of 2 boxes. Both are cut with a laser cutter.
The top part measures 39cm long and is made from 3mm opal acrylic. The bottom part is a 7x7cm cube and is made from 3mm plywood. Both are screwed together with four 16mm long M3 screws. The ventilation lines are handy to check the status of the spark core.
Attachments

Step 8: Improvements


Things i'm working on. But you may work on them too! :)
• You know what would be cool? Sensors that could tweet and so it activate different modes or notifications.
• Somebody said you could mimic the status led on the core. It would be great if the yellow power led show the status of the spark. Or maybe at light bridge.
• It would be great to add a button under the lamp. So when you press the lamp - the notification color goes away and return to the original light state (eg study)
• The color transitions are pretty harsh... fading would be way more subtile.
• Maybe adding some animation modes? Like countdown or happyrainbow?
• As I said at the beginning, VortoLight (controlling leds this way) is just an example. Why don't you hook up some servos and let it do stuff?
It cost me quite some effort to make Vortolight and to make this Instructable. So I would ask you to post or PM your improvements. Maybe the code you've made is way better, or you added some nice lighting effects / modes or you've made cool tweeting sensors. I would be very grateful if you share them. I will add them (file/link) to this instructable with full credits. Keep the maker community alive!
Happy making!
- Mark
I'm still learning english. If you see something I could improve (spelling/grammar wise)- PM me so the comment won't flood

Second Prize in the
Make it Glow!

Participated in the
Formlabs Contest

Participated in the
Enchanted Objects


![Tim's Mechanical Spider Leg [LU9685-20CU]](https://content.instructables.com/FFB/5R4I/LVKZ6G6R/FFB5R4ILVKZ6G6R.png?auto=webp&crop=1.2%3A1&frame=1&width=306)


