

Introduction: Walkway Welcome Sign


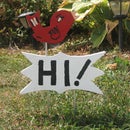


Another one of my late Great Uncle's creations, this cheerful little birdie is always there to provide a welcome greeting to anyone who walks up to your door.
When it's time for your guests to leave, he's there again to say a cheerful 'Good-Bye"
.
This whimsical little sign is made from bits of scrap wood, some steel rod and is put together with very basic wood working tools and paint.
This can be easily made over a weekend with any scrap wood that you may have around and is sure to add a perky presence to your back yard.
If you find this little tutorial useful - please take a moment to check out my adventures puttering around in my shop at my website - https://www.smallworkshopchronicles.com/
Step 1: Materials and Pattern


To create the sign you'll need the following:
Tools
- Scroll Saw
- Drill / Drill Press
- 3/16 inch drill bit
- Awl or sharp point
- Wood Glue
- Fine tipped paint brush
- Fine tipped sharpie marker
- Wire Cutters or Dremel rotary tool
Materials
1 - 0.75 x 6" x 15" wood board - wood could be pine or exterior plywood
1 - 1.5 foot length of 3/16 inch steel rod
1 - Spray can of white paint (exterior lacquer)
1 - Small can of exterior black exterior paint
1 - Small can of Antique White paint
1 - Small can of yellow colored paint
1 - Small can of red paint
1 - Spray can of clear lacquer
Download and print the attached full size templates of the sign board and birdie.

Step 2: Cutting Out the Patterns


Cut out and place the sign and birdie templates on the board that you will be using.
With a pencil, trace the out lines of the templates on the boards and cut out the sign and birdie with a scroll saw.
Step 3: Applying the Base Coat


Once the pieces have been cut out, apply the base coat of paint to the sign and birdie.
For the sign, spray paint a coat of white exterior enamel to both sides of the sign board (make sure the one side is completely dry before painting the other side!). When painting, make sure the edges of the sign get a good coat of paint.
When sign has been painted, paint the birdie with a coat of red exterior paint. Like the sign, make sure both sides of the bird get a good coat of paint.
Allow both pieces to dry thoroughly.
Step 4: Painting the "Hi" Sign


The next step is to letter the "HI!" to the front of the sign.
There are probably a number of ways to do this, however the approach taken to letter the front of the sign was to overlay the pattern template that has the "HI!" over the wooden sign. Using an awl, I mark the corners of the letters on the sign by pressing into the wood with the awl - Be careful not to press too hard or you'll leave craters in the sign :)
When you have the corners marked, use a sharpie marker to draw out the letters on the wood sign by connecting the dots that you've just marked on the wood. When complete you should have the outline of the letters on the sign.
With a fine tipped paint brush, fill in the letters with black paint.
Allow the black paint to fully dry.
Step 5: The Sign Says Good-Bye


Once the front of the sign is dry, flip the sign over and apply the "BYE" message to the back of the sign.
Using the same technique that we did for the front of the sign, apply the template with the Bye message to the wooden sign.
IMPORTANT - Make sure the Bye message is right side up to the HI! message!
Using the Awl, mark the outline of the letters, followed by connecting the dots with the sharpie.
Paint in the letters with black paint and a fine tipped brush and let dry.
Step 6: Paint the Birdie


Taking the template of the bird, sketch out the details on the wooden piece with the fine tipped sharpie. Make sure to apply the details to both sides of the wooden piece.
To paint in the details, start by painting the bird's beak with light yellow paint and a fine tipped brush.
Next paint in the outlines of the eyes, wings and feather details with black paint and the fine tipped brush.
Once the black paint is dry, finish off the bird by filling in the eyes and adding tail feather details with antique white paint.
Step 7: Adding the Holes


On the bottom edge of the sign, measure in 3 inches from each end of the sign and make a mark at the bottom of the sign at those 2 points.
With the drill press, drill 2 3/16 holes at the places that you've marked. Make the holes approximately 1 inch deep.
On the top edge of the sign, measure in 2 inches from the left hand side of the sign and make a mark.
With a drill press, drill a 3/16 inch hole in the top edge of the sign where you make the mark.
Do a test fit of the sign with the birdie. Basically you want the bird to sit a bit of an angle facing inward on the sign. When you have the sign in the position you want, mark the bottom of the bird in a spot that lines up with hole you just drilled on the top edge of the sign.
Drill a 3/16 inch hole into the bottom of the bird where you made the mark. The hole should be drilled approximately 1 inch deep.
Once you've drilled the holes, give the sign and birdie a coat of clear lacquer to protect the paint.
Step 8: Putting It Together


With the 3/16 inch steel rod, cut 2 6 inch pieces either with wire cutters or a Dremel rotary tool.
Put a little dab of glue on each of the 2 holes at the bottom of the sign and seat a rod into each hole.
Next cut a 3 inch piece of 3/16 rod and with a little dab of glue, seat the rod into the top hole in the sign.
Apply a little glue to the hole on the bottom of the bird and attach the bird the rod at the top of the sign
The sign is Complete!
Step 9: Enjoy!

Once the glue dries, you can set the sign out by sticking the sign into the ground with the 2 bottom rods.
Now we are all set to bid a warm welcome any guest to your yard!

Participated in the
Wood Contest 2016

Participated in the
Outside Contest 2016

Participated in the
Backyard Contest 2016


