

Introduction: Windmill Powered by Windmill


This Instructable is to describe how to create a Dutch style windmill powered by a wind turbine with backup solar power.
Step 1: Gather Materials


Materials Needed for the Circuit:
1 Gear Motor
1 Extender
1/2 inch of medium size tubing
1 Motor Attachment
1 Turbine
1 - 3 volt Solar Panel
Cardboard to build energy source windmill panels
6 Dowel rods to build energy source windmill panels
1 Diroid
4 Alligator clips (2 red and 2 black)
Box cutter
Hot glue
Hot glue gun
Materials Needed for the Windmill:
17 Large Popsicle Sticks
4 Wooden Skewers
1 Cork
32 Slim Craft Sticks
2 Rubberbands
Hot Glue
1 4x4 Corkboard for the Base
Drill
3 inch Section of Pool Noodle
Scissors
4 inch 1x1 Wooden Rod
1 1/2 inch Dowel Rod
1 Lamp
Step 2: Build the Series Circuit


Begin with the turbine. Attach alligator clips to each side so that the red wire is attached to the black alligator clip, and the other black wire is attached to the red alligator clip.
Then, attach a black alligator clip to the red alligator clip.
Attach the red wire of the gear motor to the black alligator clip.
Attach the black wire of the gear motor to the red wire of the solar panel.
Attach the black wire of the solar panel to a new red alligator clip.
Finally, attach the black alligator clip to the loose red alligator clip that is attached to the wind turbine.
Since we want no power returning to the turbine, we must add a diroid. The Diroid is going to connect the series by adding it to the end wires of the turbine. Basically, attach the one end of the diroid to the black wire of the wind turbine and other end of the diroid to the red wire of the wind turbine.
Now, your series circuit is complete.
Step 3: Design Panels for Wind Turbine


To design an efficient turbine that will generate enough power to cause the gear motor to turn, there needs to be six panels.
Start with some cardboard and draw a panel that is approximately 12 inches long and 2 inches in width at the center. The ends need to taper off on both sides. Use a box cutter to cut out the first panel. Then, trace the panel five times to create the remainder of the panels. Use the box cutter to cut out the other five panels. Attach a four inch dowel rod to each panel to attach to the hub of the turbine with hot glue leaving approximately a 1/2 inch overhang.
Then, attach the panels in every other port to evenly disperse the panels around the hub of the turbine. Make sure that the pitch is approximately 25 degrees for each panel.
Step 4: Build Windmill Blades


Determine about how long you would like your blades to be. For this example, they were about 3 inches long. Using the slim popsicle sticks, break them into to two pieces that will be the long sides of the blades. Determine the width of the blades. For this example, they were about 1 inch. Break the slim popsicle sticks into the desired length. This example used 11 small width pieces per blade. Using the hot glue gun, evenly space and glue the small pieces to the long length blade pieces as pictured.
Repeat this process until there are 4 windmill blades.
Glue 2 sets of two slim sticks together side by side to have two lengtheners for the blades.
Step 5: Build Windmill Tower


Using the large popsicle sticks, glue 4 together side by side. Do this twice to get two sides of the windmill tower.
Using the large popsicle sticks, glue 3 together side by side. Do this twice to get the last two sides of the windmill tower.
Glue the sides together to form a box. Make sure the same amount of sticks are parallel to each other.
By cutting the sticks with scissors, glue together the pieces to make a peak for the house. Make sure to fill the empty spaces in with sticks in a desired pattern. Make sure this is all one piece when glued together to be sturdy enough to hold up to the windmill spinning.
Glue the peak section to the box previously made.
Mount the windmill tower to the corkboard piece using hot glue.
Drill a hole into the peak of the house at the desired spot. Make sure the rubber tubing can fit loosely through this hole because it will need to spin.
Step 6: Attaching Windmill Blades


Cut the blade lengtheners to the desired length and glue to the blades. Make sure that from the drilled hole point that it does not touch the cork board or the windmill will not spin.
Glue the blades and blade lengtheners to the motor attachment at the desired distance apart.
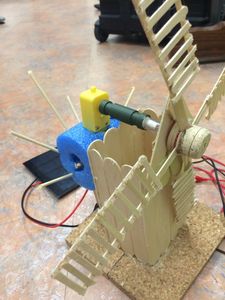
Cut about a 1/4 of an inch off of a cork and push and glue into the screw-on place on the motor attachment.
This example used two rubber bands to cover the red color of the motor attachment.
Using a small amount of hot glue, place the the tubing onto the extender piece of the motor attachment.
Step 7: Building the Mechanism


Push the motor attachment with tubing piece through the hole of the house.
Glue the dowel rod piece onto the motor extender.
Push the dowel rod with attached extender into the tubing, attaching the blade piece, tower, and extender.
Attach extender to motor.
Step 8: Building Motor Casing


Use scissors to make a hole in the foam noodle piece just large enough for the bottom of the motor to fit snuggly into.
Glue the wooden rod onto the back of the corkboard.
Place the motor into the foam noodle piece, and place entire piece onto the wooden rod.
Using skewers, connect the foam and wood at the desired height for the motor and extender to be parallel.
All of the pieces should now be together as one.
Step 9: Making the Windmill Spin
Turn the fan onto the wind turbine and the sun lamp onto the solar panel. Your windmill should now spin!


