

Introduction: 10 Drawer Dresser With Hidden Drawers and Crown Molding Hidden Storage


I decided to build this dresser as a Christmas present for my step-daughter. She is almost 15, and at this age, when Christmas comes around, we like to give our kids something more useful that they can use for quite sometime, and take with them when they move out of the house. When I did this project, I was not aware of Instructables, so I did not take very many pictures during the building process, but I do have a few. If you don't understand something, feel free to ask any questions and I will help out if I can. I've included several youtube videos to help you out in building this.
PLYWOOD FURNITURE CAN BE SEXY.
Future projects are Portable Mini Golf Course. Cool furniture like this. And a ramp for Human Bowling. So Follow me, You won't be disappointed.
Step 1: Sides, Middle, Back, and Face Frame

Tools Needed:
Table Saw or Circular Saw.
Chop Saw
Orbital Sander
Oscilating Sander
Planer
Jig Saw or Band Saw.
Nail Gun
Drill/Driver
A Square
A Speed Square
Clamps if you have them.
Materials Needed.
(3) 4' X 8' sheets of 3/4 Plywood
(Sides, Middle, 2 Tops, Base, and Drawer Fronts.)
(3) 4' X 8' Sheets of 1/4 Birch Plywood
(Back, Drawer Bottoms)
(2) 4' X 8' Sheets of MDF
(Drawer Boxes.)
(3) 8" X 24" X 3/4" Poplar Boards.
(Cut into 1/8" X 3/4" Strips on Drawer Fronts. This is what really says look at me.)
(2) 10" X 6' X 3/4" Knotty Pine Boards.
(Cut down to 3" wide, These will make the plywood sides look fancy later. We will make cove molding and saw kerfs on these parts.)
(1) 8' piece of crown molding
(1) 1 1/4" X 8' X 1/2" Molding
Glue, Chisel and Damp Rag.
(1) 1" Pack of pocket screws, 100ct.
Approximate Cost: $350-$425
First start with cutting the 2 sides and middle out of 3/4" Plywood. Cut them at 23 1/4" X 52 1/4", This is your final dimensions for these 3 parts. On the back side of all these boards, 3/4" in from the back you are going to make a heavy 1/4" slot all the way down. 3/8" Deep on the inside of the 2 sides, and on both sides of the center piece, 1/4" deep.
Cut (2) 3" strips of 3/4" Plywood. And then cut them all down to 22 3/4". These (8) pieces will be to support the back of the furniture.
Next build the Front of the dresser (The Face Frame) out of 1 1/2" X 3/4" Select Pine Wood. Cut 3 @ 46 1/2" These will be the vertical members of the frame. Now cut 12 @ 21 3/4" These will be the Horizontal members of the face frame. If you want the kerf look on the the front of the wood, Divide by how many you want to figure the distance. For instance I wanted two kerfs on the front of my dresser for looks, so I set the table saw fence up to 3/8". Ran the board and flipped it over end over end, and ran it again to get to evenly spaced kerfs. I used pocket holes to screw the frame together, but you can use dowels if you'd like. Start from the bottom to the top. Making the first horizontal flush with the bottom of the vertical piece. (Zoom up on the picture) Each horizontal piece is 7 1/2" between each other.
With the light and dark color contrast of this piece of furniture. I pre finished Staining the sides, tops, and face frame of the dresser. This will eliminate bleeding from masking and taping it off later. Just one less hassle to deal with. Always sand to a 220 grit before staining.
It's easier to cut the arch profile that you want, on the sides of the dresser that you want now. Before you assemble the frame of the dresser.
Future Build. I'm going to build a ramp for this ball. More great Projects to come.
Step 2: Putting the Frame (carcass/box) of the Dresser Together.

The reason I used this picture is because if you notice how the top shelf, (where the crown molding leads to) over hangs the sides by 3/4". The Face Frame will over hang the sides by 3/4", this will allow for the fancy cove moldings to sit flush with the front of the dresser.
Step 3: Build the Base Drawers, and Bottom Hidden Shelf.

Cut (2) shelves out of 3/4" plywood, 21 3/4" X 22 5/8". These shelves also serve as another little hidden space on the 10 Drawer Dresser. (As you see in video above) But is mainly there to square up the dresser. Use pocket hole screws and glue, to attach shelves level with bottom of the front face frame.
Rip (2) strips of 1/2" MDF on table saw @ 3 1/2". From the (2) strips, chop them @ 21" and 21 1/2".
Now cut (2) drawer bottoms out of 3/4" Ply or 1/2" MDF. (I used scrap 3/4" ply from another project.) Dimensions are 20" X 21 1/2"
Now screw and glue drawer sides and bottoms together.
Now attache 20" drawer slides to dresser and hidden base drawers.
Step 4: Base Drawer/Toe Kick of Dresser.

Cut a strip of 3/4" plywood on table saw @ 5 3/8". Chop @ 4', these are final dimensions. Deside on arch profile you like, using a fairing stick.
Step 5: Build Ten Drawers. This Is Your Boring Step of the Furniture Piece.

The video shows exactly how I built my drawers.
Rip (10) strips on the table saw @ 6 3/4" out of 1/2" MDF. Each strip will build (1) drawer. Now chop (5) strips @ 22" These will be your Sides.
Now chop (5) strips @ 19 11/16". These will be your front and backs of the drawers.
Now rip (1) sheet of 1/4" Birch Plywood on table saw @ 20 3/16", these will be the bottoms of the drawers. Now use a circular saw and a straightedge to cut the strips into (4) drawer bottoms. Mark the first strip @ 21 1/2" and cut. Cut 9 more of these.
Now set your table saw @ 3/4" as shown in video, and set blade height to 1/4", and run each board thru it once. Now since the table saw blade is only 1/8", you want to move the fence to 7/8". And run all the boards thru again, if the drawers are to tight of a fit adjust the fence over to a 32nd-16th of inch, to give you a little play. You can substitute the table saw for a router table if you prefer, using a 1/4" bit.
Step 6: Make the Drawer Fronts.

From 3/4" plywood, rip a strip down the table saw @ 7 3/8". You will need 3 strips.
Then chop them @ 21 1/2". Sand them and stain them. (I used Rustic Oak)
Step 7: Mill the Poplar Strips of Wood, to Dress Up the Dresser.

Here's a video on how I did it.
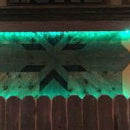
Step 8: Marking the Strips for the First Diagonal Marks.

Measure from the side of the drawer front to the center. And mark the center. You'll notice that in the photo, I offset the strips from the center, for more character. Hold the strip on the drawer front, from the bottom left corner, to the upper center mark. Offset it if you like the look, or hold in the center, Mark the strip by running a pencil from underneath the strip. Next we'll head to the chop saw and cut them.
Step 9: Cut the Angles on the Strips, This Is How I Set My Chopsaw Up to Get the Correct Angle.


Cut the strips on the marked line.
Step 10: Mark the Opposite Diagonal Pieces.

Hold the opposite diagonal pieces and mark them and then cut them as well as in the previous step.
Step 11: Apply Glue


Apply glue to the strips that are to be glued and nailed onto the first drawer
Step 12: Glue and Brad Nail Poplar Strips.


After brad nailing the poplar strips into place, apply spring clamps to the edges. Because these will be the first place that comes up. Clean up all excess glue and let dry for an hour.
Step 13: Fancy Pine Sides


Rip the 10" knotty pine boards in to 3" Strips.
Making Cove Moldings on a table saw. If you don't have the cutting jig for the table saw, you might want to skip this step, and just run some saw kerfs down the board for some character. Here's a video on cove moldings on a table saw.
After you got them cut and sanded, stain them. then apply them on each end and center of the side, with glue and brad nails, (if you want to you can add a few screws from the inside of the dresser to help hold the fancy eye popping sides of the dresser.
Step 14:


Here are the dimensions for the top part:
Top Shelf (Hidden Shelf) Dimensions: 24" X 48". I had a scrap piece 3/4" Melamine in my shop, so that's what I used.
Stain the crown molding stick and the flat molding stick.
Attach crown molding sides. Here are the dimensions: 24" to the Heel. These are brad nailed and glued on to the hidden shelf.
Then cut the back top of the dresser 20 5/8" X 53 1/4", and cut (2) spacers @ 2 3/4" X 20". Attach these spacers to the bottom side of the top. Stain it, and attach it to the dresser and crown molding. Making the crown molding and the outside of the top, flush.
Now cut the front top part of the top: 5 7/8" X 53 1/4". Stain it, and attach the piano hinge leaving a 3/16" gap between the two tops.
Now attach the front piece of crown molding 48" Heel to Heel
Now attach the cap molding to hide the plywood ends and where the crown molding meets. Side dimensions are 26 3/16" to the heel. And the front piece is 53 1/4" Heel to Heel.
Your almost done. Remove Piano hinge, and apply lacquer. I used a spray gun HVLP, and Shellac to spray 2 coats on. Hope you enjoyed this project. Thanks for looking.
It all started with a sketch.

Second Prize in the
Protected Contest

Participated in the
Homemade Gifts Contest

Participated in the
Wood Contest


