

Introduction: Two-Tone Printing


Wanting to make a snazzy coin of my university logo, I started playing with printing in multiple colors on a single-head printer.
This Instructable is a quick and dirty guide to get you going and not damage your printer while switching colors.
Step 1: Find Your Layer Height
Depending on your printer, you'll have different layer heights to work with. Defining this number from the beginning is important because it will help you design your 3D model to have predictable start and stop points. We want to be able to tell the printer to stop on the 14th layer and not the 14.483 layer.
For the sake of keeping things simple, we'll define the layer resolution now, for me it is 0.25 mm, and make sure all of our measurements on the Z-axis are divisible by this number i.e. 0.50, 1.75, 2.00.
Step 2: Make Your 3D Model

Use your favorite CAD software to make a neat 3D model, but remember to keep your layer height in mind.
I decided to use the logo from my favorite college, Colorado State University, and give it a nice striped background to hold everything in place. The stripes are 1.00 mm tall, the ram face 3.00 mm, and the outer ring sticks up an extra 0.50 mm. All of which are divisible by my layer height, 0.25mm.
With your model finished, export as an STL so that we can move on to our slicer.
Step 3: Import to Slicer


I use Simplify3D for my slicing, but the process should be similar for other software.
You'll want to import your STL file that you exported from your CAD software and then define your print settings. Specifically, you'll want to set your layer height so that it matches your design like we planned.
Step 4: Set Your Start and Stop Height


In Simplify3D you define your print settings in what's called a process. We'll want to make two processes for this print, one for the bottom color and one for the top. Ultimately, we'll be creating two separate g-codes, one for each color.
To set the height that we want to stop and switch colors, open the first process and go to the Advanced tab. Under Layer Modifications we'll want to check "Stop printing at height" and tell it our cutoff height. For my CSU coin I've used the height of my stripes, 1.00 mm.
Next, we'll repeat these steps for the second process. However, instead of selecting "Stop printing at height", we'll select "Start printing at height" and enter the same value from the previous process, 1.00 mm for this example.
Important: Many default settings include a skirt on the first layer. Be sure to deactivate this under the Layer tab for your second process. We don't want to draw a skirt in mid-air.
Step 5: Generate G-Code


To generate the g-code in Simplify3D, click the Prepare to Print button in the bottom left and a box like the one above will pop up. We're going to save the processes separately so that we can run them individually on the printer.
Select your first process and click OK. You don't have to worry about the Printing Mode section because we are only selecting one process. Once the preview loads, click the Save Toolpaths to Disk button in the bottom left and name your file something clever with "base" or "bottom" in the name i.e. CSUbase.gcode.
Now, repeat these steps but this time select your second process in the pop-up and then switch "base" with "top" in your file name i.e. CSUtop.gcode.
Step 6: The Most Important Step

The biggest surprise in printing in two colors and what nearly damaged my print head is the way that the slicer tries to start a print above the bed.
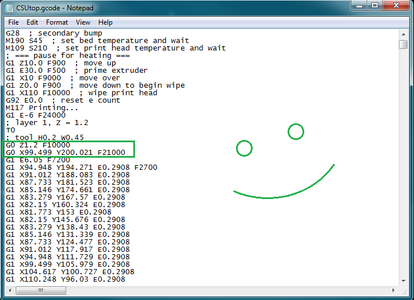
Use Notepad to open your top print file, CSUtop.gcode in this example, and scroll down until you see a bunch of "G1"s on the left side. You'll see just above all of these "G1"s are two lines starting with "G0".
Quick Lesson in G-Code:
- G1 tells the head to move while operating the tool. For a 3D printer this means that it's extruding plastic while moving or to put it simply, it's printing.
- G0 is what we call a rapid movement when the head is moving but not doing anything else.
These first two lines starting with "G0" are there to position the head above our starting point so that we can begin printing. You might notice though that it wants the printer to rapid move to the XY position and then move up to our Z position. THIS IS BAD!
With the current g-code, your printer will ram the print head into your already printed base and then try to raise to the starting height. This could dislodge your print, ruining your two-tone project, or, even worse, it could damage your print head. To stop this, all we need to do is switch the two lines with a little cut and pasting. Now, our print head will move vertically in the Z before it moves in the XY to the starting point.
Save your file and then we're ready to start printing.
Step 7: Printing the Part


Now that you've completed all of the hard stuff, we can get to the fun part, printing.
First, load the filament for your base, grey for my CSU coin, and run the appropriate g-code, CSUbase.gcode.
Once that finishes, remember not to remove your piece from the bed. Then switch your filament to your top color, orange for the coin, and then run the g-code for the top, CSUtop.gcode.
Easy enough, right? You now have a snazzy two-tone print to show off to all of your friends.
Step 8: Further Steps


A couple things you can try to take this further:
- On your CAD file, extrude an outline of your features another increment in the Z to make a cool accent around your base color. You can see my attempt at this in the first picture.
- More colors! You can use these steps to do as many colors as you like. The only extra steps now are to add a start and stop height to your middle sections.
- The rainbow Makeys above are from a neat tutorial by Makezine about how to color your prints with Sharpies, Rainbow Extrusion.

Participated in the
3D Design Contest

Participated in the
Formlabs Contest


