

Introduction: 2-part Brush-on Silicone Mold


This Instructable will walk you through the process of creating a 2-part brush-on mold of an original.
2-part brush-on molds are ideal for replicating complex shapes that would otherwise be impossible with a pour (block) mold or glove mold. Using a brush-on technique gives the silicone more flex when demolding and require less silicone than pour molds. Splitting the mold into two parts can allow you to work around undercuts in a mold.
Note that you can add more than one mold part line, however this will increase the complexity of your mold.
In this Instructable I will be making a mold of a clay original that I sculpted and then creating a slush casting using the mold.
Materials I used include:
- non-sulfur oil based clay (6 lbs)
- clay tools
- dragon skin 20 silicone (2x trial kits)
- plasti paste mothermold
- mixing containers (x20)
- brushes (x2)
- stirring sticks (x20)
- gloves (a lot)
- smoothcast 300 (1x trial kit)
- mold release
- wing nuts
- 1/8th MDF board
- sewing tape measure
Step 1: Create Design

Start by designing your part.
I had a mannequin head around, so I thought it would be fun to make up some sort of futuristic spacesuit helmet.
The first step is preparing the base model for fabrication. If you're using a base model that you don't want to get ruined with clay or mold material it might be a good idea to cover the model in something silicone friendly (note that silicone has a hard time curing on certain material surfaces). I covered mine in plastic wrap and tape.
The mannequin head was obviously not to human scale and I wanted the helmet to fit my head. So I found my head measurements using a sewing tape measure then, added clay to the mannequin's head until it matched my measurements.
Next I sketched possible designs over a template. I included the template file I used.

Once I drew something I liked I started building and used the drawings to inform what I made.
It might be helpful to draw these at full scale so you can compare what you make directly to the drawings.
Step 2: Build Original
Begin building by blocking in your model. Focus on basic shapes, proportions and placement.
Don't worry about the details or how refined it is. This is a very rough state to ensure the underlying structure of your model is accurate.
Pay attention to the placement of symmetrical features. I often draw a center line down my model for reference while building.
You may also find it helpful to lightly draw out possible placement or design of details in the clay.

Although it's not necessary I like to use clay tools when working in clay. Here's a few of my favorite tools and some tips on how to use them to enhance your clay models.

Once your design is blocked in, begin adding details. I find it easiest to cut my details out of acrylic and place them in the model. If you don't have access to acrylic matte board is a great alternative.
You can also use found objects, I embedded screws in my model.

Clay can be a frustrating material to work in. A quality sculpt can take days to complete even for a seasoned sculptor. Don't get discouraged, keep working until you have something you're satisfied with.
Remember to step back from your model every so often while sculpting. This will help you from getting caught up in the details and missing a mistake in the overall form.
It may help to take photos of your model and overlay them with your sketches in the computer to check for inconsistencies.

Step 3: Prepare Original
Now that your model is complete it's time to prepare it for molding.
Begin by gathering the mold making supplies

Examine your model and determine the best position for the part line.
Remember to keep an eye out for undercuts and other awkward geometry.
Make registration keys. I used a few nuts and filled the centers with clay.
build the part line out of clay and embed the registration keys.

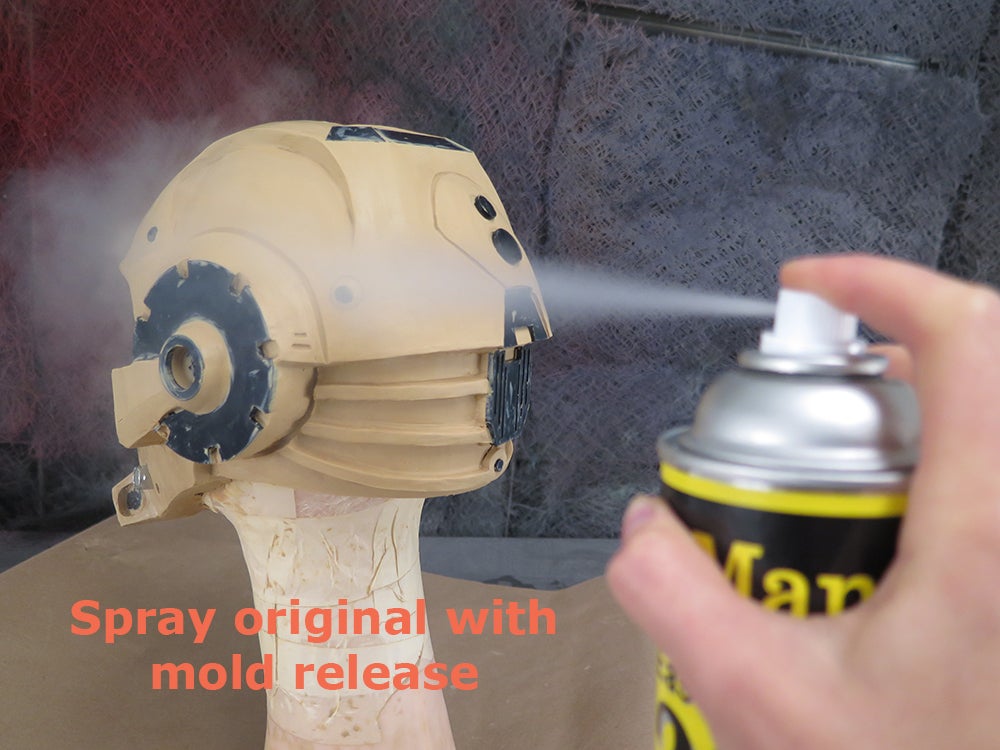
Spray the model with mold release. This will aid in releasing the model after it has been molded.
Step 4: Molding Side I
Once the mold release has had a few minutes to set, begin mixing the first batch of silicone.
Measure out an equal volume of part A and B. The first coat will be very thin so mix just enough to cover the entire model lightly.
In a new container combine parts A and B. Mix completely and begin applying to the model with a brush.
This layer will determine how accurately the mold captures the model, so be very precise and try to get every detail.
Be sure to brush gently, as the clay is soft and easily damaged by the brush.
The silicone will want to run off your model, you'll have to catch the bits that run off and reapply them to the model.
As the silicone begins to cure, the drips will become less frequent. Dragon skin 20 has a 25 minute pot life so be patient, you may have to stand there for quite a while until it stops.

Once the first coat has partially cured (no longer tacky, dry to the touch)
The second layer will be thicker than the first. I find it easier to apply the next few layers with a spatula like device than a brush.
On the final layers a thickening agent can be added to the silicone to keep it from dripping off the model and allow you to build up certain areas, like the part line. You only need a few drops of thickening agent to make it stiff enough.

Keep applying layers until you have a consistent .25"-.5" wall thickness on the model. Try to make the outer layer as smooth as possible. This will aid in releasing the mother mold from the silicone mold later.
Step 5: Molding Side II
Once the first half of your mold has cured completely, remove the clay part line barrier.
Be sure to remove all registration keys that may be embedded in the silicone.
Clean up the silicone part line as best as possible and spray the second half of the mold with release agent. Because silicone will be applied directly to more silicone on the part line, it is a good idea to make sure there is a lot of release agent in that area. Apply several coats of release agent, wait a few minutes between each coat. If the part line fuses it'll be difficult or even impossible to separate the two halves and your model will be trapped inside. This is never fun.

After the mold release has set, apply silicone to the second half of the mold as you did for the first half.
Remember to build some thickness along the part line.

Step 6: Mothermold Part Line
Cut two pieces of thin ply, acrylic or a similar material in the profile of your silicone part line as shown.
These will serve as your mothermold part line.
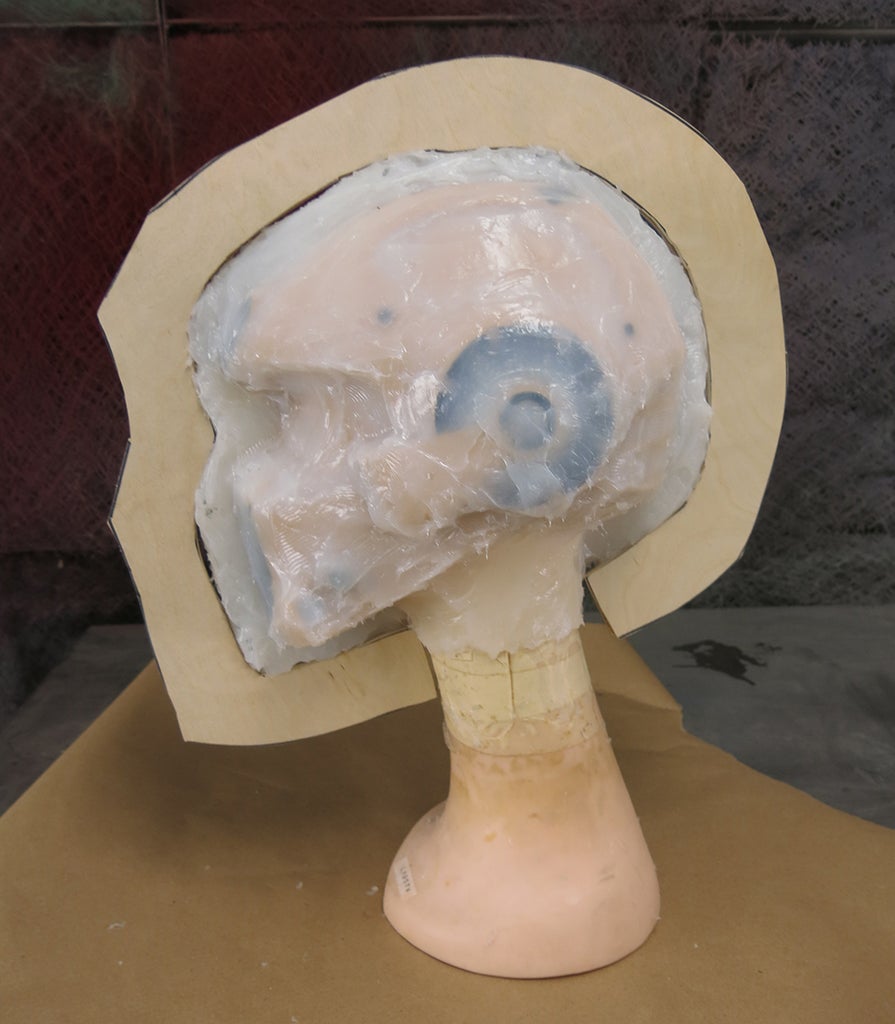
Step 7: Mothermold
Because the material the mothermold is made of likes to bond to other materials, even silicone, you must cover your mold in a release agent to avoid trapping your part inside the mold.
Begin by applying several (at least 3) liberal coats of release agent to the outside of themold. Wait a few minutes between each coat to ensure proper application.
Place mothermold part lines on the mold and gather mothermold supplies.
Measure parts A:B of Plasti paste in a 1:3 ratio, then combine parts A and B in a new container.
Plasti paste has a relatively short pot life, so work quickly. You will feel it begin to heat up as it cures.
Spread the mixture onto the outside of the mold and sides of the mothermold part lines as evenly as possible.
Think about how your part will be released once the mothermold has cured. Plasti paste will cure to a rigid form so you won't be able to flex it off of your part as you will with silicone. Apply your mothermold with this in mind.
Once side one has been applied, do the same for side two.
Allow both sides to fully cure at least 90 minutes.

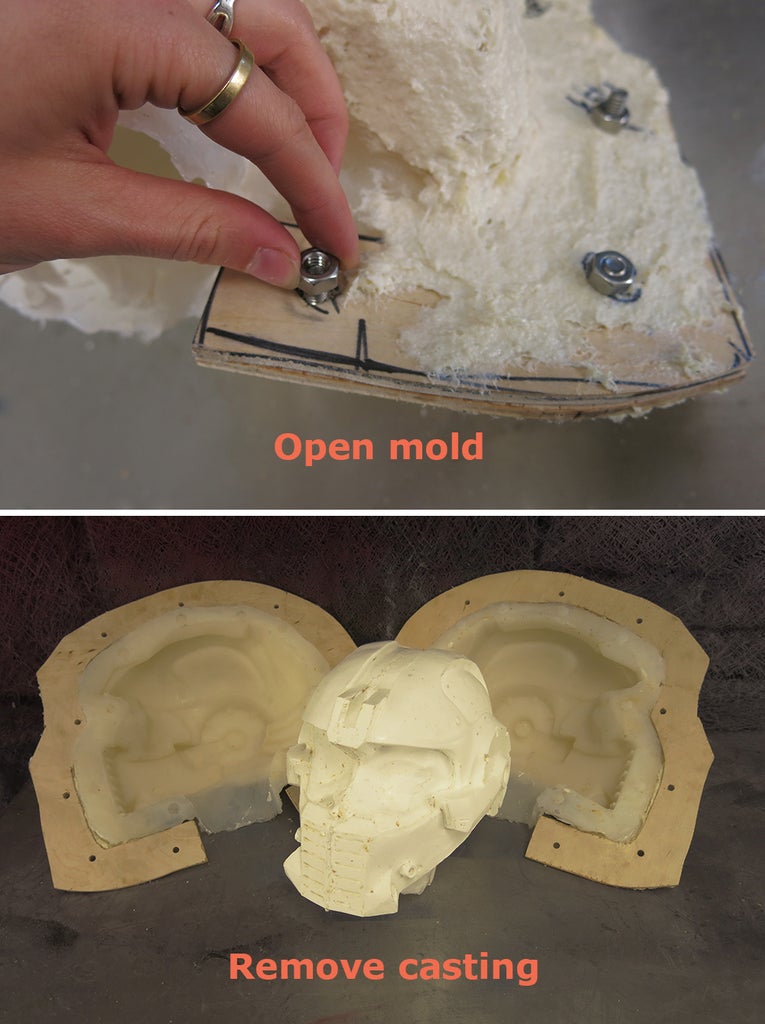
After both sides have cured completely, remove the part from the mothermold and silicone.
Clean the mold as best as possible of remnants from the original. Mine had a bit of clay leftover inside.
Close the empty mold and mark bolt placement through the mothermold part line.
Drill several bolt holes around the perimeter of the part line as needed and secure the mold with bolts. I used 1/8th inch bolts and nuts.
Your mold is now ready for casting!

Step 8: Slush (hand Rotoational) Casting
I wanted the mold to be hollow, so I used a casting process called slush casting. Slush casting is similar to rotational casting, except it is done by hand rather than using a rotational casting rig. This mold also has an opening, so it will not be turned upside down as would be done with rotational casting.
Begin by opening the mold and applying mold release.
Close the mold and measure an equal amount of parts A and B by volume. Slush casting is done by applying thin layers of casting material (in this case plastic) to the inside of the mold. The first layer will be very light and is meant to capture the details of the mold so don't mix too much material for the initial pour. You need just enough to lightly coat the inside surface. Too much may cause pools of material or air bubbles.
Combine parts A and B in a new container and mix. Pour the mixture into the mold and gently slush it around on all surfaces. I usually hold the mold in two hands and rotate it in all directions being careful to coat surfaces and not spill material.
Once the first coat has begun to cure (is no longer moving inside the mold) apply another coat of plastic. Keep adding more plastic until a desired thickness is achieved. The plastic will release heat as it cures, this heat will cause each layer of plastic to cure faster than the last. Be aware that this will shorten the pot life and time you have to slush cast.
Once your part is cast, unbolt and remove the mold.

Slush material inside the mold.

Step 9: Finishing the Cast
My cast came out pretty well however, as with any cast, there is always bit of flash (extra casting material) to clean off. I also like to touch up and areas that caught air bubbles and surfaces that need smoothing.
I use a dremel cut off wheel to remove large chunks of plastic and a dremel sanding wheel to sand down thick pieces of plastic. I then apply a coat of primer and sand the model until I am satisfied with its finish. Alternate sanding and applying paint. The paint will allow you to see the form and determine where you've sanded already.
Work from a lower grit sandpaper to a higher grit sandpaper. Lower grit sandpaper will allow you to remove more material faster but will leave a rough finish. Higher grit sandpaper leaves a finer finish but is inefficient in removing material. I used 100, 220 and 320 grit sandpaper.
Remember to allow each coat of paint to dry completely before sanding. Sanding before it dries will ruin your finish, fill the sand paper with paint and generally create more frustration.

Once you're satisfied with how your cast looks, paint it however you see fit!
I used several layers of black and metallic paint to give it a weathered metal look.


