

Introduction: 3D Chocolate Printer (made From LEGO)


After the success of my first instructable, a fully functional LEGO 3D printer, I was planning to make some improvements.
At first I was planning to replace the Z-axis threaded rods by cnc lead screws. This should result in a smoother z axis motion. With an improved accuracy of the prints in the height.
A next step would be an improvement in the X-axis. To allow more weight on top of the carrier. I was going to modify the Extruder-carrier from standing to lying. Additionally this also would have made room for a second extruder.
All this, until a colleague pointed me to the Remix Contest. Along with the question whether my printer could print chocolate. This resulted in a second version of the "3D chocolate printer made from LEGO" made by Saul (April 2005). He ends his instructable with: hopefully someone will rebuild this and simplify it.
It's 2015, and thus the original instructable is over 10 years old, still gets replies, but nobody made such a printer. Since I already made a LEGO 3D printer, all I had to do was build a chocolate extruder :)
Unfortunately, printing chocolate isn't easy.
But it can be done. And basically there are two ways to print chocolate (at home):
- Use a worm screw. And press melted chocolate out a nozzle. This requires pre-melted chocolate or a heating system.
- Use pre-melted chocolate in a syringe.
Without a heating system, the chocolate will solidify sooner with a worm screw. The chocolate will also be in touch with more LEGO. Also this requires the extruder to be disassembled and cleaned after each print.
That's why I've chosen the second option. This version is also the easiest to make with LEGO. In addition, the chocolate remains edible. And that's what it's all about.
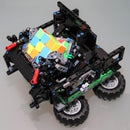
Step 1: 3D Printer Made From LEGO


The best way to gain knowledge of a 3D printer, is to build one. Building this LEGO 3D printer taught me alot about all aspects of 3D printing. Even making mistakes was part of the learning. The advantage of LEGO is that it's easy to change parts of the design.
I can therefore recommend, for anyone interested in 3D printing or robotics, to experiment with LEGO, Arduino and Nema Steppers.
Step 2: Chocolate Extruder


After the choice to use a syringe, the first thing to do was to melt chocolate. And to create some 3D objects without a printer. After some tests, I found out, that we need some pressure in order to get the chocolate neatly out of the syringe.
I tried to keep the first version of the extruder as simple as possible. That's why I created a design without LEGO gears. These can easily break as soon as the chocolate starts to solidify.
There is no endstop on the extruder. The print design should not have more content than 20 ml. After that the syringe will be empty, with the steppers still moving. While printing it's, better to stay near the printer.
However, the design chosen is scalable. It is possible to use a larger syringe. The disadvantage of this are the expenses. A 20 ml syringe costs about € 0.25. A 60 ml version costs a multiple thereof.
Material needed for the extruder
- LEGO
- 1 x 12 Volt fan 6 x 6 centimeters
- 4 x Bolts and nuts (m4 x 40mm)
- 2 x Nema steppers (42BYGHM809)
- 4 x Z-axis motor coupling with M5 wire.
- 2 x M5 threaded rod (20 cm)
- 12 x M3 bolts (for Nema stepper motor and motor coupling)
- 20 ml syringes
Building instructions
Build the LEGO parts according to the instructions (created with LEGO Digital Designer). There are three parts. The extruder, pressure lever and the fan duct (the last one is optional, but the chocolate solidifies less quickly).
Make sure the syringe fits firmly into the extruder. The syringe should not be moving while feeding the chocolate. See the red blocks/plates on the 5th picture. Fasten the fan to the fan duct with bolts and nuts. Then attach it to the extruder (using the black two pins on the inside of the fan duct). Make sure that the airflow doesn't flow past the end of the syringe. Or it will get clogged.
Fasten both Nema stepper motors with m3 screws and place m5 motor couplings (with m5 thread) on both engines.
The same motor couplings are used for the pressure lever. These are attached with m3 bolts. Make sure that the M5 threaded rods don't get stuck. Finally, after placing a syringe, the pressure level can be attached to the Nema steppers.
Now we have a chocolate extruder. The next step is to fasten it to the printer, and modify the firmware of the printer.

Step 3: Firmware and Software Settings


After replacing the plastic extruder by a chocolate version, we need to alter the firmware of the printer.
As first the firmware header, this will tell us which firmware is loaded into the printer.
#define STRING_VERSION "1.0.4"
#define STRING_URL "instructables.com"
#define STRING_VERSION_CONFIG_H __DATE__ " " __TIME__  " Chocolate"
#define STRING_CONFIG_H_AUTHOR "(Gosse Adema, ChocolatePrinter)"
#define STRING_SPLASH "v" STRING_VERSION " - " STRING_URL
Heating
We'll print without heat-bed. This can be disabled in the software (while slicing).
The new extruder doesn't have a heating element. We have to alter the temperature settings, to allow cold extrusion. Normally this is set to 170 degrees celcius.
For temperature reading of the chocolate, we can place the extruder sensor near the syringe. I have chosen to turn the sensor off
#define TEMP_SENSOR_0 0
#define EXTRUDE_MINTEMP 0
Feedrate
We also need to recalculate the extruder feedrate. Normal filament has a diameter of 1.75, or 3 millimeters. Use of a syringe gives a much larger diameter.
I don't know the maximum diameter you can specify during the preparation (slicing) of a STL file. We'll convert the diameter of the syringe to 3mm filament. This way we can determine a reduced number of required steps per millimeter.
The used stepper motors (42BYGHM809) move 0.9 degree per step. We use M5 threaded rods. These move 0.8 mm per turn.
360 degrees = 0.8 mm
450 degrees = 1 mm
450 degrees = 500 steps
A total of 500 steps gives 1 mm movement. With 1/16th stepping it's 8000 turns per mm.
1 mm of 3mm filament gives:
(0.5 * 3) ^ 2 * 3.1415 = 7.068 mm3 plastic
My syringe has a lenght of 71 mm and contains 20ml (20000 mm3) chocolate.
1 mm feeding of this syringe gives:
20000 / 71 = 281.69 mm3 chocolate
To compensate this, we need too divide the turns per millimeter by 39.85.
This (8000 /39.85) gives the value of 200 steps/mm.
#define DEFAULT_AXIS_STEPS_PER_UNIT 160,160,8000,200 {} // chocolatePrint Size
The new extruder size decreased the printbed surface. The new extruder is wider than normal. As a result, the left part of the printbed can not be used (on the X-axis). We have lost 60 millimeter on the left side (200 - 60 = 140). Don't forget to use these lower values while slicing.
// Travel limits after homing
#define X_MAX_POS 140
#define X_MIN_POS 0
#define Y_MAX_POS 200
#define Y_MIN_POS 0
#define Z_MAX_POS 200
#define Z_MIN_POS 0
Speed
The X, Y and Z Axes remain the same. However the extruder is a lot heavier than a normal extruder. We have to alter the moving speed due to the mass inertia. This can be done in Pronterface, by reducing the print speed to 10%. Also Modify the following settings in the firmware:
#define HOMING_FEEDRATE          {5x60, 5x60, 1x60, 0} // (mm/min)
#define DEFAULT_MAX_FEEDRATE     {150, 150, 2.5, 60}   // (mm/sec)
#define DEFAULT_MAX_ACCELERATION {150, 150, 100, 10000}
Once uploaded we can do a test run without chocolate.
Slicing
Use the following values during slicing:
Filament     = 3 mm        (corrected in the firmware)
Nozzle       = 0.9 mm
Heatbed      = 0 degrees   (off)
Extruder     = 0 degrees   (off)
Layer Height = 0.6 mm      (or 0.7 mm)
Step 4: Working With Chocolate


If you heat and cool chocolate without controlling the temperature your chocolate will bloom. It will appear matt and covered with white patches. It will also crumble. This is caused by chocolate crystals of different sizes. In order to avoid this you will need to temper your chocolate. Tempering controls the crystals so that only consistently small crystals are produced, resulting in much better-quality chocolate.
Never heat chocolate directly in a pan. Use the "bain-marie" method instead. Bring water in a pan to a simmer (don't boil) , and place a heat resistant bowl on top of the pan. Make sure that the bottom of the bowl isn't resting in the surface of the water.
Take a chocolate block and chop it finely with a knife (or use chocolate drops). Heat about 2/3 to 3/4 of the chocolate until it melts. And stir until the chocolate reaches a temperature of 48C (118F) for dark chocolate or 45C (112F) for milk chocolate. Use a kitchen thermometer and allow the chocolate to melt slowly.
Once all the chocolate is melted, remove the bowl and place it in a towel. Add the remaining chocolate. Use the thermometer and stir the chocolate until it reaches 32C (90F) for dark chocolate or 31C (88F) for milk chocolate. For chocolate printing, it is better to stay slightly above these temperatures. Otherwise you have the risk that the chocolate might cool too much, while printing.
Fill the syringe with the chocolate. Make sure that no air enters the syringe. If this does not work immediately, then fill two syringes fastly. And use these to fill a third one, without air. When filling multiple syringes, make sure that they remain warm. You can put them in a bowl of warm water. Use a sealed bag. Make sure that the syringe and the chocolate don't get wet. Chocolate and water don't go well together. Alternatively, you can heat an oven at 33 degrees. Use some aluminum foil to close the nozzle.
This printer uses 20ml syringes. This determines the size of the object to be printed. There are also larger syringes (60ml), but they are more expensive. It is possible to use a syringe more than once. But you have to accept that you can use them only a few times. Clean them with warm water. Do not place them in the dishwasher, this makes them unusable.
Step 5: 3D Printing Chocolate


Before printing chocolate you have to make sure that everything is ready. Turn the printer on. Prepare the extruder, by removing the pressure lever. Slice the object and load it in Pronterface. This prevents the unnecessary cooling of chocolate.
Use baking paper on your heatbed. This works fine, because the chocolate adheres thereto.
Insert the syringe into the extruder. Now attach the pressure lever. Securely tighten the m5 thread in the motor coupling. Fasten the bolt, if necessary. Thereafter, manual extrude some chocolate with Pronterface.
Now we can print. Because it is not necessary to heat the heatbed / printhead, the printer can begin almost immediately.
Tips and Tricks
- Don't print objects larger than 20000 mm3.
- Support Structures will become part of the print.
- Don't try to print too much details (picture 3). This print has 12 layers!
- Make sure the first layer isn't too low (Z-axis calibration, picture 4)
- Don't print too fast. The heart in picture 2 went too fast. The chocolate didn't solidify and it cluttered. The upper layers are reasonable. But the start went wrong.
- Avoid large complicated objects. You have 5 to 10 minutes to print.
Step 6: Chocolate Extruder V2.0


The extruder I've used for printing chocolate has some disadvantages. There is no temperature control. In order to print chocolate, it should not be too cool or the nozzle will get clogged. We must keep the chocolate at the right temperature to prevent this.
Therefore, I give a description of a possible chocolate extruder.
Heating
In principle, all electronic components are available for temperature control. Each 3D printer has a heatbed with a temperature sensor. And the temperature is regulated by the Marlin-software. The use of a "flexible kapton heater" can heat the syringe. Attach this instead of the heatbed.
And the 3D extruder hotend consists of a heating element and a temperature sensor. We can use this at the end of the syringe. This will prevent it from getting clogged. Just like a normal 3D printer.
Cooling
Besides the heat, we should also cool down when the extruder has done its job. We can use peltier elements, just as in a cooling box with fans. A Peltier element has two sides, and when DC current flows through the device, it brings heat from one side to the other, so that one side gets cooler while the other gets hotter. The hot side is attached to a heat sink, with a fan, so that it remains at room temperature, while the cool side goes below room temperature.
We can use peltier elements in two ways:
- Create a coldbed. Attach the cold side to a plate or aluminum. The entire plate will cool down. The opposite of a heatbed.
- Create a small air conditioner and use the cool air to cool the chocolate (Peltier-Air-Conditioner). The warm air might be used to heat the syringe.
Syringe
The current limit of 20ml allows only small objects to print. This can be increased by using a bigger syringe. The Nema steppers have enough power. They will break the LEGO if the chocolate solidifies in the syringe. It's possible to increase the syringe size, if we keep the chocolate's temperature at 33 degrees.
A metal syringe spreads the heat better than a plastic syringe. Combined with the two heaters, these might prevent clogging.
.
A note for those who want to build a full metal version. Keep in mind that some brass 3D nozzles may contain lead. This makes them unsuitable for the printing of food. Use a stainless steel steel version (e.g. E3D v6 nozzle RVS 3 mm x 0,8 mm).
Attachments

Step 7: Update


It's been a while since my last update, and I've made some improvements to the printer.
As the first, the threaded rod is replaced by a lead screw. These provide better accuracy in height while printing in 3D.
In addition, I've made a heating element for the printhead. This is a modified heating element for a 3D printer. It is adjusted for the usage of syringes. The syringe fits only one way. this makes it possible to change the syringe during printing. Keeping the extruder temperature at 33 degrees, keeps the chocolate liquid during printing.
The Peltier elements are capable of cooling. But the aluminium cooling fins I've ordered are too small. Switching to CPU coolers solves this problem, but adds too much weight to the printhead.
It is possible to place the whole in a "cool box", and cool it with peltier elements. Only this Lego printer is too large (50 x 50 x 50 cm). For this to work, I need to build a smaller version. (The whole can then also be made with smaller Nema steppers and electronics.) It will then only be possible to print food with this printer (and no PLA or ABS).
Finally I started using needles. This way I can print more precisely. See the following logo, printed on a cookie:

----
If you liked this Instructable, and you want to receive updates about future projects, you can follow me on Instructables, Instagram or on Youtube.
Step 8: ...


In the end, a fun experiment.
We still have an unused part of our 3D printer: The heatbed. This we are going to use for the preparation of pancakes. Imagine a birthday party with homemade/printed pancakes.
The control of the printer is done with pronterface. But we'll print only one single layer. Herewith we abuse the "raft" layers. A "raft" is a horizontal latticework of filament that is located underneath the object to print. Rafts are normally used with ABS to help with bed adhesion. While slicing, we indicate that we want a raft layer.
Choose a simple figure with a clear edge. With not too much details. It's possible to make your own figure. Optionally, you can alter the gcode and keep only the first layer.
recipe
40g  flour
1    egg
60ml milk
Mix the ingredients and fill up the syringes. Make sure there is no air in the syringe.
Put baking paper directly on the heatbed. Turn on the printer and load the Gcode-file. Instead of normal 3D printing we are going to drip the batter on the plate. For this reason, we need to alter the Z-axis endstop. So that there is about one centimeter between the syringe and the heatbed.
After heating the heatbed, we start with printing. After completion of the printing, the batter is heated by the heatbed. Unfortunately the heatbed is not hot enough to get the batter well cooked. Wait until everything is solidified, and remove the pancake (with the baking paper) of the printer.
Put a little oil in an anti-stick pan, and place the printed pancake (baking paper above) in the pan. Wait until this side of the pancake is well-done. Now you can remove the baking paper and turn the pancake. Now wait until the pancake is cooked through.
Enjoy your pancakes with chocolate!
Step 9: Lego Digital Designer
For this instructable, I have made instructions in LEGO Digital Designer.

Runner Up in the
Epilog Contest VII

Runner Up in the
Edible Art Challenge

Participated in the
Remix 2.0 Contest


