

Introduction: 3D Printed, Ultralight, 3-axis Modular Time-Lapse Motion Control System


This is the story of my first 3D printing project and how it helped to drastically reduce the overall weight of my 3-axis motion control time-lapse dolly system for easier transport on multi-day backcountry, backpacking trips. Not only did my first 3D printing project shave serious weight (in comparison to aluminum) for hiking, it also fueled additional creativity that drastically increased overall system efficiency and incorporated new features for a better user experience. A majority of everything I designed and modified was originally inspired by the creative products from Dynamic Perception (the Stage One Dolly) and eMotimo (the TB3). Below, you'll find a quick outline of the design modifications and enhancement hacks along with a detailed story of the entire process.
If you're not familiar with time-lapse and motion control camera movements, you might want to check out some of my existing, free to view, online short films such as EYE OF THE BEHOLDER and MOUNTAINS IN MOTION to see what it's all about.
Overview (the moco system features):
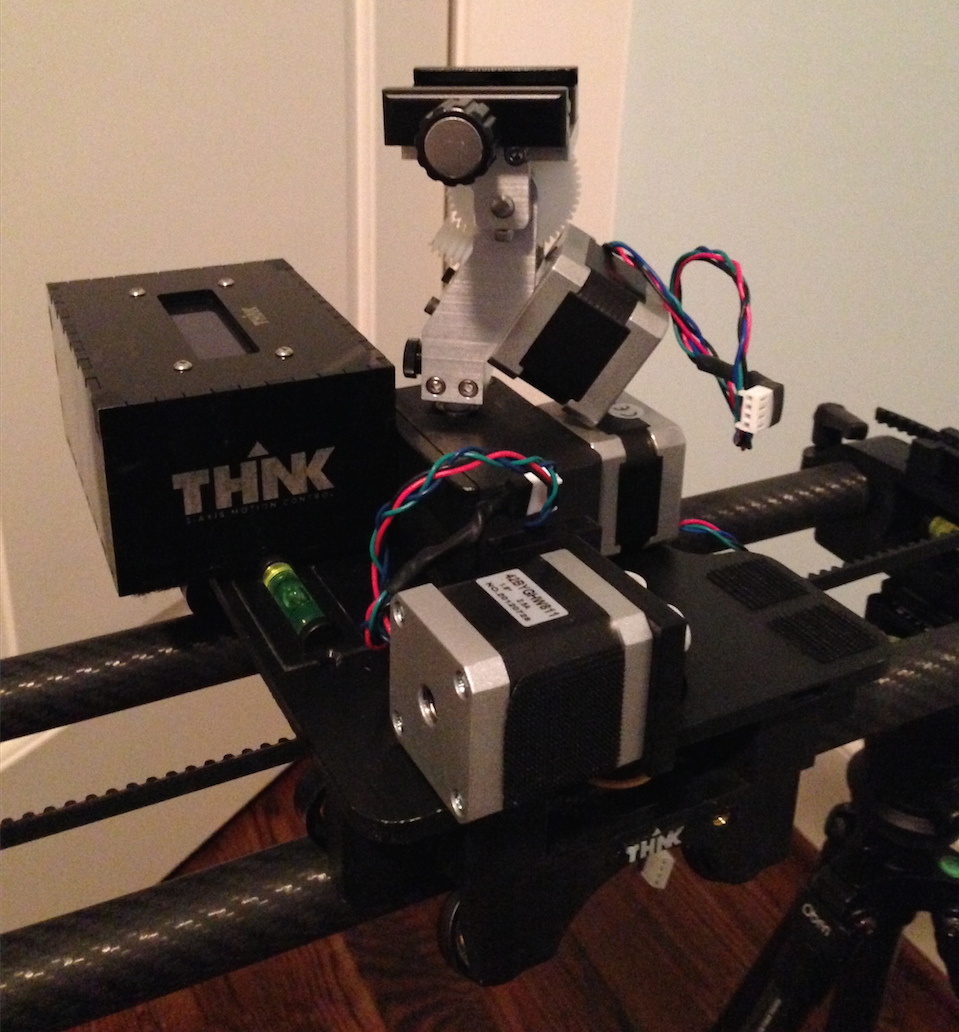
72" Carbon Fiber and 3D printed Nylon modular 3-axis motion control system with dolly / pan / tilt capabilities. Ultra lightweight and rigid thanks to the 3D printed design made from Polyamide-12 (nylon). About 50% lighter than it's aluminum big brother, the Dynamic Perception Stage One. My custom "hacked" Stage One design eliminated the frustrating threaded rail inserts with a simple clamp design. I also always struggled to accurately level the Dynamic Perception Stage One dolly on both ends (which results in wonky dolly movement) due to it's lack of built-in levels, so I designed torpedo levels to the end caps and cart-- visible from both sides for easier set-ups in unique angled and vertical positions. I'm getting much better results thanks to the levels.
20:1 worm drive (NEMA 17 stepper motor) for the dolly movement offers constant holding power, removing the need to keep the power-hungry stepper motor on to hold position in angled and vertical moves. This feature reduces power consumption and enhances battery run-time by over 10x!
Modular pan / tilt system with snap-in front panel and 50:1 worm drive. Uses a compact NEMA 17 stepper motor. TINY footprint, ultra-light, almost no backlash. Industry standard, Arca-swiss quick release clamp. Can be paired with the eMotimo tilt bracket. I added a knobbed bolt to the tilt bracket for easy on/off mounting during set-up and breakdown.
Custom designed, laser cut acrylic snap-fit eMotimo TB3 "stand-alone" controller hack offers unique configuration options and helps reduce the high center of gravity that is inherent in the standard eMotimo TB3 (causing potential issues in windy shooting conditions). Custom LiFEPO4 battery system offers superior results in cold weather and high power draw (i.e. real-time video moves) situations over the more commonly used Li-Ion chemistry.
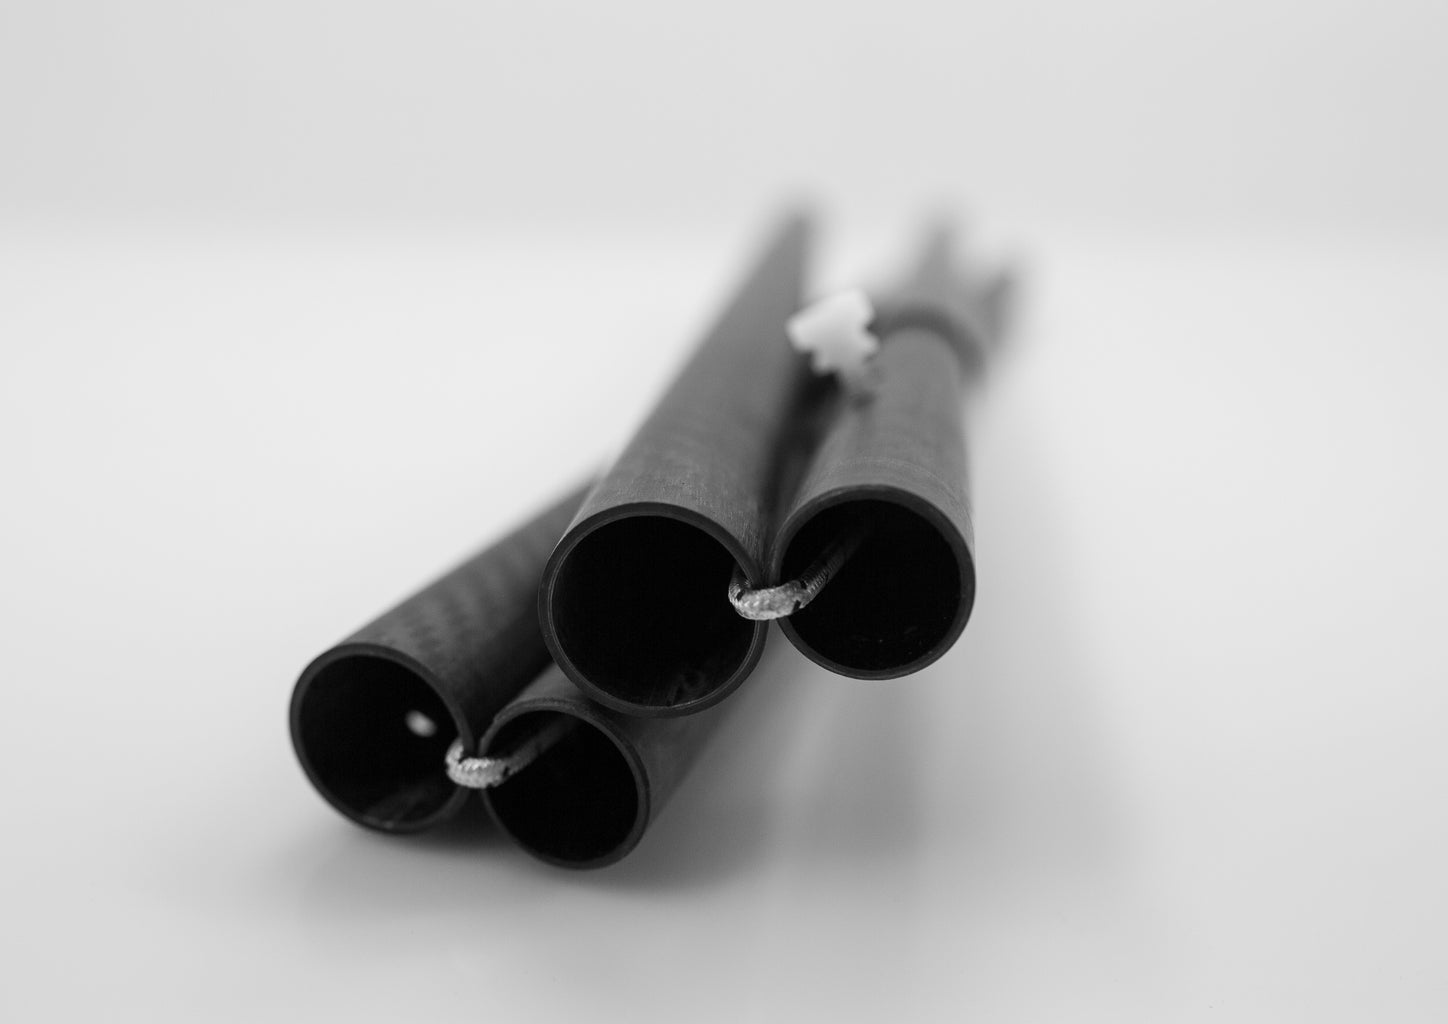
Custom 1" Carbon Fiber tubular sections create the dolly track for easy transport and superior strength / weight reduction in the overall system. Features custom designed 3D printed "connection" inserts with brass thermoplastic insert threads and glass-filled nylon bolts to securely join the segments without any rotational play between sections. Shock-coord design makes initial set-up a breeze and functions the same way a tent pole works.
Lightweight hardware: Some small, supporting hardware was custom designed and 3D printed to cut weight (i.e. bearing rollers). A few metal components are used where necessary (drive shafts, pulley, ball-bearings), but all other bolts are made from glass-filled, high-strength nylon for major weight reduction. 6 nylon 1/4-20 1" bolts weight the same as 1 aluminum equivalent. I also cut weight with a slightly shorter (5mm vs. 9mm) drive belt than what is standard from Dynamic Perception.
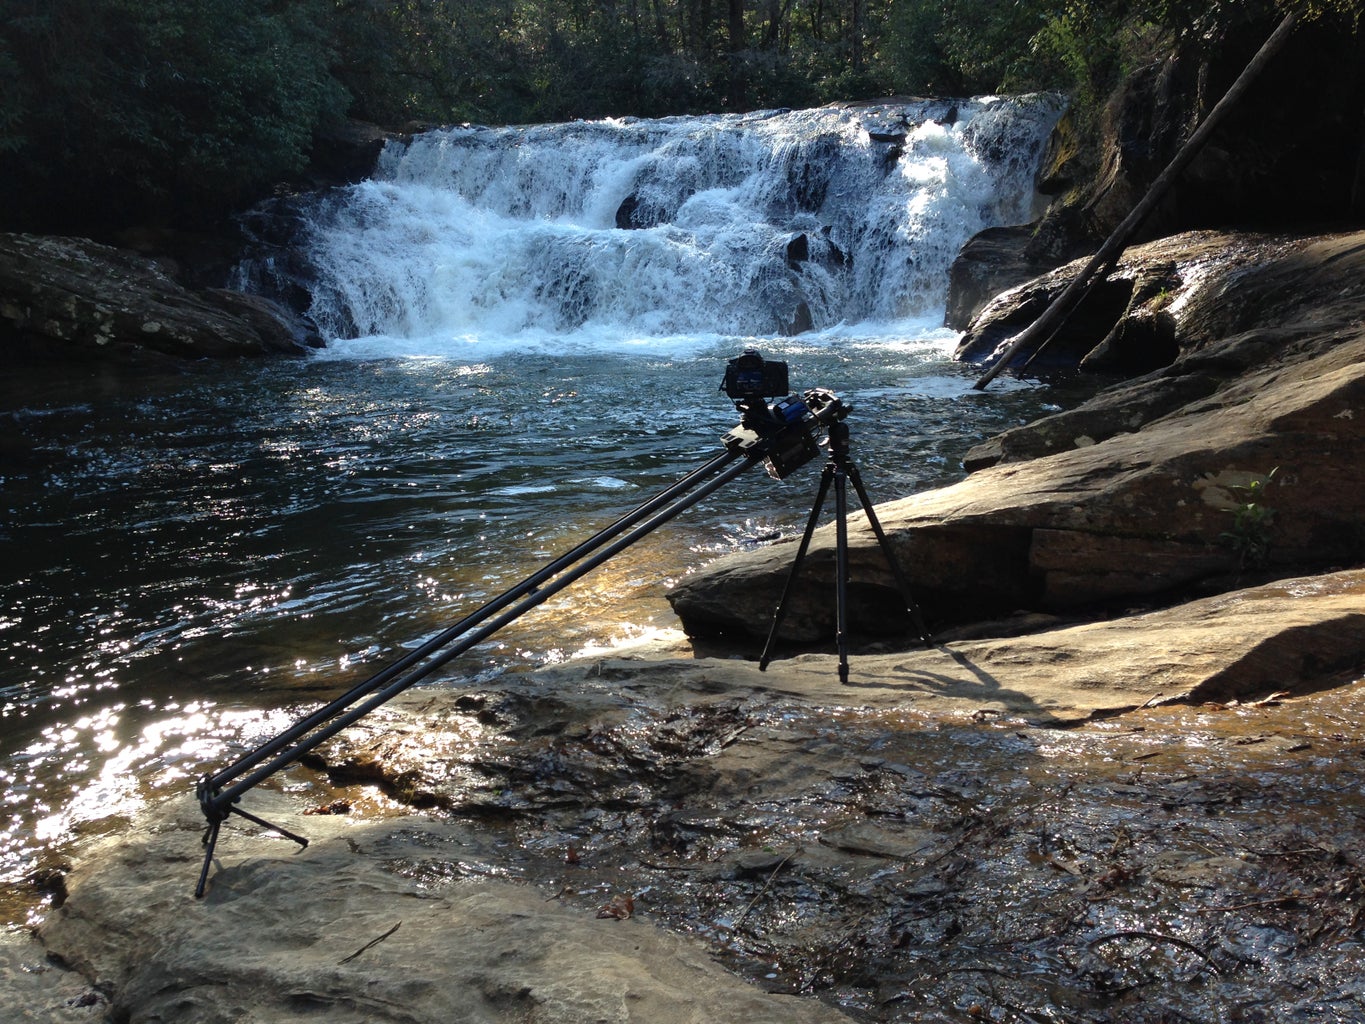
Test Footage from this rig can be viewed 3D printed Moco Test Shots on Nimia (UpThink Lab).
Step 1: The Early Beginnings


In June 2013, I was hard at work (in my free time) shaving weight from my aircraft grade aluminum time-lapse motion control dolly system - the Dynamic Perception Stage One and the eMotimo TB3 - to make backcountry time-lapse cinematography more convenient by shedding weight and trimming any fat. I had an up-coming trip planned to the High Sierra with my wife, Karen, and I didn't want my heavy camera gear to hold us back. The existing rig was designed and built by Dynamic Perception and eMotimo, both small companies bringing high quality equipment to the DIY user at affordable prices and with open-source coding philosophies. Both companies produce rock solid gear that has contributed to revolutionizing the time-lapse industry in recent years. While I was extremely satisfied with my existing equipment that was relatively lightweight, I started to dream of an even lighter system.
To cut back on weight for the backcountry wilderness, I decided to take a hacksaw to my perfectly good equipment and begin to hastily chop them up. When I maxed out the ability to hacksaw away anymore weight, I shifted to cheese-plating parts on a drill press in my basement. At this point in time, I'm fairly positive my friends and fellow time-lapse colleagues thought I was crazy to hack apart gear that costs several thousand dollars simply to shave a few ounces. On the flipside, anyone who hikes long distances with their camera equipment and motion control system surely knew why it was worth my efforts and could relate. I eventually got the existing system as light as possible-- about 1lb lighter than stock weight. It was at this point, I hit a dead end without any additional options to truly shave enough weight to make a BIG difference on my backcountry shoot excursions. At the time, all of that aluminum shredding was enough to make a difference during the trip to California to shoot the short film, EYE OF THE BEHOLDER. As months passed, I found myself contemplating the system design for a better solution. I decided to hire a local machinist in Atlanta to mill the Dynamic Perception Stage One for further weight reduction. We chiseled away at the end caps, added mini bubble levels, and added a stamped aluminum insert to remove the C-stand mount that didn't fit my needs (this allowed us to re-tap a 1/4 20 thread dead center). After a few weeks of on and off again work (the machinist was helping me on the side) we only shaved 8oz. Not worth the effort or cost, so I was back to the drawing board. I needed a new solution that eliminated aluminum altogether and didn't rely on high end equipment that was inaccessible without high cost. Could 3D printing be the answer?
Step 2: 3D Printing!


In December 2013, I discovered the selective laser sintering 3D printing technique. After researching the SLS process in my spare time and learning how easy and affordable it was to use with companies like Shapeways and i.Materialise, all of the limitations that had previously kept me away from DIY 3D printing technology quickly vanished. High-quality 3D printing was actually an affordable and viable solution with access to the high-end, EOS SLS technology!
I researched materials and eventually concluded that I could completely redesign (by partially reverse engineering my existing gear from DP and eMotimo) the entire dolly system from scratch on my personal computer with Maxon's Cinema4D and 3D print it with Polyamid-12 (nylon) to shave serious weight while maintaining a very rigid system that could withstand the stresses of being in the backcountry during multiple days of time-lapse shooting. I was really excited about the potential of this approach, but I knew a lot of work was necessary to achieve my goals. I didn't waste anytime and got started right away. The December holiday break was a few days away and I was scheduled to travel to beautiful, upstate New York to visit my wife's family for 2 weeks. I was way too excited about the possibilities with 3D printing to wait until January 2014 to begin my work. I decided that the solution was to sneak away with my laptop whenever time allowed during my visit with the in-laws. I managed to redesign the entire dolly in 3D and add various enhancements to maximize the overall system and escape design limitations in the existing, purchased equipment. This included integrated torpedo levels, tension based carbon fiber rail connections on the end caps of the dolly track, and multiple DC/Stepper motor mount configurations on the dolly cart. I was finally ready to place my order with Shapeways to print the first (and hopefully the last) "prototype". Unfortunately, I was in Sullivan County New York without internet access! After convincing my loving and understanding wife that I should make the drive into town to gain internet access at a local coffee shop, I was on my way to place the initial order.
Yikes! Due to the large build size of my design, the cost was north of $400 for just the dolly cart and end caps. Very expensive for my FIRST EVER 3D print and this cost excluded all the other hardware I still needed to purchase for final assembly. I probably should have started with something really small to learn the 3D printing process, but I was already too deep to hold back! I cautiously double checked all my design measurements and sipped a soy latte. With my fingers crossed, I placed the order with Shapeways and didn't look back. When I arrived home to Atlanta after the new year, the prints were waiting on my doorstep! This was just the beginning...

Step 3: The Initial Assembly


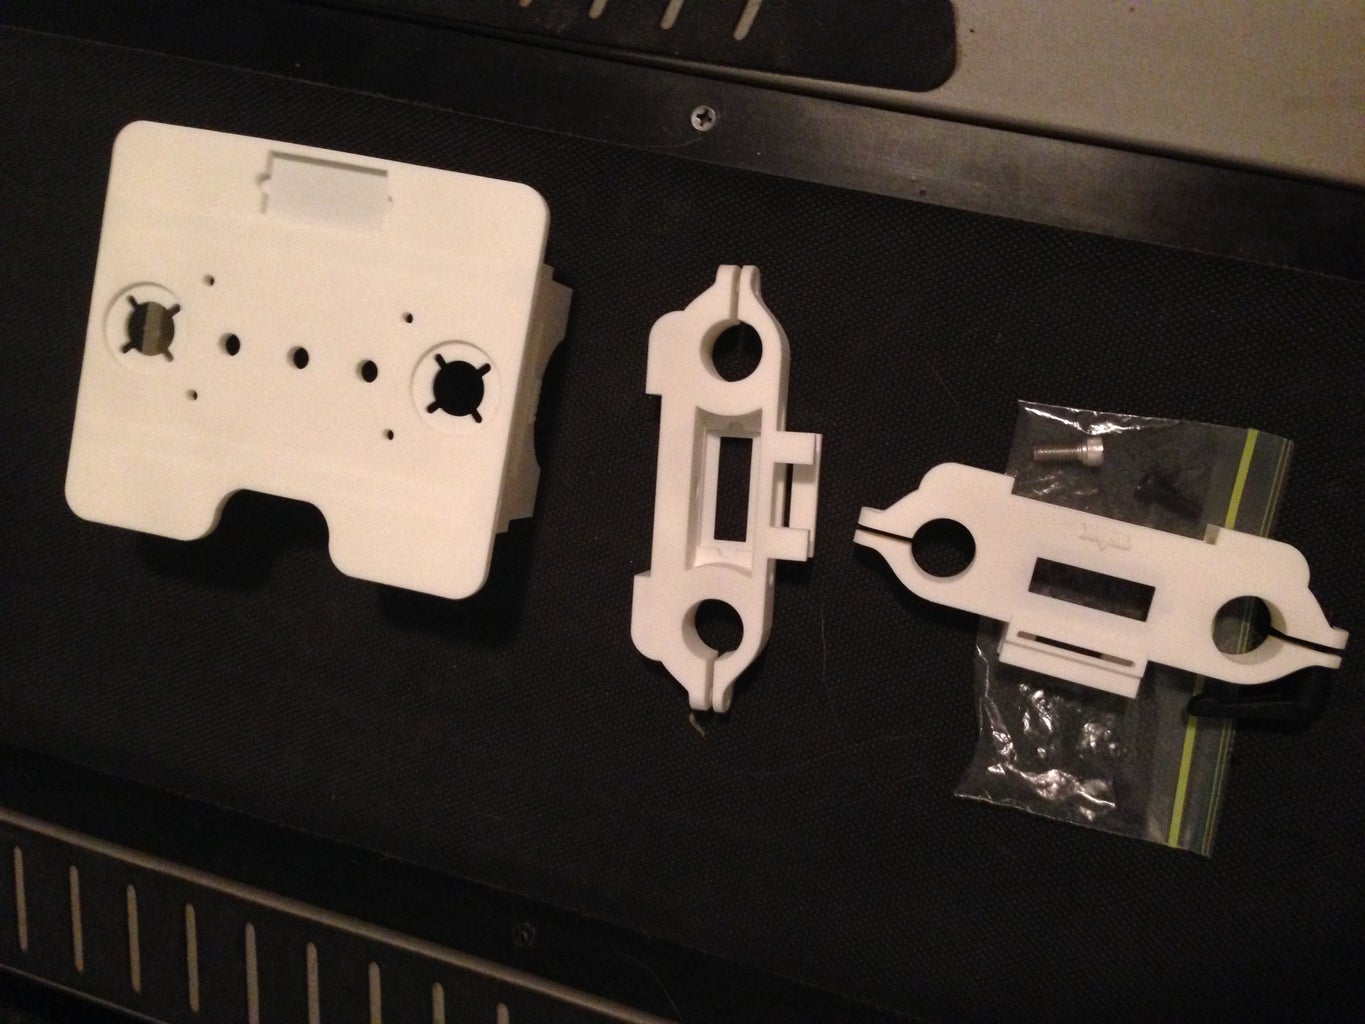
With the initial SLS Nylon prints in hand, I was ready to begin assembly. This started with brass thermoplastic inserts I had previously ordered. Incase you're wondering why this is necessary, let me provide some additional insight. The 3D printed nylon is crazy durable and not brittle, so the chances of it breaking is slim to none. However, tapping threads in 3D printed nylon isn't going to provide reliable use when looking at the big picture of long-term reliability. The brass thermoplastic inserts are the solution. They are melted into the nylon with a soldering iron. Once inserted, they will not rip out unless the nylon is heated up to 800 degrees to loosen the nylon that grips the diagonal ridges covering the exterior of the insert. The ultra lightweight 3D printed objects now have threaded holes that are metal just like my heavier aluminum equivalents. This ensures reliable and sturdy connections to assemble the entire system and safely support several thousand dollars worth of D-SLR equipment.
Since I didn't completely know what to expect with my first 3D print at the time, I was worried that the large, flat surface of the dolly cart might warp. To avoid this, I designed the platform to be 1/4" thick. Additionally, I added two 6" long, 1/8" wide hollow insert chambers. I planned to install lightweight 1/8" aluminum strips inside these chambers for added rigidity and to prevent any possibility of warping in the future. Luckily, when the print arrived, the platform was unwarped (a benefit of SLS printing) and very rigid, so the 1/8" aluminum support beams might not have been necessary, but I went ahead and installed them anyways. Complete peace of mind with a small weight footprint! After installing the 1/8" aluminum internal support beams, I had to seal the slightly porous nylon to prevent condensation and light rain from absorbing into the material (potential for major problems in the wilderness). I did this with acrylic black paint (brushed on for durability since compatible, flexible acrylic spray paint doesn't seem to exist) from a local hobby store along with a clear coat for added protection. This was extremely tedious! I learned from this experience and started to use a new technique on all future 3D prints that involves dying the nylon black and sealing with a clear coat to prevent the tedious acrylic paint job. Now, all that was left to complete the system was some carbon fiber track, modified eMotimo TB3 controller utilizing a stand-alone design and some worm drives.
Step 4: The Carbon Fiber Rail System


Inspired by the Dynamic Perception design, I devised a modified 1" carbon fiber system that excluded the threaded aluminum connections. The design utilized 11.75" CF ferrule connections epoxied within the 1" tubing. After shopping around, I ended up ordering everything from Rockwest Composites in Utah (highly recommended, excellent customer service and superior products). Rylan at Rockwest assisted with "snap" connections and shock cord (like tent poles) to hold the segments together at each ferrule connection point. They also handled the ferrule bonding so I didn't have to shoulder the expense to purchase all the necessary materials to do it myself. This overall design seemed brilliant and worked well, but it did suffer from rotational play between each segment. After some thought, I came up with a solution that involved more 3D printed parts! I designed a inner mount that used a threaded 8-32 brass thermoplastic insert. I drilled and tapped 8/32 threads on the CF ferrule connections and used a nylon bolt to securely join each segment without any rotational play. Perfect solution! Unfortunately, just like tapping (threading) 3D printed nylon parts, you cannot reliably count on threaded CF to not strip after extended use. This is where the 3D printed inserts save the day. The 3D printed mount, printed by Shapeways, with brass threaded insert fits snuggly into the carbon fiber ferrule and locks in place with some expanding Gorilla glue offering a reliable thread to securely join the segments together that will not strip.
Step 5: The Multi-Axis Controller
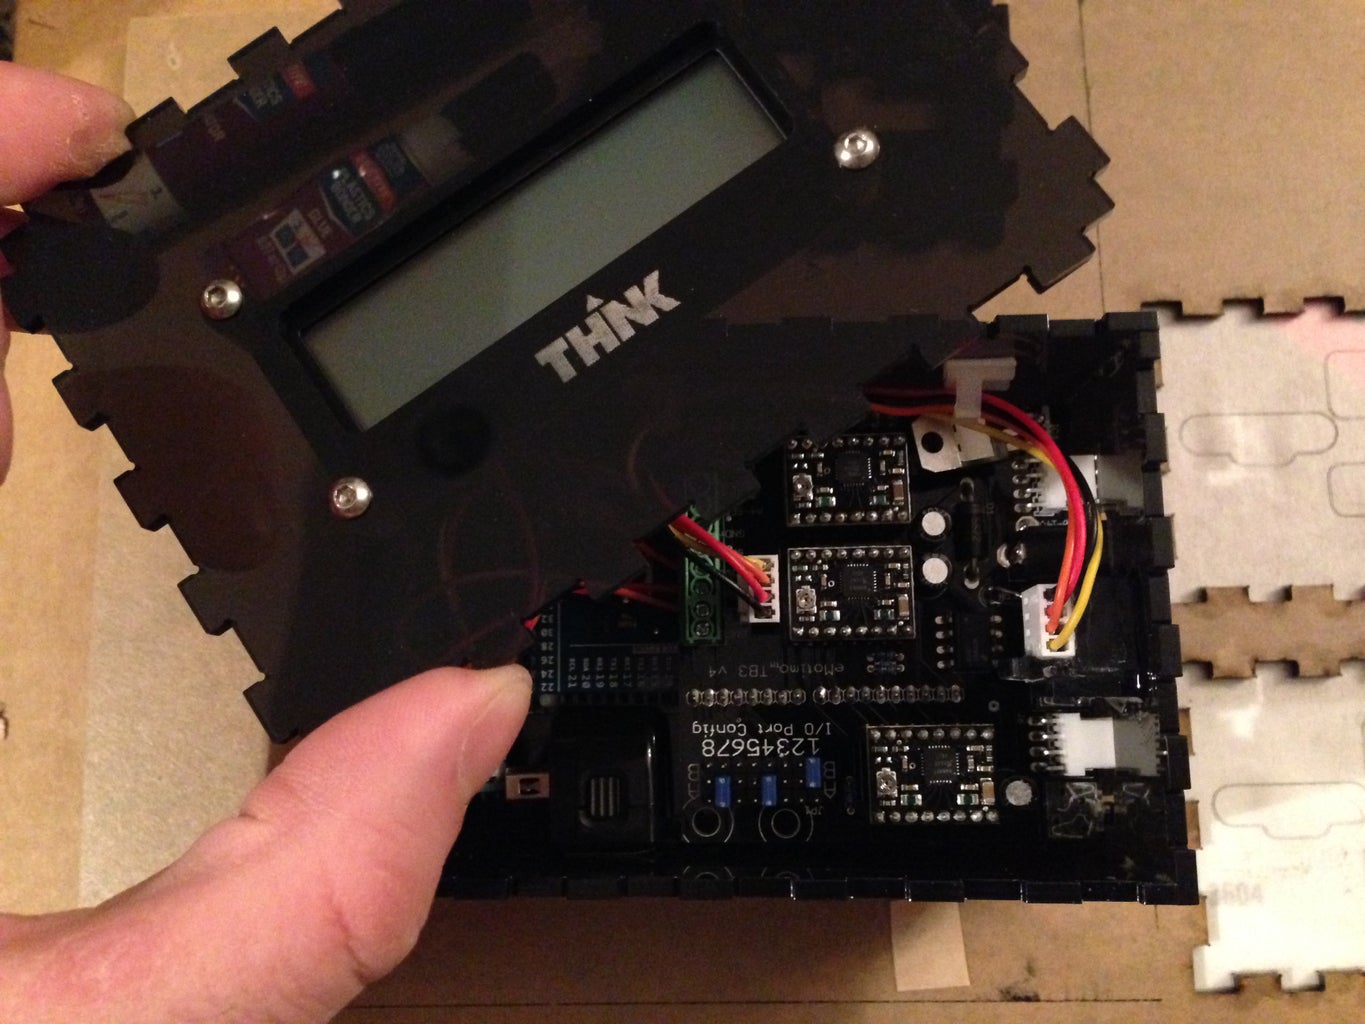
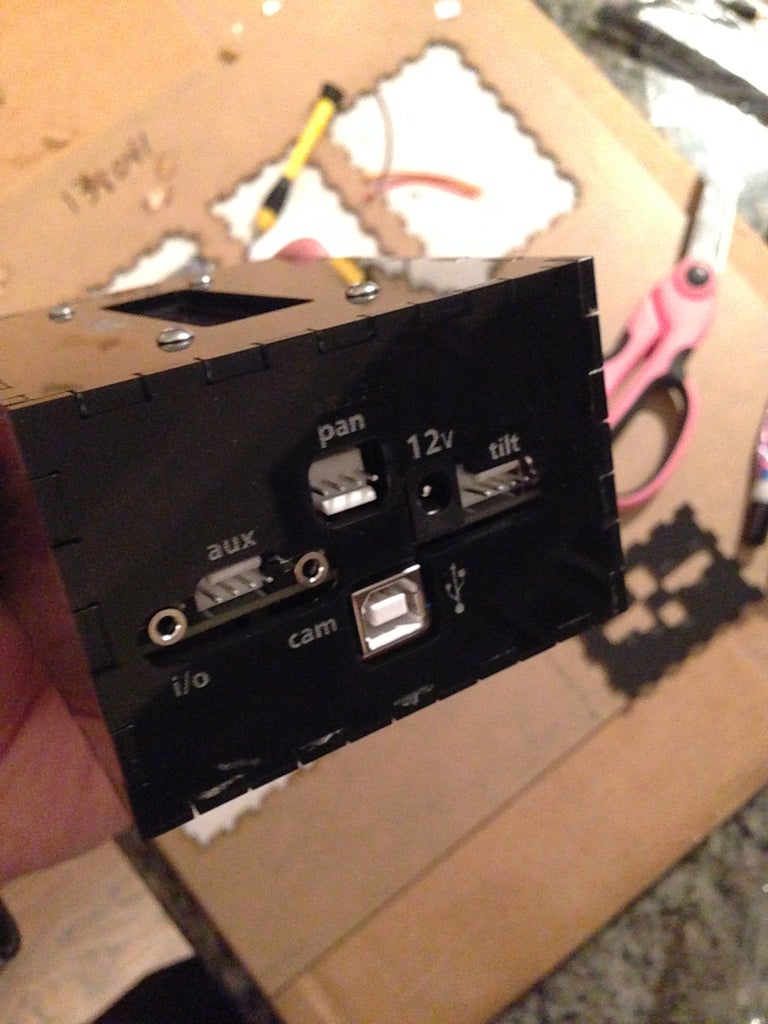

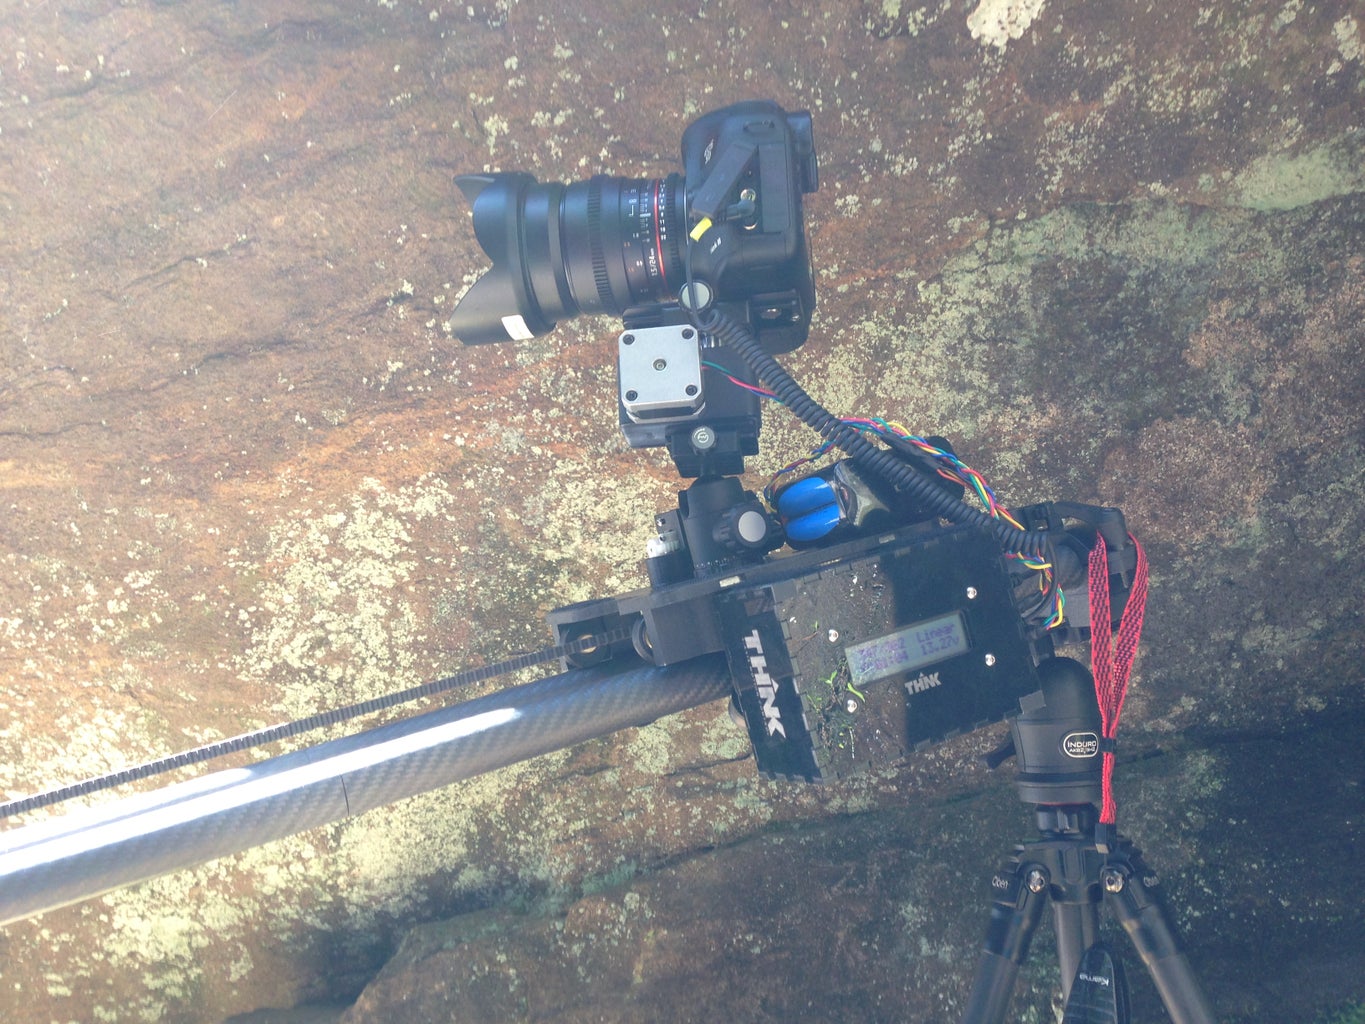


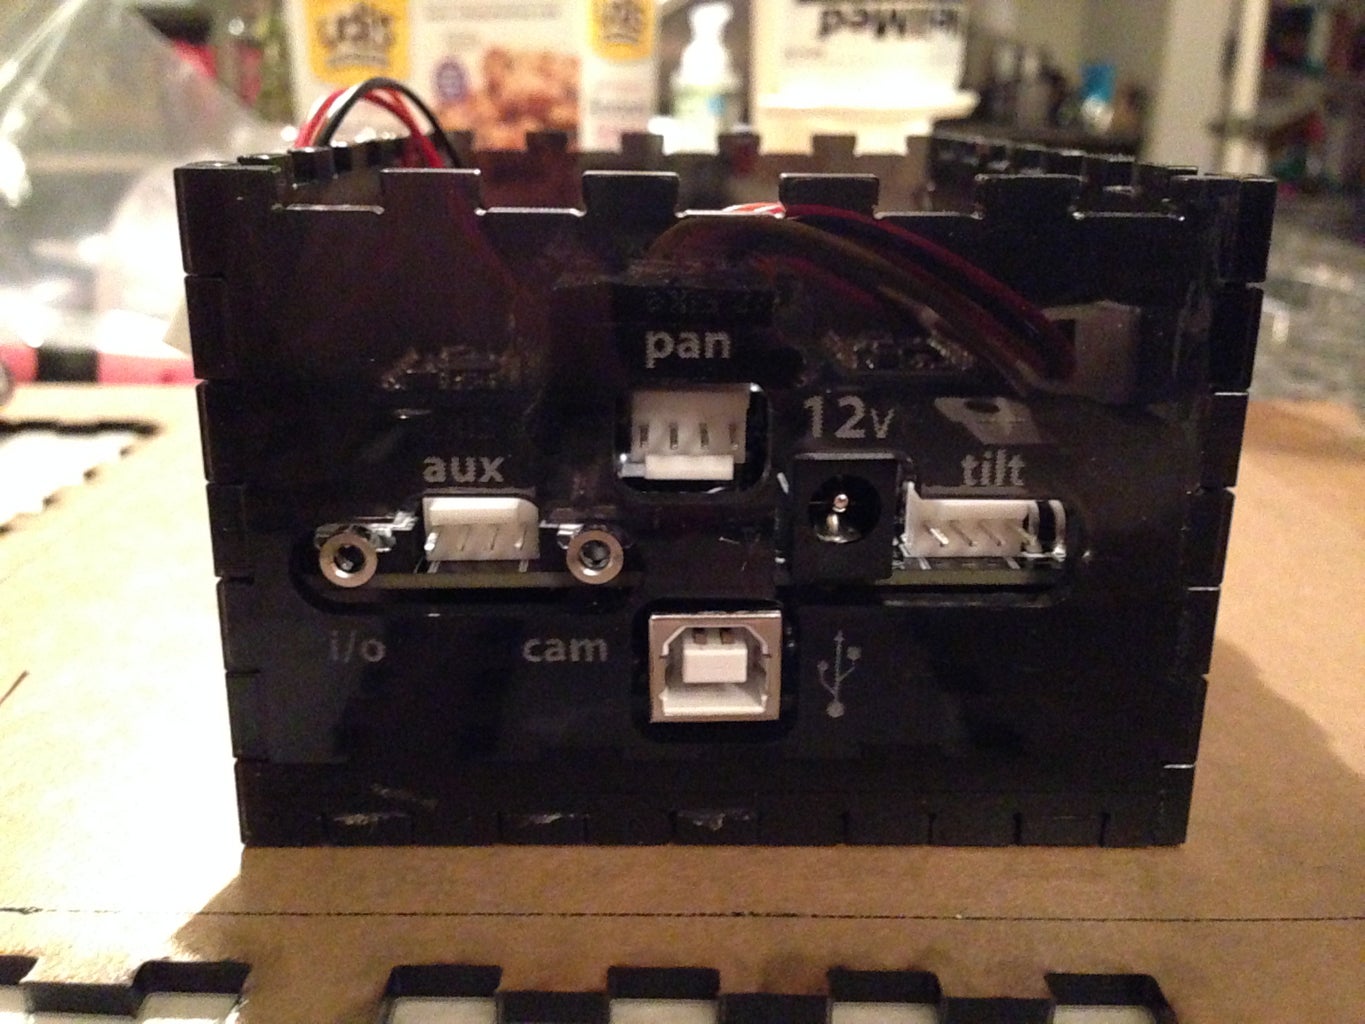
For the stepper motor controller, I decided to try something new. 3D printing had worked miracles on the first attempt, so I figured it was time to try my luck with acrylic laser engraving / cutting. I obtained the Arduino internal guts that make the open-source eMotimo TB3 pan/tilt unit so user friendly and amazing to shoot with and refit them to a custom enclosure design. This included relocating the internal, unaccessible 3rd axis port for exterior access. Anyone with an eMotimo should understand why this was necessary, if not, feel free to send me a private message and I'll be glad to explain. I designed the snap-fit enclosure in Adobe Illustrator and had it laser cut and engraved by Ponoko online. The acrylic sheet arrived with my laser cut and to my surprise, everything fit as expected. I assembled the Arduino components and relocated the internal 3rd axis port with some jumpers, epoxy, and an acrylic support mount. Now I had the amazing power of the eMotimo in a standalone controller for added flexibility, modularity, and lower overall weight. To compliment the stand-alone controller, I started to learn how to write Arduino sketches (I'm not a coder!) so I could add additional functionality to the already brilliant, open-source eMotimo code. This included the ability to turn the LCD backlight on/off with nunchuck button combos during time-lapse sequence run-time to conserve battery power along with a few other power saving and user enhancements.
Step 6: Modularity: Worm Drives


While most of the 3D printed design was initially inspired by my original equipment from Dynamic Perception and eMotimo, I did design a few semi-original hacks to further expand the complete motion control system. After seeing an article on snap-fit 3D parts posted by Shapeways, I devised a strategy to incorporate them into a removable panel on a modular pan axis worm drive. After designing the pan module in Cinema4D, I had it 3D printed and dyed black. Once it arrived to my house in Atlanta, I installed the worm drive components from SDP-SI and ServoCity. The pan module uses a 50:1 worm drive for precise movement with an ungeared NEMA 17 stepper motor. The snap-fit panel worked perfectly. Beginners luck???
Next up, I found myself problem solving power saving techniques for remote, backcountry dolly shots that required angled or vertical movements. With a standard, off the shelf planetary gear and NEMA 17 stepper motor (i.e. 27:1 ratio) the dolly was capable of moving vertical and at other angles, but there was a catch! The planetary gear didn't have any "holding" power to hold the weight of the cart and D-SLR camera unless it was fed constant power. This might not seem like a big deal, but constantly feeding a stepper motor power (12-14v in my case) during a time-lapse that might run for 4-5 hours is a major power sucker. If the battery dies mid shot or the power cable is accidentally disconnected, the entire rig will crash to the ground! Constant power to a stepper motor will suck all the juice out of a battery in no time...guaranteed. I found that lithium-Ion batteries lost power the quickest while I got better results using LiFePO4 (Lithium iron phosphate), but there was no way to avoid how much power the NEMA 17 stepper motor would consume to retain the necessary holding power on angled and vertical shots. My solution came in the form of a 20:1 worm drive that I designed and 3D printed. A worm drive is advantageous to a planetary gear because it has holding power at all times-- even when the stepper motor is not powered. This means the stepper motor driver can safely turn off in between shots to conserve battery power. I went through two 3D printed prototypes before I started to get really good results with the 20:1 dolly worm drive, but it was well worth the time and effort. After all, I had already managed to make it through most of the other design phases with minimal R&D iterations which saved me a lot of money in overall production costs. The new dolly worm-drive saves so much battery power on shoot-move-shoot movements that it offers 10x battery life increase. This results in less weight to carry into the backcountry because I can pack less LiFePO4 batteries.
Attachments
Step 7:


Thanks for taking the time to learn about my pursuit to shave weight and enhance functionality and battery consumption for remote, back-country time-lapse cinematography. I'm willing to consider sharing all of my source files so you can build you own ultra-light moco rig, but out of respect to the original manufacturers (Dynamic Perception and eMotimo) I'm not posting the source publicly. My build does cost slightly less than buying the heavier, unhacked gear from the original manufacturers but it is a time-consuming process that requires experience and various tool and part availability to achieve a final, working system. All of the hacked feature benefits alone are worth the effort, in my opinion, but it's simply a matter of time before eMotimo and Dynamic Perception offer their own "official" solutions to the masses. Due to the complexity and time required, I don't recommend doing a custom build like this yourself unless you absolutely need the lightest possible moco system for hiking and mountaineering oriented time-lapse shooting. Private message me if you're still interested and I'll try my best to assist.
To keep an eye on how I'm using the 3D printed motion control system, you can follow me on Facebook - Doug Urquhart and Instagram - Doug Urquhart and The UpThink Lab. For more info on my time-lapse offerings, please check out my site.

Grand Prize in the
Gadget Hacking and Accessories Contest


