

Introduction: 3D Printing Guide


Welcome to your own personal 3D printing encyclopedia! In this section we'll cover the following:
1. Additive Manufacturing Technologies
We start by identifying the different 3D printing technologies available to makers, discussing the pros and cons of each method.
2. 3D Modeling Methods
There are several different methods of 3D modeling, which we'll define here.
3. Prepping and Slicing Software
In this section we'll go over the different options for slicing software.
4. Entry Level Manufactured 3D Printers (FDM)
Next, we go over some good options for entry-level 3D printers, hopefully helping you decide which one's best for you if you're still on the fence.
5. Service Bureaus
In this section, we'll go over some of the outsourcing options available to anyone with an internet connection and a shipping address.
6. Finishing Methods
Finally, we'll explore some of the finishing methods that might be useful for 3D printed parts.
Step 1: Additive Manufacturing Technologies
3D printing is a kind of computer controlled additive manufacturing. It works by taking a digital 3D model, translating it to a series of horizontal slices in machine language, and building the model in three dimensions using a number of different technologies.
Extrusion Technologies:
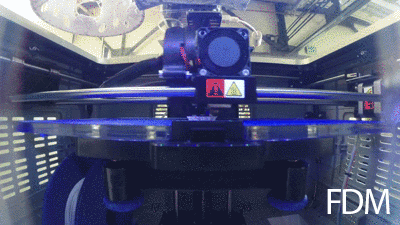
FDM (Fused Deposition Modeling) / FFF (Fused Filament Fabrication): This process uses a nozzle that extrudes a heated medium in a liquid state onto a build platform (one slice at-a-time). The extruded material cools instantly into a hard material that the next slice is built upon. Think of it as a hot glue gun on a mechanical gantry; the glue gun draws a shape on the platform in 2D, then moves up one level (slice) and draws the next 2D shape. Stacked on top of each other, the slices form a complex 3D shape.
- Pros: Inexpensive material, durable, variety of machine and material manufacturers.
Cons: Low resolution, slow build speed, failures on overhanging features.
Light Polymerized Technologies:
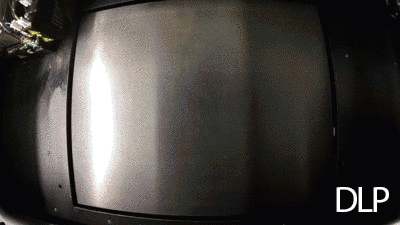
DLP (Digital Light Processing) / SLA (Stereolithography): This process covers a range of different printing types in which a liquid medium is laid down on a build platform in successive slices (in much the same way an inkjet printer prints). The layers are hardened with UV light, and successive layers are built upon each other. Many DLP printers, such as the Objet series by Stratasys, print a soluble support material along with the hardened resin in each slice, effectively encasing the finished print. This ensures a perfectly smooth surface and eliminates the need for support structures.
- Pros: High-resolution objects, overhanging features are a non-issue.
- Cons: Limited build areas, low durability, high cost.

Powder Bed Technologies:
SLS (Selective Laser Sintering): This technology uses powder as a medium, such as metal. A laser heats the powder slice-by-slice, building a solid piece out of sintered metal.
Pros: High durability in the case of metal, many desirable properties of metal objects. Smooth surface finish with little evidence of slicing.
- Cons: High cost, no desktop machines yet available, low durability with plaster objects.
SDL (Selective Deposition Lamination):
This technology builds a full-color 3D object by inkjet printing on single sheets of office paper, layering them on top of each other with glue, and cutting the shape of each slice out with a drag knife. The resulting 3D objects have 360º X 360º color.
- Pros: Full-color objects, inexpensive material.
- Cons: Brittle finished parts, parts have low durability.
This is not an exhaustive list. New technologies are being developed all the time, and there are other commercially available technologies that aren't mentioned here. These are only the most common technologies, and therefore, a good place to get started.
Step 2: 3D Modeling Methods

Direct Modeling:
Direct Modeling is simply the process of creating a 3D model through the process of manually altering a 3D object using a number of different geometrical creation and manipulation techniques. The types of modeling geometry most commonly used in direct modeling are below.
Solid Modeling: Within solid modeling software, 3D objects are treated as solid objects as opposed to hollow shells. This type of modeling is very useful for designing 3D objects that are (for the most part) ready to print on a 3D printer. Solid modeling helps the user avoid model issues such as walls that are too thin for the printer to build, and holes in shells that can cause printing errors.
Solidworks and Fusion 360 are two high-quality programs that offer solid modeling.
Polygon Modeling: This type of modeling treats the 3D object as a hollow shell with discreet flat facets made up of edges and points. Polygon modeling can be useful for sculpting objects quickly and designing objects with flat faces.
Maya, Blender, and 3DS Max are some of the most popular programs for polygon modeling.
NURBS Modeling: NURBS (Non-Uniform Rational Basis Spline) modeling is a type of modeling that uses control points to affect a curved surface. In a polygon model, the control points are directly attached to the model surface, making for straight edges and facets. In a NURBS model, the control points are not directly attached, therefore moving a control point will cause the surface to distort smoothly in relation to the points.
Maya and Rhinoceros are two of the most popular programs for NURBS modeling.
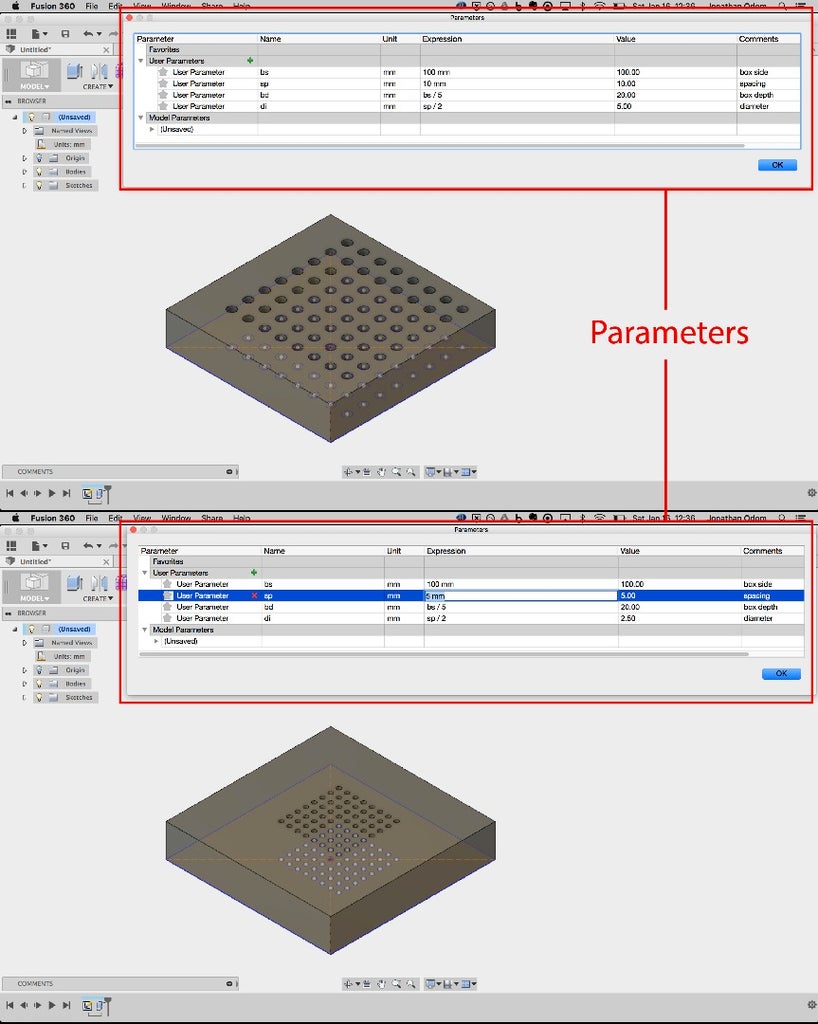
Parametric Modeling:
Parametric Modeling is the process of creating a 3D object through the use of parameters. This method is usually mixed with direct modeling to some degree, but objects can also be designed exclusively through parameters. Parametric modeling can be done using any kind of 3D geometry.
In Fusion 360 or Solidworks, parameters can be as simple as a variable representing the diameter of a hole in an object. Using a global parameter allows the user to change the value and have this hole diameter change in every place it occurs in a model.
In Maya, the user might write a complex Python script to create a complex object with little or no direct modeling. Rhinoceros has an open source companion called Grasshopper that gives the user a graphic interface, allowing her to visually design the parameters as a series of functions and links.
Openscad is an open-source parametric 3D modeling program that uses solid geometry. From the company's site: "OpenSCAD is not an interactive modeler. Instead, it is something like a 3D-compiler that reads in a script file that describes the object and renders the 3D model from this script file. This gives you (the designer) full control over the modeling process and enables you to easily change any step in the modeling process or make designs that are defined by configurable parameters."
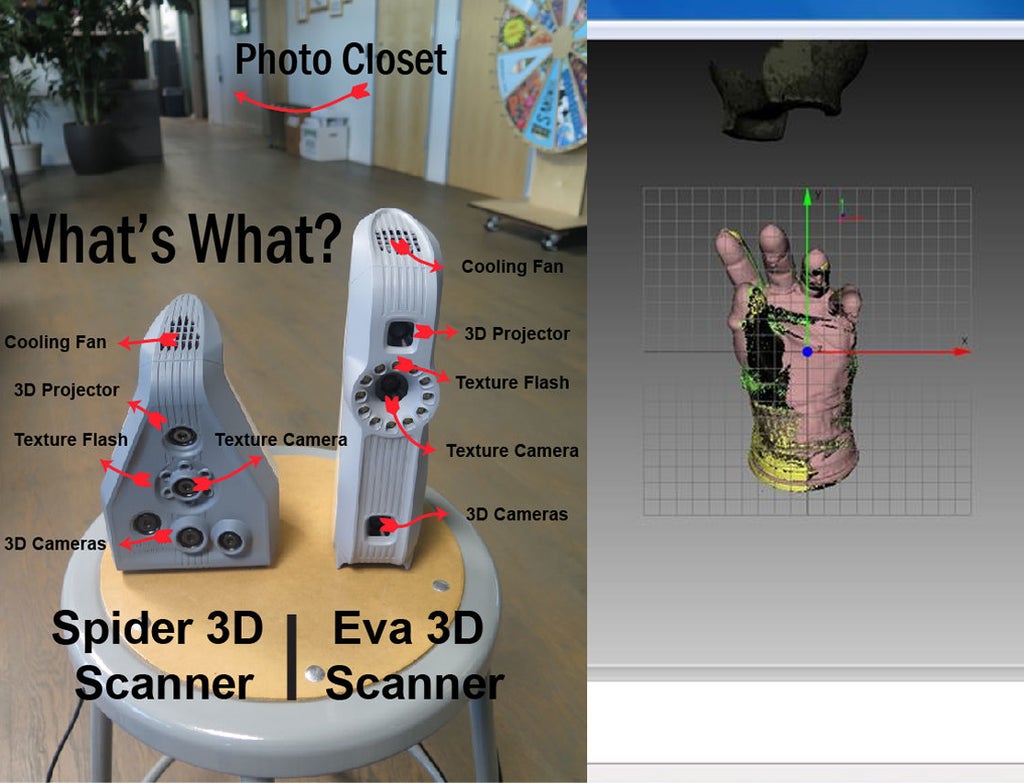
3D Scanning:
3D scanning describes a process by which a physical 3D object is digitized as a complex polygon model within a 3D modeling environment. There are many tools and methods available for 3D scanning, but generally the scanning process involves digitizing a 3D object or space as a series of points that are assembled later as a polygonal object of high complexity using infrared, laser, or physical contact.
Because scanned objects have such a high level of complexity when brought into a modeling environment, they are very difficult to manipulate in the way one would manipulate a model that had been constructed directly or parametrically.
We won't go over 3D Scanning in this class. Check out these instructables if you're interested in the method.
Step 3: Prepping and Slicing Software
Preparing / Repairing
Certain kinds of 3D modeling require the model's mesh to be repaired before it can be printed. Artifacts like holes in the surface and reversed polygon normals typically come from 3D scanned objects and models created using polygon modeling software. Thankfully if you're solid modeling in Fusion 360 the way we've been covering in this class, you don't have to worry about these things.
If your models won't print or your slicer tells you there's an error in the file, just bring it into Meshmixer or Print Studio and use their auto-repair tools.
Choosing a Slicer
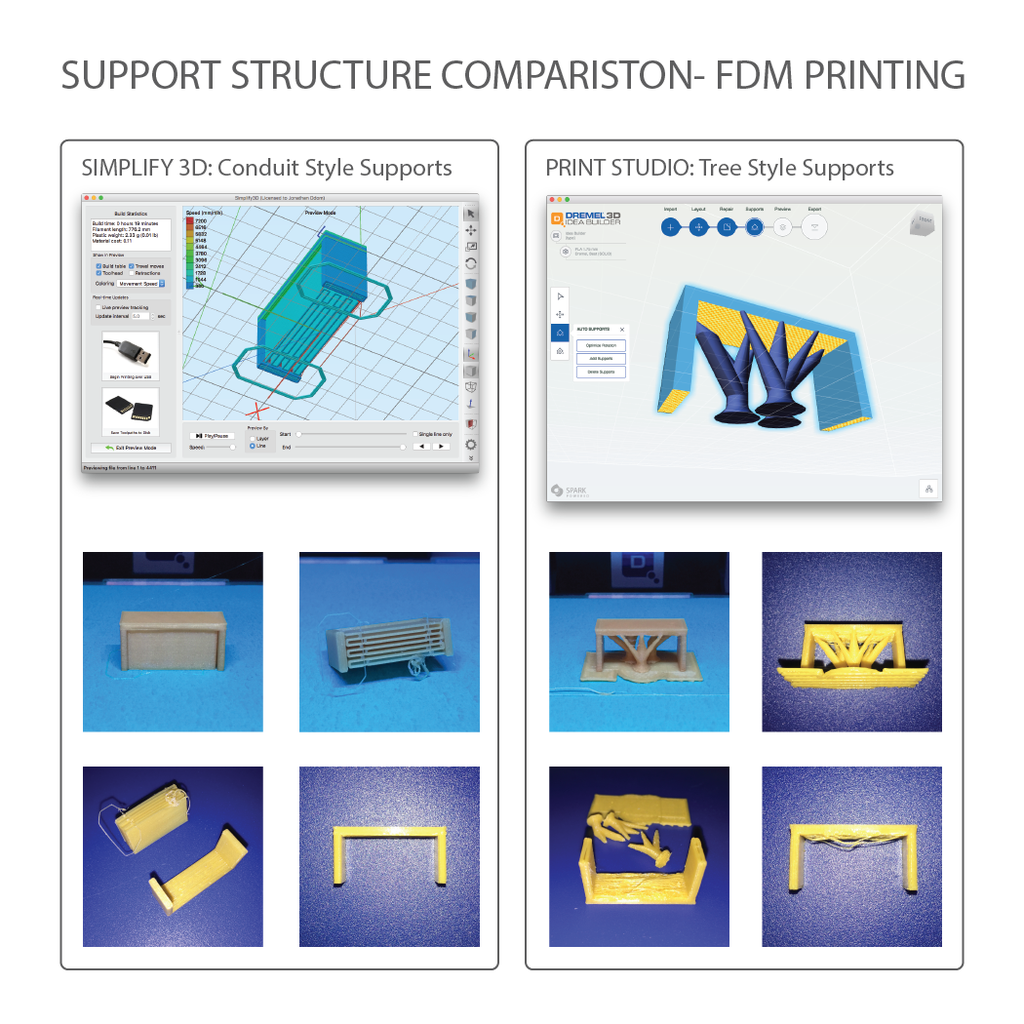
There are lots of Slicers to choose from. They vary widely in price and quality, but it's important to understand that this a crucial part of the 3D printing pipeline when it comes to quality. The slicer creates the instructions for the 3D printer and can generate models that are full of holes and irregular surfaces or fail altogether. A good slicer will give you excellent results when calibrated properly, so it's worth it to pay for a good one if the free versions don't work for you. Maker's Muse's review of 2016 Slicing Software shows the same results I've found- Simplify 3D produces the best results, hands-down.
Slicers not only create the machine code for the 3D printer to follow, they create the support structures. Slicers like Meshmixer and Print Studio are free and produce generally great results with easy UIs, but at the moment, they only work with tree-style support structures. These types of structures work very well for DLP 3D printers, but if you've got any kind of significant overhang in a model printed on an FDM machine, you need parallel wall type support structures.
MakerBot's software has these kinds of supports, but their software only works with their machines. Cura by Ultimaker has these kinds of support structures and it's free, but I find the software to be difficult to use and the results are poor for me.
Simplify 3D costs $150, but it's incredibly easy to use and has produced flawless prints every time I've used it. Not only are the surfaces smooth and accurate, the support structures snap off effortlessly and require practically no cleanup. You've already spent money on a printer, just put in the extra $150 for Simplify 3D and get the best results possible.
The guys at Print Studio are working on these kinds of supports, so hopefully later this year I'll be able to recommend this free software.
Step 4: Entry Level Manufactured 3D Printers (FDM)
If you don't already have a 3D printer, here's a great page by Make Magazine. They review a number of popular 3D printers and break them down by price and overall score. The Dremel used in this class is somewhere around the middle with a score of 28 (the highest score on the list is 35) and a price tag of $999 (the highest cost on the list is $3975).
The Printrbot Simple got the same overall score as the Dremel, but it scored much lower in Dimensional Accuracy and Overhangs. These are the most important categories for me because I use 3D printing to make mechanical assemblies. If your printer has issues with dimensional accuracy and overhanging features, you're going to have a really rough time making assemblies that work properly.

Terminology
- Axes: X, Y, and Z. X and Y are the dimensions in which an individual slice is built, Z is the vertical dimension.
- Build Platform: The base on which the object is built.
- Build Volume: The maximum dimensions in which an object can be printed.
- Extruder: An assembly consisting of a stepper motor, a heating element, and a print nozzle. The stepper motor draws the filament into a heated core and through a print nozzle. The heating element brings the filament to a consistent temperature that allows the melted filament to be applied to the bed and successive layers of the cooled filament.
- Filament: The spooled plastic material that is extruded to create the 3D model. There are many different types of filament, but for our purposes, we will only cover PLA (Polylactide) which is a biodegradable thermoplastic derived from corn and other plant products.
- G-Code: A file with encoded instructions for printing the object. This file tells the machine where to go in X, Y, and Z, what temperature to maintain for the extruder, feed speeds for the stepper motors, etc.
- Slicing Software: Software that takes a model exported from 3D design software, adds support structures if needed, and exports the model as a series of instructions for the 3D printer. It's called "slicing software" because 3D prints are built up in horizontal slices.
- Support Structures: Automatically generated printed structures that support overhanging geometry in printed parts. These are meant to be removed and disposed of when the part has finished printing.

Dremel 3D Idea Builder ($800)
- Build Volume: 9” (230mm) (X) x 5.9” (150mm) (Y) x 5.5” (140mm) (Z)
- Materials: PLA
- Pros: Affordable, reliable, easy maintenance, quiet, great customer support, files pulled from internal memory, excellent machine interface.
- Cons: Inferior support structures for substantial overhanging geometry (3rd party software can solve this problem).
The Dremel 3D Idea Builder is a sign of things to come: a long established, profitable hardware company has learned from the startups and entered the market with an affordable, widely available 3D printer.
Here is my experience with the machine: With heavy, regular use for over 9 months, the machine is still working well. Filament jams are rare and easy to fix. Printing failures happen maybe 15% of the time (which in my experience is comparable to the Rep-2).
I recommend this machine because it's ready to use right out of the box using very simple software. It's the right mix of affordability, build volume, and user-friendliness.
Go to the Glossary for more info on the Dremel and other 3D printer options.

Printrbot Play ($400)
- Build Volume: 4" (100mm) (X) x 4.1" (105mm) (Y) x 5" (130mm) (Z)
- Materials: PLA
- Pros: Very affordable, reliable, easy maintenance, great customer support, files pulled from internal memory, seriously well built.
- Cons: Small build volume.
The Printrbot Play is an amazing little machine. $400 for a 3D printer that's this well made, has internal memory, and has really good tech support is pretty amazing. The only issue with this one is that it's got a small build volume. If you're looking to get started with 3D Printing on a budget, this is the printer for you.
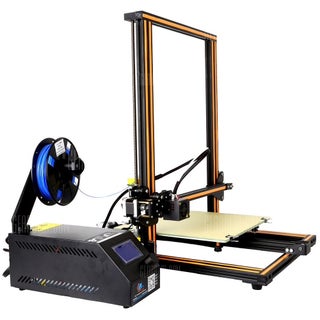
Creality CR-10 ($400)
- Build Volume: 11.8" (300mm) (X) x 11.8" (300mm) (Y) x 15.75" (400mm) (Z)
- Materials: PLA, ABS, HIPS, Nylon, PETG
- Pros: Very affordable, high quality prints, huge build volume, easy to unclog / repair, customizable, heated bed (allows for much wider range of filaments and prevents prints peeling up), on-board computer control, fast nozzle heating.
- Cons: Some assembly required, takes up a lot of space, not a simple, self-contained box (power supply and printer are separate objects connected by cables).
In terms of bang for the buck, this is the best printer I'm aware of. The build volume is huge but it's still less than $400. It's a bit messy on a desktop because the power supply and printer are separate, but that's a small price to pay. The print quality is excellent in my experience, the heated bed opens you up to a whole range of high-performance filaments, and even though it's sold as a "kit", it basically just comes in two parts that screw together and a bunch of cables you have to plug in. If you're a little more savvy with machines and not intimidated by some assembly, this machine can't be beat.
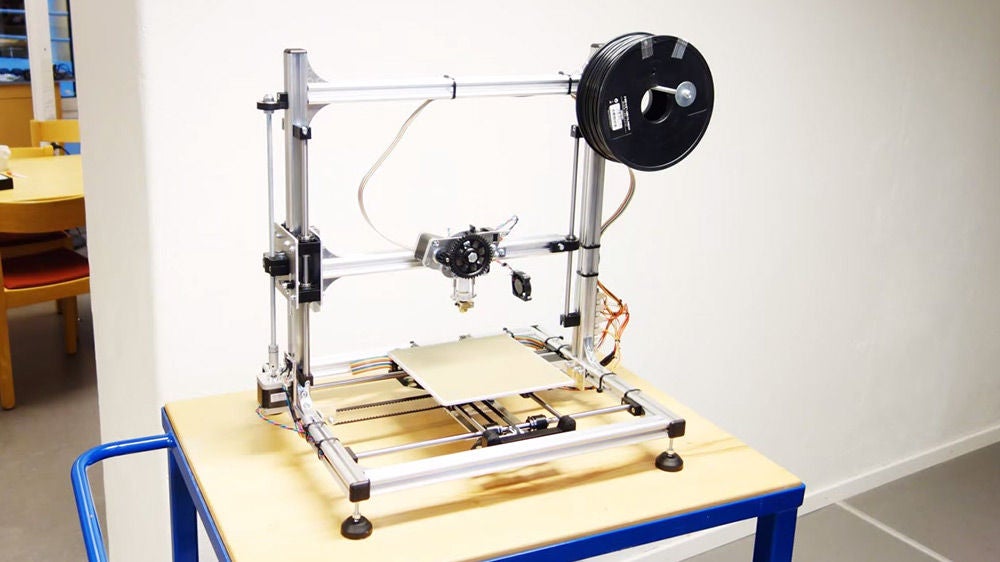
DIY 3D Printers
Although there are plenty of options for affordable manufactured 3D printers, some makers prefer to make their own. Switch and Lever's Building a 3D Printer instructable (pictured above) shows you how to set up your own Velleman K8200.
There are kits available from a variety of companies, and there is enough information readily available for anyone with some basic electronics and mechanics knowledge to create their own out of anything from 8020 extruded aluminum to Lego. Going the DIY route will almost certainly save you money, but it's a big investment in time and effort.
Step 5: Service Bureaus
A Service Bureau is a 3D printing service available to consumers. They charge on a per-model basis to print 3D models you upload to their site, and offer a wide variety of materials using almost every 3D printing technology that currently exists.
Although there are lots of options available for owning your own 3D printer, service bureaus can be a great way to get a high-quality print of your model in materials that would otherwise be inaccessible.
3D Hubs connects local 3D printing services worldwide. You upload a model and local services bid on producing the model for you. This can result in bargain pricing, but be careful to pay attention to customer reviews. Sometimes entry level 3D print users offer their services and can't promise the quality that a professional operation can, albeit at a higher cost.

Shapewaysis a service bureau that offers high quality prints in dozens of materials. Metals, plastics, ceramics, and sandstone are among the options with this site. In my experience, they offer unparalleled quality, are very responsive, and are reasonably priced for their excellent results.
I firmly believe the best way to learn about design for 3D printing is to have your own printer, but if owning your own 3D printer isn't in the budget right now, you can learn one-piece-at-a-time with a Service Bureau.

Step 6: Finishing Methods
When FDM printed parts are finished, they have small ridges on the surface. This is an unavoidable result of the building process- single layers of filament welded on top of each other. With chemical finishing, we can smooth out these ridges while creating a shiny surface and even stronger adhesion between the layers at the same time.
There are lots of different theories on how best to smooth and polish PLA prints. There seems to be a general agreement that methyl ethyl ketone (MEK ) or an MEK substitute (ethyl acetate) is the best chemical to use on PLA. You'll find a lot of instructables about smoothing 3D printed parts with acetone, but this only works with ABS, not PLA.
If precision is important, you don't want to apply the solvent directly to the part- essentially it's melting the plastic, so any direct contact with the liquid will cause the part to deform. Because of this, getting the part in contact with vapor is the best way to go- this ensures just enough contact to smooth out surface ridges but not enough to erase major detail or change the shape of the part in any significant way.
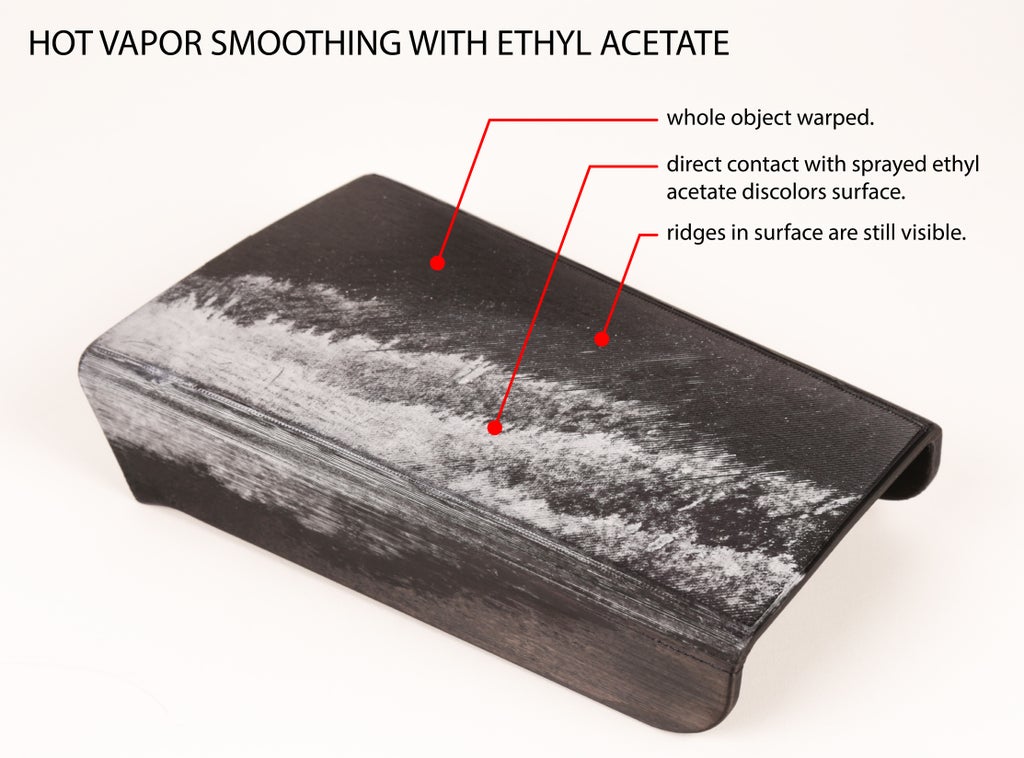
Hot Vapor Smoothing
With this method, MEK is heated and the vapor is trapped in a closed container with the printed part. MEK is highly toxic and is outlawed in California, so I gave ethyl acetate (EA) a try. Remember that EA shouldn't be anywhere near your lungs, and heating it will make for a higher likelihood of inhalation. It's also highly flammable, so heating it up comes with another set of risks.
I tried the rice cooker method, and the results were not good. The ridges were still highly visible in the end, there was white discoloration on the surface in some places, and the entire part became warped and weirdly flexible within 2 minutes of exposure.
Perhaps with more experimentation this would work better, but I prefer the epoxy finish from Lesson 11 because it's easy to control and produces good results.
Cold Vapor Smoothing
This method is much safer than the hot method. Basically, all you have to do is enclose the part in a container, cover the walls of the container with an absorbent material (like fabric or paper towels), saturate the material with the solvent, then leave the part in the container for about 40 minutes. I tried this with EA and it doesn't seem to have had any effect on the test part. I've seen lots of examples with ABS plastic using acetate with this method that seem to have worked well.
You'll still need gloves, goggles, a respirator, and a well-ventilated area to do it, but the results are pretty good for all the examples I've seen.


