

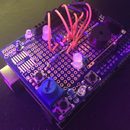
Introduction: 3x3 LED Sweep


In this Instructable I will be showing the steps and the code to build your own arduino based minesweeper!
THINGS YOU WILL NEED
1 X Arduino UNO R3
2 X Potentiometer
- 1 x Button
- 9 x LEDS
- 10 x 220 Ohm Resistors
Step 1: Positive and Ground Wires

BASIC SETUP
- Connect 1 jumper wire(red) to the + side of the breadboard to the GND port on the arduino
- Use another jumper wire(red) to connect to the other side of the breadboard on the + rail
- Connect 1 jumper wire(black) to the - side of the breadboard to the 5v port on the arduino
- Use another jumper wire(black) to connect to the other side of the breadboard on the + rail
Step 2: Add Potentiometers

- Connect both positive and negative sides to the equal rail on the breadboard
- Connect the first potentiometer to pin A1, the second to pin A2
Step 3: Add Button

- Connect positive to one of side of button
- Connect 220 Ohm resistor to the other pin on the same side as positive
- Connect a ground wire from the GND rail on breadboard to the resistor
- Connect pin 13 on arduino the button side opposite from the ground
Step 4: Add LEDS

Add 9 Leds just like in the picture above. Make sure they are just like this for easier wiring. Notice how the LEDs are lined up so that all the ground sides touch, and the other side is ready for a pin to be connected
Step 5:

Connect a ground wire to the 3 negative rails connected to 3 LED Columns
Step 6: Add Resistors

Add the resistors to each of the positive sides of the LEDs, you'll add 9
Step 7: Connecting the First 3

Connect all of these
- Pin 4 is ;ast Red LED
- Pin 7 is last Green LED
- Pin 1 is last Blue LED
Step 8: Adding 3 More LEDs

Connect all these
Port 3 goes to the middle Red LED
Port 6 goes to the middle Green LED
Port 9 goes to the middle Blue LED
Step 9: Adding Last LEDs

Connect these
Pin 2 to first Red LED
Pin 5 to first Green LED
Pin 8 to first Blue LED


