

Introduction: 400X USB Webcam Digital Microscope (DIY)

Am gonna share you an awesome DIY project about a USB digital microscope using a webcam which magnifies microscopic organisms such as bacteria, cheek cells, onion cell nucleus, etc.. using low-cost lenses. Because lenses which are used for magnifying the above organisms costs much.Digital microscopes are used to see images of these microscopic objects in the digital electronic devices such as computers, laptops, smart TVs, even in smartphones. These digital microscopes cost much as compare to the compound microscopes. Because the camera system used in the digital one are costlier. Hence as the magnification, quality, digital content of the microscope gets enhanced, their rates also run proportionately.USB digital microscopes cost about 100$ to 300$ and above online. Think about how it would be for you if you get an enhanced USB digital microscope with a reasonable magnification just for 8$. Just with a 4.5$ 10x objective lens and 4$ 10x eyepiece, make your own USB digital microscope using webcam you use on your PC’s. (Please check www.lifenuskha.com for more info on this project)
Things Required:
* A 10x objective lens and a 10x eyepiece lens for image enhancement
* A wooden cardboard and a cardboard box
* PVC pipe* PC or laptop DVD drive
* Two-way stick tape
* Smartphone for flashlight or any led light for illumination
* A rectangular wooden piece
* A laptop or PC camera application and a USB webcam.
Step 1: Take the 10x Objective Lens and Open It’s Upper Case First Portion and Open the Lower Portion As in Above Pics.


Step 2: Insert the Objective Lens Into the PVC Pipe With the Screwed Side of the Objective Lens Inside the Pipe.

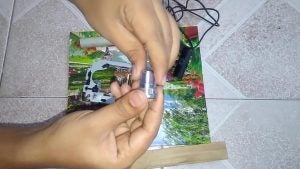
Step 3: Unscrew the Lens From the USB Webcam

Step 4: Take a Small Tube From Any Scrap Around Your Home or Make It Using a Cardboard to Fit the PVC Pipe Inside the Webcam Lens Hole.


Step 5: Take the Rectangular Wooden Piece and in the Front End Drill Two Holes Such That That the DVD Drive Tray Will Be Fitted Into It. Note That I Have Opened the DVD Tray From the PC DVD Drive for Mounting and Adjusting the Webcam, Objective Lens Tube System.

Step 6: Take the Wooden Cardboard and Make Two Holes to Insert the Screws As Shown Below,

Step 7: Now Drill Two Holes on the Bottom Side of the Wooden Piece to Screw the Cardboard Screws Into It.

Step 8: Tight the Screws to Fit the DVD Drive Adjustment Tray Into the Wooden Piece As Shown Below,

Step 9: Screw the Wooden Piece on the Cardboard and Now the Entire Setup Will Be Very Stable and Tight.

Step 10: Take the Two-way Stick Tape and Stick It to the Moving Part of the DVD Drive Tray


Step 11: Now Take the Webcam, Objective Lens Tube and Stick It to the DVD Adjustment Tray on the Two-way Sticker. If It’s Not Gluing Tightly Just Use Cello Tapes to Fit It Solidly.

Step 12: Mark a Circle in the Area on the Cardboard So That the 10x Eyepiece Easily Fit Into It. Where the Objective Lens in the Tube Faces As Shown in the Figure Below. (I Have Removed the USB Webcam for Marking Easily on the Board)

Step 13: Put a Hole on the Circular Mark in the Cardboard.

Step 14: Now Take the 10x Eyepiece and Insert in the Cardboard Hole Below the Objective Lens. (If the Eyepiece Is Not Fitting in the Hole Just Make the Hole Larger Enough to Fit the Eyepiece As Shown in the Figure Below)


Step 15: in the Bottom of the Cardboard the Eyepiece Will Protrude in a Way As Shown in Figure Through Which Light From the Light Source Passes to the Specimen on the Top of the Eyepiece Under Objective Lens

Step 16: Take a Cardboard Box Then Switch on the Smartphone’s Flashlight and Place the Phone in the Box.


Step 17: Place the Wooden Cardboard Set Up Over the Cardboard Box and Uplift the Tube Using the Adjustment Knob in the DVD Tray. You Can See Light Illuminating Through the Eyepiece Lens As Shown in the Third Figure Below.


Step 18: Now Connect the USB Port of the Webcam With the Laptop or PC and Place the Specimen You Have to View Over the Eyepiece and Open the Camera Application on the Laptop or PC to View the Magnified Image of the Specimen.


Step 19: Please Check the Sample Images I Have Taken With Using the Above DIY Webcam Digital Microscope Project Below,


Step 20:
Now you have completed the entire set up and watch enjoying the different microscopic objects, organisms in your laptop or PC which will be 400 times magnified image than the actual size of the specimen.I will upload this entire project video on you tube soon and will embed here so stay tuned.


