

Introduction: Make a BB Gun From a Flashlight! (700fps!)


New how-to video:
For this Instructable you will need:
1 x metal flashlight
1 x 6mm brass tube (or similar metal tube that fits a 6mm BB)
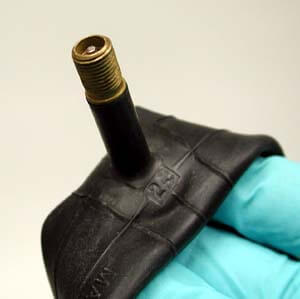
1 x schrader (tyre) valve - it can be threaded, ripped from a bike tube or be one of those rubber tubeless snap-in ones
1 x JB-Weld, araldite or similar epoxy
1 x superglue
1 x bike pump or CO2 inflator or air compressor
Tools:
Hack saw
Drill
Hot glue gun
Click HERE for an animation on how it works.
There are a few small bits and pieces that may be required but they can generally be found around the house, in the garage or can be bought for cheap at a hardware store.
Step 1: Finding the Right Flashlight


For this build you do not need an expensive Maglite or branded flashlight, the most important feature of the flashlight is that it has to be metal. The next important part is that it has a threaded cap on the end for changing the batteries; this cap must also be made of metal and it should have an o-ring around it so the seal is watertight. The only other requirement really is that the flashlight has the push-button/switch to turn it on mounted in the end cap, if the on/off button is mounted on the side of the body then the flashlight can't be used for this build as we intend to use the flashlight body as an air tight chamber.
Flashlight check list:
1. Flashlight is all metal.
2. Flashlight has a threaded cap for the batteries - this is required so the valve of the gun can be removed from the gun in case it stops working
3. Flashlight has an end-mounted on/off switch and not a switch mounted in the main body.
4. Flashlight body is a cylinder and not some weird shape; e.g. a conical cylinder that tapers at one end (this does not include the flared end that houses the light bulb as this can be removed and is not part of the flashlight body)
So those are the basic requirements; most metal flashlights should meet these requirements. The silver flashlight in the picture above meets most of these requirements as it has a threaded end cap with an o-ring, is made of aluminium and is a perfect cylinder. Although not visible in pictures below, this flashlight actually has a push-button mounted in the body of the flashlight and not the end cap, this means this flashlight cannot be used as it will have a big hole in the body once the components are removed. Apart from that, it is a good example of the type of flashlight required.
The green 'Kathmandu' flashlight above shows a picture before modification and a picture after it has already been modified in to a BB gun by myself. It is another good example of a flashlight required for this build: metal construction, threaded end cap with o-ring, cylindrical body and end mounted on/off switch (it has been replaced with a schrader valve in the photos below).
Step 2: How Does It Work?


Basically, it is a pneumatic air gun with a coaxial piston valve. The piston is similar to that of a piston in an internal combustion engine in a car, its function is to seal the barrel while air is pumped in to the chamber and then to unseal the barrel and let all the air from the chamber flow in to the barrel and propel the projectile. You can find an interactive diagram for a coaxial piston valve here (third diagram on the page).
The diagram picture of this design is in a compressed size and is hard to read parts of it, click the i symbol in the upper left corner of the photo and then click on the full size image.
Here are three animations, all in different speeds, of how this gun works:
Animation at 8fps (fast)
Animation at 4fps (medium)
Animation at 2.5fps (slow)
Click "Play in full screen" on the animation page for better quality.
Components:
Fill valve: the fill valve is a valve which allows you to pump air in to the chamber, once this is completed the fill valve prevents air from the chamber escaping.
Exhaust valve: the exhaust valve is a valve which operates the piston valve by letting air out from behind the piston.
Piston valve: the piston valve is the main valve, it seals the barrel to allow a build up of pressure in the chamber. It works on the principle of uneven forces. The force that pushes the piston against the barrel is the air pressure you pump in to the gun behind the piston (this area behind the piston is called the pilot volume). This air pressure also goes in front of the piston and fills the chamber. Although there is the same amount of air pressure in front of and behind the piston, the piston remains pushed against the barrel as the area of the back of the piston is greater than the area of the front of the piston as the front of the piston loses some of its surface area by sealing against the barrel. Therefore, according to Force = pressure x area, there is more force behind the piston than in front. Once the pressure in the chamber has been built up and you are ready to fire, you trigger the exhaust valve which lets out all the air behind the piston (the pilot volume) so only air in front of the piston remains. This air in front of the piston, pushes the piston back, unblocking the barrel, and allowing the air to flow rapidly out of the barrel. This all occurs in less then 5 milliseconds.
Barrel: the barrel is, as you all know, the tube that the projectile is propelled through like any gun. In this design, the barrel is actually inside the chamber but it is sealed off from the chamber by the piston valve. Once the valve opens, air can flow in to the barrel.
Note: in this build, the fill valve (schrader valve) is also the exhaust valve. This is because you can pump air through the schrader and also release air by depressing the pin in the schrader valve. You should all know this from when pumping/deflating bike tyres.
Key piston valve points:
For the piston valve to work, the piston itself needs to be a good fit inside the flashlight body. If you use some wood dowel as a piston, it should make a perfect fit with the inside of the flashlight; tight enough so that the piston cannot wobble inside the flashlight body but loose enough so that it can still move (you don't want the piston to be jammed in one spot). A good way to tell if your piston is a good fit or not is by moving it in and out of the flashlight body; when you push the piston in, it should push all the air out the other end of the flash light. When you move the piston out, it should create a very slight vacuum/suction.
The piston also needs a sealing face. This is a flat piece of rubber that seals against the barrel. The seal between barrel and piston needs to be air tight, rubber can create an air tight seal when pushed in to the barrel.
Other points about the piston will be covered in construction. You can see an example of my piston in the pictures above; as you can see, it is very simple, cheap and easy to make.
Step 3: Gutting the Flashlight


Okay so now that you have your flashlight, we will need to gut all the components from it so we are left with just the body, end cap and front lamp fitting. I have uploaded pictures below of me dismantling the silver flashlight from step 1; it was very easy, all I needed was a screwdriver to get off the front black fitting holding the bulb.
The photos above will be in order of the steps I describe in dismantling the flashlight. To reiterate; the silver flashlight above is not a flashlight that can be used for this project because it has a on/off button mounted through the flashlight body, I am merely using the flashlight as an example to you guys so you can follow the dismantling steps.
The first step is to unscrew the front reflector unit which houses the bulb and a reflector; most flashlights should allow this to be removed in case a bulb needs to be replaced. Once the reflector housing is off, remove the bulb by whatever means necessary and then removed the fitting that the bulb is attached to inside the body of the flashlight.
Next, remove the end cap from the flashlight and dismantle the battery components (probably a spring and some other stuff). This shouldn't be difficult at all. Now we have done that, we should be left with three main flashlight components (labelled in a picture below): the reflector housing, the main flashlight body and the end cap.
Now we can move on to the next step.
Step 4: Installing the Fill/exhaust Valve


This is a quick and easy step and requires little skill, tools and materials.
Step 1: Get a schrader valve as outlined in the intro. If you are buying a threaded schrader valve; make sure it has a 1/8" thread or less, if you are ripping one out of a tyre or buying a tubeless snap-in valve you will have to cut some rubber off the valve itself. To do this, thread a plastic or metal valve cap on the schrader valve head (a cap from a car or bike tyre will do) and then place this in a vice. The valve body will be covered in a rubber and it is our goal to remove most of this rubber from the body. You can use a knife, file, heat gun (remove the inner components of the valve beforehand, if you're using heat) or whatever you like to remove the rubber. Once removed, you should be left with the brass schrader valve body with no rubber on it.
Step 2: Grab the flashlight end cap, a set of drill bits and the schrader valve. You will now need to find a drill bit that matches the diameter of the schrader valve as it our goal to drill a hole in the flashlight end cap that is the same size as the schrader valve body.
Step 3: Once you have your hole drilled in the end cap and the schrader valve can fit in this hole, we can now epoxy them in place. If you're using JB-Weld, follow the instructions on the packet and cover the hole drilled inside the end cap with some epoxy and apply some epoxy to the schrader valve body; doing your best to keep epoxy away from the schrader valve head and from blocking the hole at the bottom of the schrader valve. If you're using an araldite or other epoxy, follow the instructions on the packet and do the same.
Step 5: Attaching the Barrel


Okay, so now we're moving along; not long to go.
The goal here is to epoxy a barrel inside the chamber which the piston will seal against, this step is slightly more difficult than the last and has some ambiguity about which components to use (I will go in to this later).
First you need to acquire a metal tube for a barrel. I found 6mm tube from hobby stores (bring a BB along with you to make sure it fits as best as possible) and aluminium tube from a garden weed sprayer that fit a BB quite nicely as well. If you're in America and can't find any at a hobby store, you can also use auto brakeline or order some off the internet (don't ask me where). The main points are that the barrel is made of a metal and that it fits a 6mm BB reasonably well.
Now that you have your barrel, cut it to length. Grab your barrel and put it against the flashlight body, cut it a few centimeters (3-4cm) shorter than the length of the flashlight body. This is because at the end of the flashlight are threads inside the tube for the end cap, which take up about 1.5cm-2cm of the inside of the flashlight body and you also need to fit a 1.5cm long piston inside the body with another 0.5cm-1cm room for the piston to move back. If your flashlight is similar to the green or silver one I have used as examples, it's probably a safe bet to cut the barrel 4cm shorter than the length of the flashlight body.
This is where things get a little difficult. You will need to find some object that fits inside the front end of the flashlight body and you can drill a hole through for the barrel to go inside. This fitting is to support the barrel at the front of the flashlight and keep it centred so you can epoxy it in place. In my example, I have used a nut from a 1/4" brass compression fitting, the hole in one end of the nut will need to be drilled bigger so it can fit the barrel through it. The good thing about this nut is that the edges of the hexagon fit perfectly inside the flashlight body and it has a hole through the middle to centre the barrel. You can use a nut like I have or any other object that completes the same goal.
Once you have found your object to centre the barrel in the front of the flashlight, you can epoxy it in place. Insert the barrel through the compression nut (or whatever you use) and epoxy around the barrel and inside the nut fitting. Then you add epoxy around the outside of the nut fitting and around the inside of the flashlight body where the nut will go; insert this piece inside the flashlight body (in the orientation shown in the pictures below; i.e. flat nut face facing out, threaded part facing in. Make sure there is sufficient epoxy between the outside of the nut and the inside of the flashlight body and enough epoxy between the barrel and the inside of the nut fitting. We need an airtight seal that will hold back several hundred PSI.
The best way to let this cure so that the barrel ends up centred and the epoxy doesn't drip all the way down inside the flashlight body is by standing the flashlight on some baking paper or cardboard on its front end where you've just epoxied the nut. The epoxy will then be dripping down and around the barrel and nut fitting; which is good. Some epoxy may leak out the front and bond to the paper or cardboard but the flashlight can easily be removed once it has dried.
If the barrel is quite free moving inside the flashlight body while the epoxy is curing and you can't keep it centred, use some blu-tac on the inside of the flashlight body to hold the barrel in the centre of the body. If you are confused by this step, just look at the diagrams on the earlier pages. The goal is to epoxy the barrel so it is centred in the middle of the flashlight body; you can find your own solution to doing this but mine is to use a nut as a spacer between the barrel and flashlight body. The epoxy is not shown on any of my diagrams but you want epoxy about 1.5cm-2cm down the length barrel and between the flashlight body.
If you're still confused after all this, go back and watch the video in the intro. Near the end, I show the flashlight with the barrel epoxied inside. Screen grabs of this are above with the other pictures in this step.
Step 6: Making the Piston


Compared to the previous step, this one is relatively easy.
The piston needs to have a relatively perfect fit inside the flashlight body for it to work correctly. Once your piston is completed, it should be a good enough fit that it cannot be moved side-to-side inside the flashlight but a loose enough fit that it can be moved forward or backward with your finger pushing against it. When you put the piston inside the flashlight, you can test it by blowing down the barrel with the end cap off the other end. The piston should be difficult to move with your breath and it should let only a very small amount of air by, or none at all. In some cases a well built piston can be moved by blowing down the other end so if your piston is like this, it's probably okay as long as not much air is leaking around the piston.
Construction:
I made my piston from some plastic hose I found in the garage. The hose fit perfectly inside the flashlight body and with a bit of lubricant/grease, it would work well. You can try and find some hose as well or you can cut a piston from strong closed-cell foam, rubber or plastic. I have also made a piston from the rubber head in a plastic syringe. If you're using rubber hose like I did, here is how to make the piston:
1. Cut a small length of hose no more than 1.5cm long.
2. Sand down the ends of the hose so they are flat (this is important as the sealing face needs to be perfectly perpendicular to the barrel, it can't be on an angle.
3. Fill the hose with hot glue
4. Cut from a small sheet of rubber a circular disk that has the same diameter as the hose
5. Find a metal washer that has the same outside diameter as the hose (if you can find one with no hole in the middle it would be perfect, if not you can just use a washer but find one with a hole about 4mm or less in diameter).
6. Superglue the metal washer to one end of the hose
7. Superglue the rubber disk to the metal washer
8. Cover the hose in a lubricant or grease and insert it in the flashlight body with the sealing face facing toward the barrel.
Step 7: Safety
I've decided to add a segment on safety as I've come to realise that not everyone who makes this will have had the experiences I have had and know what may be safe and what may be dangerous. I will outline a few things that I feel are most important but remember to exercise caution at all times with this BB gun. It can be built so it is safe and it can be operated so it is safe but it is very easy to turn a safe build in to a dangerous one when in the wrong hands.
Rule 1: Wear safety glasses at all times when handling the gun under pressure.
I've had some very close misses over the years, sometimes when I wasn't wearing safety glasses, and at the end of the day it is better to be safe than sorry and missing an eye. There is no reason any part of the gun should fail under reasonable pressures (~300PSI) but you must be prepared for the rare chance something does go wrong.
If you are firing at a target you do not think will ricochet the BB, or even if you are firing out in to the open, be sure to wear safety glasses. I've had some odd experiences when BBs have rebounded off something I wouldn't have though would be a problem and have the BB whiz back over my head at high speed.
Rule 2: Never shoot or aim this at any person, animal or property that is not yours.
While you may think this gun is alright to shoot someone with at low pressure, it is not worth risking an accident. This is not a commercially made gun, you cannot hold someone other than yourself reliable if something goes wrong (e.g. a misfire). This gun is capable of out-performing typical airsoft guns with ease; the velocities produced by this gun are no joke, they can and will do damage.
Rule 3: Never ever look down the barrel.
If something is wrong and the gun is working whatever you do, do not look down the barrel. I cannot stress that enough. Even if the BB is removed from the barrel, under pressure there is still the possibility of something being propelled out the barrel and into your eye if a misfire were to occur. If you must look down the barrel; remove the flashlight end cap first to insure the gun is discharged. This is a good habit to get in to as it is very easy to forget and while in the moment, take a look down the barrel when the gun is pressurized.
Rule 4: Keep to the limits of the gun's design.
While the gun I have made personally made be adequate for pressures as high as 800PSI, I have many years experience working with these guns and epoxy at high pressures so it is easy for me to have an understanding of how much pressure my designs can take. While you may be following my instructions, I cannot insure that you mix the epoxy correctly, correctly prepare the surfaces for adhesion and apply enough epoxy to enough surface area to parts that can take the extreme forces involved at high pressures. By following my instructions and applying reasonable amounts of epoxy to the parts and waiting the correct cure time before pressurizing the parts, your build should be safe at 300PSI; though it would be a good idea to first pressurize it under some heavy towels or in a metal/wooden box and leave it for an hour or so.
Rule 5: Don't be stupid.
This is not a toy for children or for teenagers who act like children. You must be responsible at all times when using this gun and treat it like a firearm at all times. I am in no way or form responsible for any actions you take when following, building and using this instructable and the BB gun. I am in no way responsible for any accidents or injuries that may result from building and using this BB gun.
Final note on safety: Don't be put off, these can be extremely safe to build and can handle the pressure well under the right circumstances. If you are worried about the design of your BB gun, please do not hesitate to contact me and I can offer my best advice on the situation. If you do this, please be sure to send adequate photos outlining the problem in question.
Step 8: Finishing Up
Now that the piston is complete, your gun is ready for testing. Screw on the end cap and attach your CO2 inflator or bike pump. If you're using a CO2 inflator, be EXTREMELY careful as I never fill my gun to the full 800PSI output of the CO2 inflator (in hot temperatures, this pressure can climb to over 1000PSI). I recommend buying a 0-300PSI shock pump, they are far safer than CO2 inflators and tell you the exact pressure.
Once your chamber is filled with pressure, you need a way to trigger the valve. You can use a nail or other small object to push the pin in the schrader valve or you can get creative and make an attachment like I have. It's basically some random brass fittings with a bolt going through the middle and a spring that threads on the schrader valve. I can push the bolt down in to the schrader pin, firing the gun; the spring then returns the bolt to its original position. Pictures of this adapter are below. I wont go in to how to make one as you need fittings that I'm not sure everyone can easily find and I'm not even sure what they are called, I just had them spare in my box of brass fittings. In the mean time, find a creative way to make your own attachment or trigger for depressing the schrader pin. If you remove the head attachment from an old bike pump, you could trigger the gun by pulling up the lever on a pump head attachment like this as it engages a pin that moves forwards and depresses the schrader valve pin.
There is one last thing: the lamp reflector head that I got you to unthread from the flashlight body back in step 3. You can either remove the glass/plastic front and reflector from inside the head or you can leave it in place. If you remove the glass and reflector, it will allow you to shoot the gun while it is threaded on to the flashlight (I have done this for my green flashlight BB gun). If you leave it in place, the flashlight gun will give the appearance of a flashlight when the head unit is attached to the flashlight body, but you can't load and shoot the gun until you unthread it from the body as it obstructs the barrel.
Troubleshooting:
Air is leaking out your barrel: your sealing face on the piston needs replacing/the barrel is not centred inside the flashlight body and is on some angle/the sealing face on the piston is on an angle/the sealing face is the wrong type of material
When you depress the schrader pin, nothing happens/all the air comes out the schrader and not the barrel: your piston is too tight of a fit and is stuck/your piston is too loose and too much air can move between the piston and inside of the flashlight body/you're not using enough pressure (50PSI should be more than enough for the valve to work)/not enough air is flowing out the schrader valve fast enough.
Performance is bad: probably a combination of the problems above.
Any other problems? Send me a message.


