

Introduction: A Beginner's Guide to Engine Rebuilding


At a certain time in your life, especially if you are a car guy or gal, you may find the need to rebuild an engine, and there are many reasons why you might discover this. You may want your engine to perform like, or better than, the day it rolled out from the factory or maybe you are just curious about what actually happens inside of an engine. Whatever your reasons are for tearing apart your engine you still might wonder how you should go about disassembling your engine. If you have never torn apart an engine before, or taken apart hundreds of engines, this is the guide for you. In this instructable, I will be covering my first ever engine rebuild and the steps I took to make my engine good as new. I hope that you find this instructable helpful and I hope that your engine rebuild goes well. Now let's get started tearing apart that engine.
If you would like to donate please donate at the link below:
Step 1: Table of Contents
Here is a list of all of the following steps, so you can easily find which step you are looking for.
- Step 2: Research and Planning
- Step 3: Disassembly Part 1: Engine & Accessory Removal/Labeling System
- Step 4: Disassembly Part 2: Top End Removal (Valve Covers, Carburetor, Intake, Distributor, & Valley Pan)
- Step 5: Disassembly Part 3: Valvetrain Disassembly (Rocker Arms, Pushrods, Lifters, & Cylinder Heads)
- Step 6: Disassembly Part 4: Camshaft Removal (Harmonic Balancer, Oil Pan, Timing Cover, Timing Gears, & Camshaft)
- Step 7: Disassembly Part 5: Bottom End Disassembly (Oil Pump, Oil Pan Baffle, Connecting Rods/Pistons, Main Bearings, & Crankshaft)
- Step 8: Disassembly Part 6: Cylinder Head Disassembly (Valves, Valve Springs, & Valve Keepers)
- Step 9: Coming Soon/Donations
Step 2: Research and Planning
Before you go tearing apart an engine it is very important to research and plan out the engine rebuild. There are many questions you should ask yourself before rebuilding an engine. What kind of engine do I want to rebuild? What kind of performance do I need out of the engine? How much do I have to spend on this project? How much time do I have to rebuild the engine? For my rebuild, I chose a classic American V8 engine and I just need it to perform as a stock engine. I would like to have the rebuild completed in less than six months.
For my engine, I selected a Pontiac 455 from a 1973 car. I selected this engine because I plan to put my engine into a 1979 Pontiac Firebird Trans Am. Pontiac 455 engines were only used from 1970 to 1976, but all the Pontiac V8 engines from a 287 to a 455 have the same block dimensions. This characteristic made it perfect for a 1979 Pontiac Firebird Trans Am because it should fit right in the engine bay.
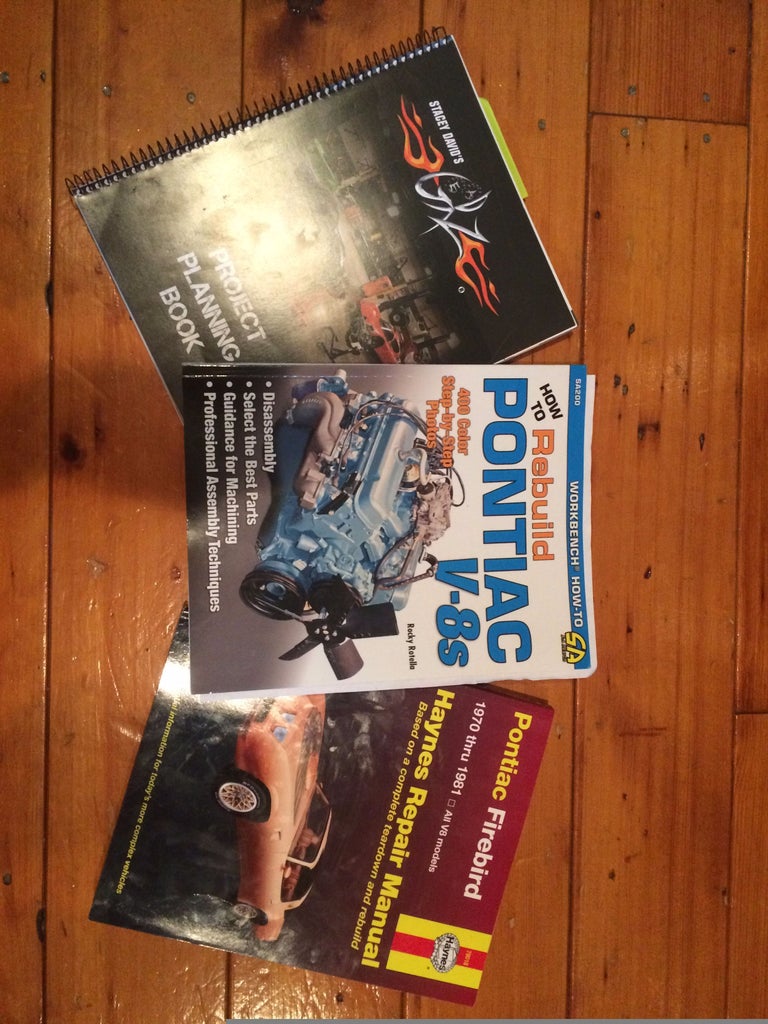
You may choose a different kind of engine, such as a Chevy, Ford, Toyota, Honda, Nissan, etc., for your rebuild, but whatever you chose you will want to research it. There are many ways to research an engine. For example, I ordered three books to help me with my rebuild. The first book is "How to Rebuild Pontiac V-8's" by Rocky Rotella. This book covers the rebuild of a Pontiac 400, which is similar to a Pontiac 455. There are lots of color photos in this book which makes it great to have when rebuilding my engine. It also covers part selection and what you need to have done at your machine shop. The next book I bought is "Haynes Pontiac Firebird (1970-1981) Repair Manual". This book is excellent for my application because it covers rebuilding a Pontiac 455 and how to perform maintenance on a 1979 Firebird Trans Am. The final book I bought is "Stacey David's Gearz Project Planning Book". I bought this book so I can keep track of all the parts I use in my engine, and how much they cost. If I ever sell my engine I can include this so the new owner knows exactly what work I performed.
The final resources I use when I have problems disassembling or rebuilding is the Internet. The Internet is a great tool to use when you have a problem because there is a good chance that someone else has had the same problem as you.
Now that you have researched and planned your engine rebuild it is time to start disassembly!
Step 3: Disassembly Part 1: Engine & Accessory Removal/Labeling System


Alright, time to get to the disassembly of the engine. If your engine is already in a car you will need to use an engine hoist to remove it from the engine bay. Then it can be placed on an engine stand. I will not cover that here because it is different for every car. I purchased my engine outside of a car locally on Craig's List. I used a come-along puller and the trusses of my garage to hoist my engine onto an engine stand.
After securing my engine onto my engine stand I took off all of the accessories (alternator, water pump, air conditioning compressor, and power steering pump), pulleys, and the accessory brackets. I will include pictures of my accessories being removed but refer to your Haynes manual or other resources for information on how to remove your accessories.
Bagging and labeling your parts is very important so that you can easily find your parts when you need to clean them or reassemble your engine. I will briefly explain my labeling system so you can use mine or make your own method. I use a notepad and divide my disassembly into sections (labeled by letters) such as accessory removal, top end removal, valve train removal, etc. I then divide those sections into specific parts (labeled by Roman numerals) such as power steering pump removal, cylinder head removal, etc. I then divide those sections into steps (labeled by numbers) that give a short description and a hand drawn picture of where the bolts are located. I then bag the bolts in label them "Section Part - Step" (for example B II - 3), and use tape to label the larger parts. I also take a photo with my phone of the bolt/part location, so I know exactly where everything goes. Labeling and bagging your parts is a critical step to engine rebuilding.
Step 4: Disassembly Part 2: Top End Removal (Valve Covers, Carburetor, Intake, Distributor, & Valley Pan)


It's time to really start the disassembly of your engine. For this section of disassembly we will remove the valve covers, carburetor, intake distributor, and valley pan, so let's get to it.
Start off by removing the two or more bolts holding on your carburetor to your intake manifold. The engine I purchased did not include a carburetor, so I skipped this step.
Next, I will remove the valve covers by removing the four bolts on each valve cover. I will label and bag those bolts and remove the valve covers.
If you have a Pontiac engine now would be the time when you remove a bolt know as the "Coolant Bypass Bolt". This bolt connects the timing cover to the intake manifold, so make sure to label this bolt in a special way. If you do not have a Pontiac you can skip this step.
The next part to remove will be the intake manifold. I removed the ten bolts holding down my intake manifold to my cylinder heads. If any of your intake bolts are studs, make sure to make a not where they are located. Now lift of the intake manifold so we can gain access to the valley pan. If you have an old cast iron engine like mine, the intake will be about forty pounds in weight, so be ready and do not drop it.
The next thing to remove is the valley pan. My valley pan was held on by two bolts, so I removed them and took off the valley pan. If you have never seen the inside of an engine before take your time to look at the beautiful engineering that lies inside.
Now would be the time to take your distributor out. If it is stuck, or gets stuck while you are removing it, use a solvent such as brake cleaner to help remove it. My distributor was super stuck, so I left it in its place for later removal.
Step 5: Disassembly Part 3: Valvetrain Disassembly (Rocker Arms, Pushrods, Lifters, & Cylinder Heads)


The next part to remove is the rocker arms. My rocker arms have a curved nut and a curved washer. After removing the nut and washer the rocker arm slides off. You will want to keep each rocker arm, nut, washer, pushrod, and lifter together, so you can put them in the same place they were removed from. I use baggies labeled 1a through 8b (1a,1b,2a,2b,3a,3b,etc.) and place all of the corresponding parts together.
The next part to remove is the pushrods. You should be able to simply pull these out, label them, and place them with their rocker arms.
The next part to remove is the lifters. You may have to use two hands and your favorite penetrating fluid to remove them. Simply slide them up and down until they come out of their bore. If you still cannot remove them, try using a lifter removal tool or wait until you remove the camshaft.
Now it is time to remove your cylinder heads. These bolts are very tight and vary in lengths. After removing the ten cylinder bolts, note their locations and their lengths. You may want to keep one or two head bolts loosened so you can break the head free. After breaking it free, remove the bolts and remove the head. If you have an old cast iron engine like me, theses heads may weigh about sixty pounds.
Step 6: Disassembly Part 4: Camshaft Removal (Harmonic Balancer, Oil Pan, Timing Cover, Timing Gears, & Camshaft)


Now is the time to remove the harmonic balancer. If your engine turns over, thread a bolt into a flywheel bolt hole on the back of the crankshaft. As you rotate the crankshaft, while removing the harmonic balancer bolt, it will lock itself against the engine stand. Now you can remove the harmonic balancer bolt either with an impact wrench or a long 1/2" breaker bar. After removing the bolt, use a harmonic balancer puller to remove the harmonic balancer from the crankshaft.
The next part to remove is the oil pan. There are seventeen bolts holding on my oil pan. After removing all the bolts, remove the oil pan.
Now it is time to remove the timing cover. There are two bolts and two studs holding on my timing cover. After removing the bolts and studs, I remove the timing cover. You will need to remove the bolt holding the fuel pump eccentric to the cam shaft. Now you can remove the two gears and the timing chain. If your lifters are still stuck, place the upper gear (without the chain) back on the camshaft and rotate it, so you can get your lifters to move.If your distributor is still stuck you will want to remove the oil pump's two bolts, and then use a rubber hammer to hit the oil pump drive shaft. This drive shaft is connected to the bottom of the distributor and should knock the distributor loose.
Now it is time to remove the camshaft. Start by removing the two bolts that hold on the camshaft thrust plate. After removing the plate your should be able to pull the camshaft out. There are camshaft bearings that help the camshaft rotate, but we will let the machine shop remove and install those so that we do not damage the block.
Step 7: Disassembly Part 5: Bottom End Disassembly (Oil Pump, Oil Pan Baffle, Connecting Rods/Pistons, Main Bearings, & Crankshaft)


If you have not already, go ahead and remove the two bolts holding the oil pump. After removing the oil pump, remove the oil pump driveshaft.
Next, remove the oil pan baffle, or windage tray, which is secured with four bolts. The lower dipstick tube is also connected to the tray. Make sure to inventory the tube so you do not lose it.
The next step is a very important step. It is time to remove your pistons. You will want to remove your connecting rod caps and pistons one at a time so that you do not get them mixed up. Start by removing the connecting rod cap nuts. Then you will need to remove the cap and note its orientation. You may need to tap it with a rubber hammer to get them loose. After removing the cap use a long wooden or rubber handle to remove the piston. Then mate the cap back to its connecting rod.
The next thing to remove is the main caps. Remove the two bolts on each cap and then remove the cap. After removing all of the caps, go ahead and remove the crankshaft. You will then need to remove the main bearings from the block by pushing on the end opposite of the bearing tang (indent).
Your block is now completely disassembled and ready to go to the machine shop. The last thing to disassemble is your cylinder heads.
Step 8: Disassembly Part 6: Cylinder Head Disassembly (Valves, Valve Springs, & Valve Keepers)


The final part to disassemble is your cylinder heads. You will want to purchase or rent a valve spring compressor. Do not use the overhead valve spring compressor because they do not work. You will want a valve spring compressor like this one. You will also want to take a large socket and hit the spring with it to break it free from the valve spring keepers.
Next, you will want to compress the valve spring and remove the keepers using a magnet or a small screwdriver. After releasing the pressure from the valve spring compressor, you can remove the spring, spring shem, and valve. I labeled my valves, springs, keepers, and spring shems just like I labeled my rockers, pushrods, and lifters.
The final thing to remove is the sensors that are connected to the cylinder heads. After that, your engine is completely disassembled and ready to go to the machine shop!
Step 9: Coming Soon/Donations
That is my progress so far, so stay tuned for the next part of this instructable when I take my engine to the machine shop and put it back together.
I am seventeen years old and have a part time fast food job in my small town in Ohio. Working on engines is very expensive and when you make minimum wage you don't have very much money to pay for one. I am also planning to restore a 1979 Pontiac Firebird Trans Am. I also plan to finish this instructable and make another instructable about restoring the car. Any donations to the link below are appreciated. Thanks!


