

Introduction: ADD Routes to Your 3D Print to Make It Light Up


What we want to achieve:
Hello DYI'ers in this instructable i´m gonna show you how to add routes and compartments to your 3D prints.
With this you´ll be able to add LED / electronics to make it the perfect accessory right in time before Halloween.
For this tutorial and as example i´ll use a 3D model of a skull, and basic 3D models for the backclip part. You can watch and download the finished design for free here MyMiniFactory [ FREE DOWNLOAD ]
What we need:
For this instructable you´ll need the following:
- 3D software of your choice [ for example : Blender ( FREE : DOWNLOAD ) ]
- Meshmixer 2.6 [ FREE : DOWNLOAD ]
- some spare time
- and your 3D models
- the finished result can be downloaded for "free" on MyMiniFactory [ FREE DOWNLOAD ]
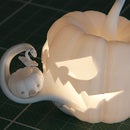
Step 1: PART [1] - Compartment and Skull
![PART [1] - Compartment and Skull](https://content.instructables.com/FVR/J4L4/I1FQ848G/FVRJ4L4I1FQ848G.jpg?auto=webp&fit=bounds&frame=1&width=1024auto=webp&frame=1&height=300)
![PART [1] - Compartment and Skull](https://content.instructables.com/FND/TUI4/I1FQ85FY/FNDTUI4I1FQ85FY.jpg?auto=webp&fit=bounds&frame=1&width=1024auto=webp&frame=1&height=300)
![PART [1] - Compartment and Skull](https://content.instructables.com/FAV/I5MS/I1FQ85G0/FAVI5MSI1FQ85G0.jpg?auto=webp&fit=bounds&frame=1&width=1024auto=webp&frame=1&height=300)
Import your 3D models
In this section we´re going to boole the routs and compartments for the electronics to fit inside.
For this we ´re gonna use the newly released "Meshmixer 2.6" , which you can find under this LINK ( its free to download & use )
[Image 1] , [Image 2]
The first thing we do is import both our models : Skull and backplate clip.
[Image 3]
Import the second model by clicking the "plus" Import button in the top left corner.
Hit "append" and both models are in your scene.
Step 2: Move Your Compartment to the Right Position


[Image 4] , [Image 5]
Inside the "Object Browser" select your second part and hit the "Edit" button inside the toolbar and select "Transform" from the "Menubar".
[Image 6]
Move the compartment to position were you see it fit.
Step 3: Subtract Your Compartment From the Basemesh


[Image 7]
To subtract the compartment from the skull you´ll have to select both models, in the right order. [A minus B] First selected model [A] is the basemodel and the second selected one [B] is the volume with will be subtracted from A.
[Image 8]
If either one of the models lack a certain polygon density you´ll encounter those problems by increasing the polygon count you can get rid of those problems. As can be seen in [Image 9]
Step 4: Part [2] - Tubing Your 3D Model
![Part [2] - Tubing Your 3D Model](https://content.instructables.com/FKC/L98J/I1FQ85LF/FKCL98JI1FQ85LF.jpg?auto=webp&fit=bounds&frame=1&width=1024auto=webp&frame=1&height=300)
![Part [2] - Tubing Your 3D Model](https://content.instructables.com/FA5/MP4I/I1FQ85LG/FA5MP4II1FQ85LG.jpg?auto=webp&fit=bounds&frame=1&width=1024auto=webp&frame=1&height=300)
![Part [2] - Tubing Your 3D Model](https://content.instructables.com/FGG/N5OE/I1FQ85LI/FGGN5OEI1FQ85LI.jpg?auto=webp&fit=bounds&frame=1&width=1024auto=webp&frame=1&height=300)
![Part [2] - Tubing Your 3D Model](https://content.instructables.com/FCY/18V2/I1FQ85LT/FCY18V2I1FQ85LT.jpg?auto=webp&fit=bounds&frame=1&width=1024auto=webp&frame=1&height=300)
PART [2] - Tubing
[Image 10]
To add the tubes you can use the new "Add Tube" function, which is available in "Meshmixer 2.6"
Go to "Edit" and choose "Add Tube" right at the bottom of the menu.
A new menu with a few settings pop up.In my example model i want the tube to go from inside the compartment to the corresponding eye socket.
By clicking and dragging the end points of the red tube you can move the start and end position of the tube.
[Image 11]
I´ve changed a few setting:
Algorithm : First drop box i´ve change the spline algorithm from : "Auto Route Smooth" to "Spline inside"
Auto Route Smooth created some wobble results, which i didn´t want "Spline Inside" created a more linear tube.
Radius : due to the fact that i wanted to use 5 mm LED, i set the minimum starting radius of my tube to 2,5 mm and the end radius to 5 mm.
[Image 12]
If you are satisfied with the result check your settings and hit accept. The newly created tube will be subtracted from you base model.
Step 5: PART [3] - Reduce Printing Time
![PART [3] - Reduce Printing Time](https://content.instructables.com/FXT/37JR/I1FQ85LW/FXT37JRI1FQ85LW.jpg?auto=webp&fit=bounds&frame=1&width=1024auto=webp&frame=1&height=300)
In this section we´re going to make the model ready for the 3D printing process.
Right now our model is a solid piece, to reduce time and material consumption we´ll use the "Hollow" function of Meshmixer.
Go to "Edit" and choose "Hollow" from the menu.
The "Offset distance" is the width of your newly created walls, depending on your 3D printer 1 mm - 3 mm get the best results.
You can change the "Mesh density" and "Solid Accuracy" to get a better quality inside mesh.
Hit "Accept" and your ready to export and print your model.
Step 6: If I Win the Formlabs 3D Printer Contest:
If I win the Formlabs 3D Printer Contest:
As a little kid I got a slot car racing track with a Lamborghini Countach, I was so fascinated by the electronics and the product itself that this was the time when I started to tinker around.
And now as an industrial design student i'm challenged with a lot of product design task on a daily basis.
From funny ideas during lunch break to serious company related products.
Each time I came up with an idea I immediately want to see it, feel it, hold it and see the final product come to live. That is the beauty of the 3d printer.
The rest of my free time I spend tinkering around with electronics, augmented reality, or household hacks.
If I would win a Formlabs printer, I could step up the game and combine all those fields.
I could build the slot car I was so fascinated as a kid, but this time around from scratch and 3d printed parts.
Every idea, every doodle I made on a napkin could come true as an actual physical product, that is so fascinating and the reason why I would make a good use of the “Formlabs 3D Printer”

Participated in the
Formlabs Contest


