

Introduction: Add Functionality and Reload Your "Disposable" Camera


Have you ever felt guilty when using a "disposable" camera? Well not any more! In this Instructable, we will add functionality to your disposable camera by adding:
1. An ability to take multiple exposures on one frame of film,
2. A "bulb" function that will help you take long exposures,
3. A tripod socket to take full advantage of numbers 1 and 2,
4. The ability to shoot film of your own choosing (by reloading).
So now chuck that Leica S2 and buy 30,000 disposables!
Step 1: Danger....Will Robinson!


Single use cameras with a flash have a photo strobe capacitor that can hold a charge even when the power to the circuit is taken away. If you take this charge through your chest, it could stop your heart and kill you!
This scenario is pretty unlikely, but a possibility. Usually, you will get a minor burn on the offending finger and a new appreciation of capacitors. Still, never trust a capacitor! When in doubt...discharge.
I use the "short out" technique to drain the charge from the capacitor. This is not the best method to say the least. The proper way is to drain the charge through an appropriate resistor or load bank (like a lightbulb) as demonstrated here:
http://www.ehow.com/video_4997784_discharge-capacitor.html
Just be careful and know where your fingers are and you should be fine!
Step 2: Stuff You Will Need

1. Kodak disposable (single use) camera .
2. Small screw drivers.
3. Glue...epoxy and superglue (cyanoacrylate).
4. Nut that will fit a tripod thread.
5. Two metal washers.
6. Dental floss, thread, cotton yarn.
7. Box cutter.
8. Film.
9. AA battery.
10. Changing bag or darkroom.
11. Electrical tape.
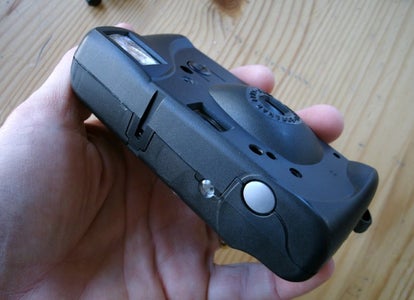
Step 3: Camera Overview


This camera is a pretty common type of disposable camera. You can easily find them in stores or thrift shops (usually expired).
We call them "disposable" but the industry calls them "single use" cameras as you don't really throw them away when you are done with them. You take the camera in to get the film developed. The photo finisher is the one that throws them away!
Kodak got on the "recycling" band wagon a while ago, but it is not quite what you might think. The cameras are designed to be ripped apart by the photo finisher to get at the film, so the bodies are not lovingly reloaded with film and resold. Some parts are probably reused, but most of the plastic is melted down and reused for other stuff. Better than finding its way into a landfill...but reloading it yourself will put you in the "reuse" part of the cycle.
This particular specimen is one with an Ektanar lens. That is Kodak's code for "quality consumer" grade lens. In other words, a step up from the miniscus lenses found in crappier one time use cameras. This lens has two plastic elements and can render some pretty good images with modern films.
Step 4: Cracking the Case
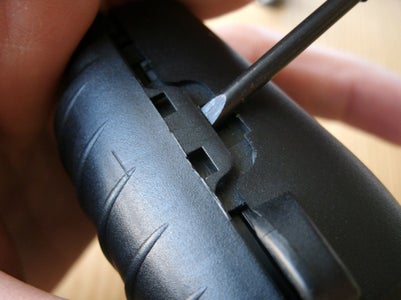
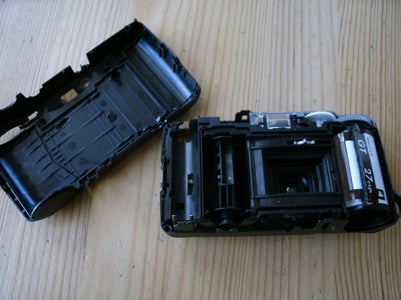


Opening this camera isn't rocket science!
1. Take off cardboard cover (not shown).
2. Locate the 4 latches...one on each side of the camera.
3. Pry the latches up and separate the front, back and guts of the camera.
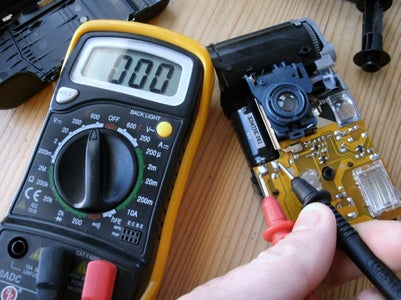
4. Before you get too far, discharge the capacitor, First, put on some safety glasses. There is a small chance that the charge will melt your screw driver and throw molten metal into your eyes! Touch the two terminals together with an insulated screw driver (one with a plastic handle). If there is a charge, you will hear a loud "crack" and might see a spark. Do this several times until there are no fireworks. If you have a Volt, Ohm Meter (VOM), you can check the voltage to ensure it is zero...just to be safe.
5. You will have the front, rear, guts, supply reel, and take up film can when you get the whole thing disassembled.
If you used the camera, you can now take the film to your photo finisher for developing. Ask to have the film can returned with your negatives and prints! It makes reloading this camera easier.
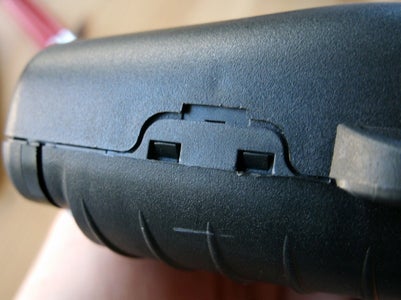
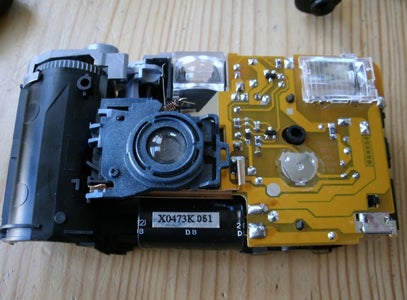
Step 5: Adding a Multiple Exposure Capacity


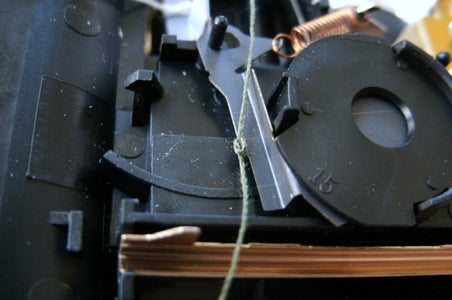
The film sprocket in the camera turns, drives a lever and cocks the shutter. If you look through the front of the camera, you will see a lever that the sprocket actuates.
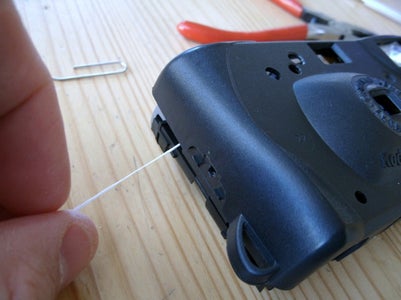
1. Your first job is to tie a piece of dental floss around that lever so you can cock the shutter simply by pulling the floss.
2. Once you have the floss tied, thread it out the left hand side of the camera around any support stanchions.
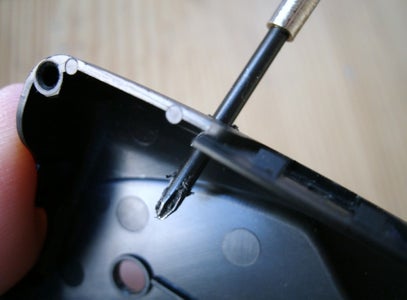
3. Finally, drill a hole in the front cover of the camera so the floss can exit. The plastic is so thin, I just forced a small screw driver through the wall of the front cover. Dress up this hole so it is a smooth as possible so the dental floss does not get hung up.
4. Once you are all set, test your new multiple exposure capacity by pulling the floss and making sure it cocks the shutter.
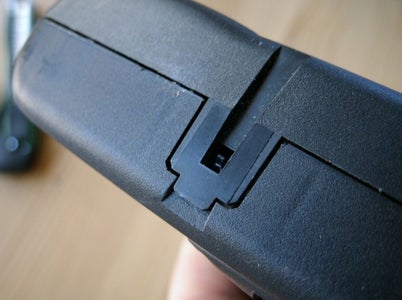
Step 6: Adding a "Bulb" Shutter Speed Capacity


For this modification, you will simply attach a string to the shutter paddle so you can pull the paddle out of the way and make long exposures.
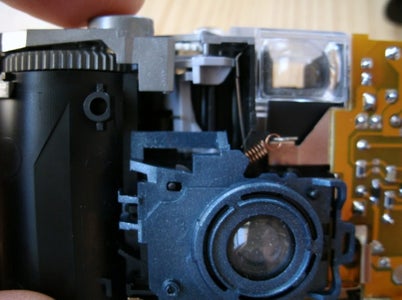
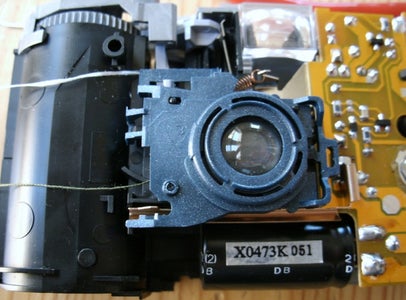
1. First locate the lens board and look for the pull tab on the right hand side. Insert a small screw driver in and pull to the right. Now lift off the lens board.
2. Now take off the lens. Note the small tab that ensures it is inserted correctly.
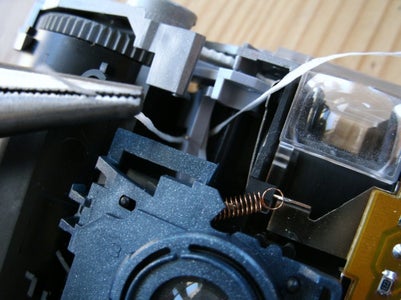
3. Locate the shutter paddle. It is a metal paddle that swings out of the way of the aperture to make the exopsure. Locate the small tab on the arm. This is the target to tie the thread.
4. I used thread to tie because dental floss was too large for the small target. As added insurance, add a drop of cyanoacrylate glue to keep the string from falling off. Once the string is tied, snip off the tail and test the bulb function. Pull to the left and the shutter opens.
5. Replace the front element and the lens board. Check out the bulb function again to ensure there is no binding.
6. Finally thread the floss and thread through the holes you made and replace the front cover.
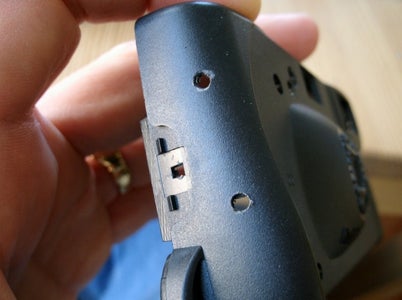
Step 7: Adding a Tripod Bushing


The bulb mode is pretty useless without a good way to hold the camera steady. If you wanted to take a photo of star trails, it would be a superhuman effort to hold the camera still for several hours! A single use camera was not designed with such nicities, so we have to add one on. This bushing is just a nut that fits a tripod glued up between two washers. It is not the prettiest modification, but it works! The tripod bushing should be the strongest part of the camera. There is nothing strong with the thin plastic of this camera, so I located the tripod bushing on the widest part. I'd preffer more towards the center of mass of the camera, but what are ya gonna do?
1. Score the plastic of the rear cover that covers the take up reel (film can). This gives the epoxy something to bite into.
2. Mix equal parts of epoxy resin and hardener and glue the steel washer onto your prepared section of the camera. Clamp and allow to cure (five minutes for this type).
3. Mix a new batch of epoxy and glue the nut on the center of the washer. Clamp and allow to cure.
4. Mix a new batch of epoxy and glue the final washer to the top of your assembly and allow to cure.
5. Fill the space between the two washers with yarn or string saturated in epoxy. This should give the bushing enough strength to function as a stable point of attachment for a tripod.
Step 8: Reloading With Film


1. Take your salvaged film can you got back from your photo finisher and tape your donor film to the short tail left by the photo technician. Tape both the back and front and trim any tape so it will flow easily into the can. I'm using a bulk loader here, but you could use any can of film as a donor. You would just have to do the final exchange of film in a changing bag or dark room.
2. Use your normal bulk loading technique to load the can.
3. Label your can with the actual film. I'm using black and white film here, so I really don't want it processed C-41!
4. Tape the film leader to the supply reel. Tape all the way around the spindle to the film on the other side. Keep in mind, this will make the film stop and unable to advance when you get to the end. This will ensure you can take out the film to develop it without having to use a lead retriever.
5. Ensure the shutter is tripped and adjust the film counter wheel to the number of exposures you loaded.
Step 9: Putting It All Together


1. Assemble the camera guts and front cover (already put together), the rear cover, a AA battery, and the film can attached to the supply spool.
2. Put all into a changing bag (or dark room) and visualize how they are arranged.
3. Close changing bag and stick your hands into the hand holes. Identify all the components by feel.
4. Your first job in the changing bag is to feed the film out of the film can and wind it onto the supply spool. Once all the film is wound, fit the spool into the slot in the guts of the camera.
5. Once the film supply spool and film can are seated, insert the AA battery. The positive (bump side) of the battery goes up.
6. Fit the rear cover onto the camera and press down until it clicks into place. Feel around to make sure all the tabs are engaged.
7. Take the camera out and make sure everything looks OK. Test out the bulb and multiple exposure features to ensure nothing got caught up in reassembly.
Step 10: Finishing Touches


Almost done.
1. The bulb feature is very sensitive. To keep the thread from getting caught, glue a magnet to the front and glue or tie a ferrous washer or nut to the thread. This will keep tension off the shutter paddle for normal operation. A heavy nut was chosen in this case so it will keep the shutter open if it hangs free
2. Label your pull strings.
3. Tape around the perimeter of your camera to ensure the whole thing does not fall apart. This will also help with any light leaks you accidentally introduced.
Step 11: Operation
The camera will operate as originally designed, but what fun is that?
1. Multiple exposures: Take photo. Pull MX cord to recock shutter. Recompose and take photo. Lather, rinse, repeat.
2. Bulb: Compose photo. Pull bulb cord. Let hang on weight for 1-12 hours. Release cord to end exposure. Cover lens and fire shutter so you can advance the film.
3. Tripod: Put camera on enormous, large-format tripod and enjoy the snide remarks.
4. Recycling: Feel superior to all those folks who waste electrons clicking away at photos that they will never look at again.
5. Flash Photos: The flash will work as designed when using the camera normally. The bulb function will cause the flash to go off if it is turned on at the time. If you are using the bulb function, you probably don't need the flash anyway.
6. Have fun with your new and improved, formerly disposable camera!
Step 12: Update: Sample Photos


Here are some sample photos. I mostly did double exposures, but I also included some bulb photos at low light levels. Something the original point and shoot could never do.


