

Introduction: Add WiFi to Arduino UNO


Connect your mincrocontroller to the internet by adding ESP8266 WiFi Module!
The ESP8266 Wifi module is a complete WiFi network where you can easily connect as a serving Wi- Fi adapter, wireless internet access interface to any microcontroller based design on its simple connectivity through Serial Communication or UART interface.
Adding this module to your Arduino UNO will open you to more and exciting projects
Step 1: Build Circuit

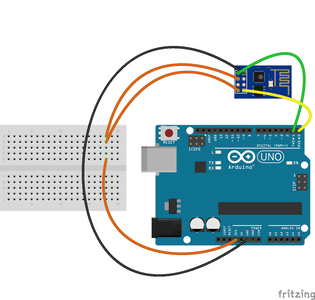
Connect the pins more described on attached Pin table
Follow these steps.
- connect the red wire to VIN(3.3V) to the +3.3V power from the microcontroller.
- connect the black wire to the ground.
- connect the green wire to the TX of the Wifi module and microcontroller
- connect the yellow wite to the RX of the wifi module and microcontroller
About the circuit
ESP8266 is strictly powered only to 3.3 V. More than that will destroy the module.
IMPORTANT do not use voltages more than 3.3V!
Connect the VIN to 3.3v to power up and also the ENABLE pin to enable the module.
TX is connected to RX which means whatever we want to Transmit in ESP8266 will Receive by Arduino UNO. And vice versa for RX to TX. Upon building this circuit, we now ready to start WIFI with Arduino UNO.
Step 2: Talk to Module


Communication with ESP8266 is via Attention Command or AT Commands.
Check the AT Commands table attached to review the codes.
Setting your board
1. Upload the sketch sample attached here to your Arduino UNO.
2. Download Telnet Client for Android
3. Connect to your ESP8266 Wifi
4. Once connected, get the IP address
5. Open Telnet Client on Android phone.
6. create connection by clicking connect , Add IP and port 80.
Once connected send request by typing:
esp8266: <any AT Commands>
Or turn on built in LED using command
LEDON
Or turn off built in LED using command
LEDOFF
Or just say
HELLO
Attachments

Step 3: About the Code
All our request will be read and parse on the loop() function
if(wifiSerial.available()>0){

    String message = readWifiSerialMessage();

    if(find(message,"esp8266:")){
       String result = sendToWifi(message.substring(8,message.length()),responseTime,DEBUG);
      if(find(result,"OK"))
        sendData("\n"+result);
      else
        sendData("\nErrRead");               //At command ERROR CODE for Failed Executing statement
    }else
    if(find(message,"HELLO")){  //receives HELLO from wifi
        sendData("\\nHI!");    //arduino says HI
    }else if(find(message,"LEDON")){
      digitalWrite(13,HIGH);
    }else if(find(message,"LEDOFF")){
      digitalWrite(13,LOW);
    }
    else{
      sendData("\nErrRead");                 //Command ERROR CODE for UNABLE TO READ
    }
  }
If you want to communicate with Arduino UNO or ask todo something, just add your condition
if(find(message,"")){
     //something do do here}
I added some function to communicate with ESP8266.
/*
* Name: sendData
* Description: Function used to send string to tcp client using cipsend * Params: * Returns: void */ void sendData(String str){ String len=""; len+=str.length(); sendToWifi("AT+CIPSEND=0,"+len,responseTime,DEBUG); delay(100); sendToWifi(str,responseTime,DEBUG); delay(100); sendToWifi("AT+CIPCLOSE=5",responseTime,DEBUG); }/* * Name: find * Description: Function used to match two string * Params: * Returns: true if match else false */ boolean find(String string, String value){ if(string.indexOf(value)>=0) return true; return false; }
/* * Name: readSerialMessage * Description: Function used to read data from Arduino Serial. * Params: * Returns: The response from the Arduino (if there is a reponse) */ String readSerialMessage(){ char value[100]; int index_count =0; while(Serial.available()>0){ value[index_count]=Serial.read(); index_count++; value[index_count] = '\0'; // Null terminate the string } String str(value); str.trim(); return str; }
/* * Name: readWifiSerialMessage * Description: Function used to read data from ESP8266 Serial. * Params: * Returns: The response from the esp8266 (if there is a reponse) */ String readWifiSerialMessage(){ char value[100]; int index_count =0; while(wifiSerial.available()>0){ value[index_count]=wifiSerial.read(); index_count++; value[index_count] = '\0'; // Null terminate the string } String str(value); str.trim(); return str; }
/* * Name: sendToWifi * Description: Function used to send data to ESP8266. * Params: command - the data/command to send; timeout - the time to wait for a response; debug - print to Serial window?(true = yes, false = no) * Returns: The response from the esp8266 (if there is a response) */ String sendToWifi(String command, const int timeout, boolean debug){ String response = ""; wifiSerial.println(command); // send the read character to the esp8266 long int time = millis(); while( (time+timeout) > millis()) { while(wifiSerial.available()) { // The esp has data so display its output to the serial window char c = wifiSerial.read(); // read the next character. response+=c; } } if(debug) { Serial.println(response); } return response; }
/* * Name: sendToUNO * Description: Function used to send data to UNO. * Params: command - the data/command to send; timeout - the time to wait for a response; debug - print to Serial window?(true = yes, false = no) * Returns: The response from the UNO (if there is a response) */ String sendToUno(String command, const int timeout, boolean debug){ String response = ""; Serial.println(command); // send the read character to the esp8266 long int time = millis(); while( (time+timeout) > millis()) { while(Serial.available()) { // The esp has data so display its output to the serial window char c = Serial.read(); // read the next character. response+=c; } } if(debug) { Serial.println(response); } return response; }
Thats it! Now that you've learn how to communicate with ESP8266, you may now explore more Internet of Things projects. Maximize the power of this WiFI module and be a Maker!.
Feel free to add revisions on my github repo

Participated in the
Makerspace Contest 2017


