

Introduction: Adjustable Window Prop Rod


Do you have a window that just won't stay up? Are you still propping yours open with your Emmy or Ming Vase or firearm or pet? Are you frustrated by the lack of adjustability in these objects, forcing you to collect an ever-greater number of different-sized items that create clutter around your window, or topple out onto passers-by who invariably file suit? Then look no further than this Instructable: it could save you millions.
*Update Jan. 20, 2023: I was this many years old when I discovered there's a (problematically named), bigger version of this called a "bench slave," which helps hold up your material on a work bench. Now you know too!
Step 1: Other Solutions


When your window won't stay up, you have several options:
1. Fix the window.
This is certainly the most safe and responsible thing to do. But you're looking at a website at which you can learn how to blow stuff up and launch things and blow more stuff up, so my guess is that you're not going to err on the side of safety and responsibility.
2. Let Martha Stewart teach you how to make one:
http://www.marthastewart.com/265335/window-stepped...
It's a Good Thing.
3. Buy a cool prop stick from the Window Woman of New England:
http://window-woman-ne.com/window-stik.html
I bet this is like the best window stick thing that $18 can buy.
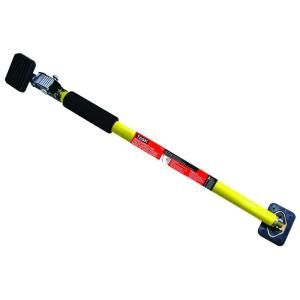
4. Buy some soulless metal rod:
http://t.homedepot.com/p/Task-113-in-Quick-Support...
This one is $28, and can not only keep your window open, it also claims to be "ideal for securing building materials in tedious installations when you don't have a free hand."
5. Make one of these things for close to zero dollars.
Step 2: Design, Materials


At first I tried out a stepped design (like options #2 and #3 mentioned in the last step), cutting a mock-up out of foam core board. And it seemed to work fine for the first two "steps," which propped the window open about five inches. But at higher steps it became precarious: the angle of the prop increased uncomfortably at the higher steps. I'm assuming that my geometry was off and that I should have just kept tweaking the design, but instead I abandoned the tried-and-true and veered off into over-engineered doodle land.
We have a wooden baby gate that used to keep our kids in but currently keeps our ducks out (they're always trying to weasel into the house to steal cat food). It stays in place using a little swinging bar and some notches and leverage and such, and I think that's pretty cool. So this prop rod also stays in place using a little swinging bar and some notches and leverage and such.
Materials:
- A square stick, 1"x1" works. Palette wood is fine: just hack off a 1"-wide piece.
- Flat wood, about the same thickness as the stick, for the quarter-round block. I used some scrap oak, but you could cut this part from palette wood, too.
- Thick wire; I used a piece of a wire hanger.
- String, thin rope, twine, small chain... something you can use to tie it off so it doesn't fall out your window.
Tools:
- Jigsaw, for jigsawing
- Pliers, for plying
- Wire cutters, for cutting wire
- Drill, for drilling
- Drill bit, slightly thicker than your wire, for drilling a hole slightly thicker than your wire.
I drew some pictures in Adobe Illustrator and managed to plan it all out pretty well before I fired up any power tools (a PDF of that doodling is attached to the last step of this 'ible). The relative dimensions are more important than the actual dimensions, but in the interest of completeness I'll be providing some measurements.
Step 3: Cut, Drill, Notch


Cut the wedge-shaped block out with your jigsaw. The straight sides of mine are 2" and 2-1/4", for no particular reason.
Drill a hole in the block about halfway down the curved side, and about a quarter inch in. Use a drill for the drilling, because that's what drills are for.
Cut your stick to whatever length makes sense for your desired window-propping range; I went with sixteen inches for no particular reason.
Notch the stick. I put the notches closer together toward the bottom, then farther apart toward the top. Place the lowest notch only a couple inches from the bottom, because you can't go any lower than the height of the block. The notches need to be deep enough to keep the wire in place, and wide enough to allow the wire to slip in and out easily; 1/8" was plenty for me.
.
Step 4: Bend the Wire


The wire is bent into a rectangle whose ends terminate inside the block.
Figure out how long your wire needs to be:
- The length of the first bend should be a little less than half the thickness of the block; 3/8" or so.
- Hold the block against the stick. The second bend is a little more than the distance between the hole in the block and the edge of the stick, or about 2-1/4".
- The third bend is a little longer than the full thickness of the block, or about 1".
- The fourth bend is the same length as the second bend (2-1/4"), and
- The fifth bend is the same as the first (3/8").
Add that up and cut your wire as long as it needs to be; it will be in the ballpark of six inches.
Make all the bends using pliers or your teeth, leaving the ends bent outward a bit. Then place one end into the block and bend so that each angle is 90 degrees, the ends are both plugged into the block, and the arm swings around easily.
Step 5: Assemble

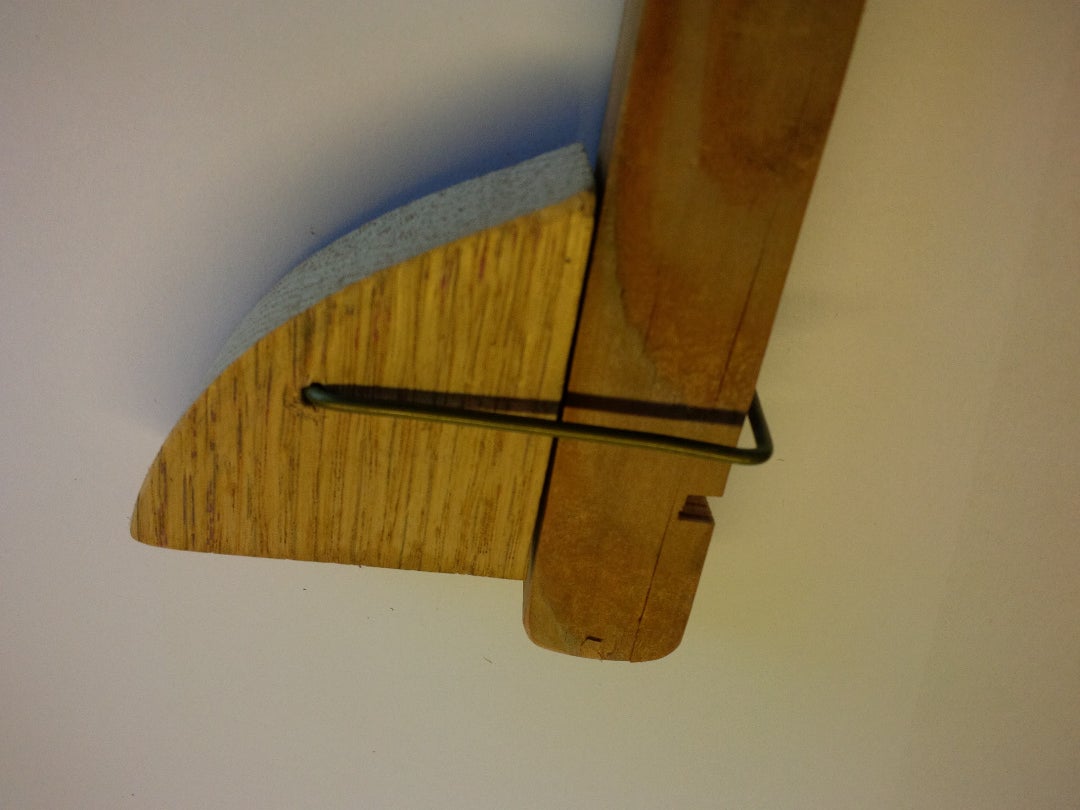


Slide the block onto the stick, with one flat side facing up, and the curved side facing away from the stick.
Check all the notches to make sure the wire drops in easily and the block slides up and down.
Make a safety line. Mine was made from some clothesline stuck through a hole near the base, but you are welcome to make yours out of 14 carat gold or licorice.
Step 6: Prop That Window, and Revel in Your Accomplishment.


Slide the block to the desired height, drop the wire into a notch, and rest your window on the prop.
I haven't tested how much weight this can support, but it's a whole lot - way more than you're going to generate with your window.
Note: this is far from child-safe: pull outward on the stick and the window drops. So keep children away until the are past stick-pulling age.
Cheers!
Mike
Attachments


Participated in the
Bedroom Contest

Participated in the
Pallet Contest


