

Introduction: Adjustable Child's Bench


- When the kid is sitting, his/her feet must reside flat on the ground
- There has to be a way to hook an end-point holder (a piece of wood on which the cello's tip resides; used when playing on slippery surfaces) to the bottom.
This instructable shows all the materials, tools and steps I followed to make the bench, but it could all very easily be adapted to building other items. The bench used three interesting techniques that are worth mentioning here:
- Dove tails - they offer very high strength union for parts that are connecting at 90 degrees. Commonly used on drawers and chests, they can be made fully visible on both ends (like with this bench), or only visible on one end and not the other (I think that one is call a half dove tail). Mine were made entirely by hand, but if you're mass producing these things and looking for efficiency you should switch to using a router with a dove tail guide.
- Mortise and tenon - another high strength technique for attaching pieces. This was used for the quarter-round supports under the bench, and involve having one piece fit partially (but very tightly) into another. For the bench, the supports' entire top and side fit into the seat and leg (respectively) of the bench, and the union is practically invisible.
- Glue only. No nails or screws were used to assemble the top and the the legs it connects to. The adjustable legs on the outside of the bench are held on by simple bolts and wing nuts.
Step 1: Material and Tools


The material of choice in this case is obviously wood. But there are several kinds, and choosing the right one depends on several factors like the wood's beauty, the cost, the ease of working it, etc.
In my case I knew I wanted to experiment with dove tails and mortise and tenon techniques, so I didn't want to buy really expensive woods only to see them get trashed. I ended up choosing pine to work with, and actually got lucky with the pricing too. It turns out that planks of pine that are knot free are more expensive (probably because that wood is stronger), but the knots are what would give the bench more character and beauty (in my opinion, at least), so the cheaper wood was actually exactly what I wanted. I ended up using two 8 foot lengths of 1"x10" (which cost about $12 each), but I think you could get all the material from just one board. I used two because I messed up one of the legs and also wanted more pieces with knots in them.
Once everything was finished I was able to stain and varnish the piece so the colouring can really be played with a bit at that point. The wood can probably be made to look like any type of wood (with the right type of stain), and the only thing to keep in mind after this is the softness of the material and how easily it can get scratched and dinged. Pine is a relatively soft type of wood (i.e. a 2x4 won't bend, but you can mark it with your fingernail), but given that this piece of furniture is going to be used by an 8 year old I figured it's going to happen anyway so there's no use using something really expensive.
As for tools, you need several clamps (especially tabletop clamps which will be useful when cutting the dove tails), a roughing planer, chisels, files, exacto knife, wood glue, jigsaw, regular saw and a coping saw. You will also find a mitre saw quite handy, as well as some sanding blocks, files, and the usual hand tools.
Step 2: Experimenting With the Dove Tails


One of the videos I found the easiest to follow and well done was one by Ed Borastero, but I'll note now that I'm not endorsing the guy, know who he is, and haven't watched any of the other videos he's posted. This link is simply an example of a good dove tail instructional:
http://www.youtube.com/watch?v=Ia5p-tv8c1E
The video shows pretty much how I made my dove tails. Seeing that this was the first time I was ever attempting this, I tried a couple of joints on scrap wood cut from the main 8' board first. Here are a couple of things I've learned:
- You don't really need the fancy little wood saw used the video. I've seen it used in several others, and it seems easier to work with than a regular saw. But I won't be doing these very often, and honestly got pretty good results with my regular one.
- Once the tails have been marked on the wood, scratch out the part of the design that is going to be removed. Then, when making your cuts, make sure you cut inside the line (i.e. within the area of removal) and not on the line itself. This will make for much tighter fits.
Step 3: Preparing the Real Dove Tail Cuts


- Turn the top of the bench upside down, and stand the leg up near the edge. Indent the leg by about 1/16" so that the final dove tails protrude a little and can be sanded down perfectly flat. Use an angle to ensure you've got the leg set up at 90 degrees, and mark the position with a line.
- Draw the dove tails onto the bench. I just went for three equidistant and equal tails, but you could go wild here and make it as you wish. Maybe a big one in the middle a two small ones on either side?
- Make sure you draw the tails on all side, and connect them on the edge of the board. Scratch out the area to be removed so it's easy to identify when cutting it out.
- Stand the top up in a desk clamp, and make your cuts. Remember to cut right next to the line (and not on the line), and make the cuts within the removal area.
- When you're done with the vertical cuts, use the coping saw to go in sideways and fish off the removal.
- I learned pretty quickly that a chisel was useless when cleaning up the tails on pine. The wood is too soft, and the chisels would end up bending the grain and leaving ugly marks even though the blade was new and sharp. I opted instead for an exacto knife, and that worked perfectly. The marks were easy to make, and the wood was soft enough that I was able to clean up the tails in very few strokes.
Steps I followed for the leg:
- You now need to trace the shapes you cut out of the top on to the leg itself. Start by placing the leg on to the top and indent it by about 1/16", and trace the border. This will be your depth gauge.
- Stand the whole thing up (I use heavy screw boxes to prop the whole thing up), align the top and the leg, and carefully trace the tails on to the edge of the leg.
- Ensure the tracing you've made are translated to all sides of the leg, and clearly mark which areas of the tail are to be sawn out.
- Cut the unwanted areas off just like you did with the top, and ensure you're always cutting next to the line and within the shaded area.
- Once everything is cut off and you've shaved off the wood to achieve a really clean cut, try assembling the pieces. they should fit tightly and need a bit of tap to get in. If it's too tight, shave off a bit more.
That's about it. Repeat the whole thing for the other side and you're done! Sit back and enjoy the beautiful joinery you've just made!
Step 4: Adding Support Under the Bench


The dove tail joints are pretty strong in themselves and lend a lot of support to the bench, but I wanted to make sure that lateral movement on the bench would not put too much stress on the structure. This gave me a perfect opportunity to try out mortise and tenon joinery. This is basically the case where one piece of wood is shaped in such a way that part of it ends up embedded in a receiving socket in another piece of wood.
In my case, I had a mortise channel running under the bench and then down the side of each leg. The supports then had matching tenons cut into them, and they fit right into those grooves. Seeing that I was dealing with wood that is soft and easily marked, I made the tenons thinner than the thickness of the support. This allowed for the tenon to completely sink into the mortise and then have the wider edge of the support completely cover the whole thing.
The process started by tracing out the shape I wanted for the support, and leaving an extra 0.25" margin on the sides touching the seat and leg. The curve of the support was achieved by placing a nail at the corner, attaching a piece of string, and tracing the quarter circle at the edge.
Once the supports were cut, I traced the 0.25" margin on the edges as well, and then removed the excess wood. The wood being removed was a bit thin, so I worked with the exacto. Being pine, this was not hard to do. Just watch those fingers.
With the tenons ready, the supports were placed back on the bench, centred, and their outlines were traced. This outline became the guide for creating the mortise, but it's important to note that once the support would be fully installed it would be recessed by 0.25", so the mortise was made shorter than the length of the support to avoid ending up with a very ugly hole.
To cut the mortise out I just used an exacto to start the tracing and then a 0.25" chisel to remove the material. Frequent test fittings ensured I got down to the right depth.
Once I was done cutting the mortise into the bench I repeated the process with the leg, and then repeated the whole thing on the other side of the bench.
Step 5: Making the Extension Legs


This was the home stretch. The complex cuts had all been made, and all that was left was to make the extension legs, drill the holes for the bolts, sand everything down, stain and varnish. Piece of cake.
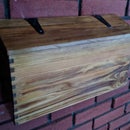
For the legs I decided to use a tapered design. I removed 0.5" of stock off of both sides, leaving about 2" intact near the top. To round off the taper I traced the outline of a small washer.
Once the taper was complete, I traced the leg on to a new piece of lumber and used the same measurements to create another taper, but this time it was inverted so that the bottom of the extension leg was wider than the top. When the whole thing is assembled, this would give it wide tops and bottoms, but thinner mid sections.
The extension legs were then cut out and filed down to size. Then they were laid out on top of the fixed legs in the same way they'll appear once fully assembled, and the bolt holes were marked and drilled 2" apart. The holes are a bit wider that the bolts themselves to allow for two things: easy assembly, and easy adjustments to avoid chair wobbling and rocking.
Step 6: Sanding and Gluing, Staining and Varnish


Sanding is an awesome step. Your creation is right there before you, and you start finessing out the little details, making it smooth to the touch, cleaning out all the pencil and scrape marks, and generally just finishing the whole thing up.
I moved from 60 to 100 to 220 grit, progressively cleaning the whole thing up and making it smoother. All the corners were rounded off, and an orbital sander was used on all the large surfaces. For the protruding dove tails I used a hand scraper to bring them down flush with the bench's surface and then continued with regular sanding and edge rounding.
Once everything was sanded down, I went for a first dry assembly. Boy was it a pleasure to see this thing come alive :)
After the dry assembly was complete and everything was verified to look ok, I started the glue up. All surfaces had wood glue brushed on to them and were then assembled and held in place with large clamps. It was at this point that I noticed there were still slight gaps where the mortises and tenons of the support pieces connected, so I used wood filler to hide them. It worked out just fine, but what I didn't know was that the filler really stains raw pine. I had a lot of sanding to do after the filler dried up, and I still think I missed a couple of spots.
Finally, when everything was nice and dry, two coats each of stain and varnish finished the job and had it ready for use.
Done :)


