

Introduction: Adjustable Under Garagedoor Shelf/projector Mount


if you use your garage as a hangout area as well as a workshop sometimes you have to be creative with your use of space. The perfect position for a projector in my space is directly under the open garage door. Hanging a mount from the ceiling would not be possible. This under garage door shelf can open up some possibilities for previously unusable space. With this design it can be used almost the entire length of the door track, except where the door makes the turn to vertical.
Your application, needs, and available materials will be different than mine so I'll forgo a materials list. I try to use things that I have laying around.
the main thing that you will need though is a plank longer than the track width of your garage door. (mine is 9'8")
Be careful! My projector is only about 5lbs, considering the weight of the plank I used, I'm not over taxing the door framework. If you decide to load up this shelf with tools, brik-a-brak or whatever else, do so at your own risk.
Step 1: Assess Your Application.


measure the distance between the outside of your garage door tracks. The shelf length will be just wider than that. I cut mine no more than 1/4" longer to minimize binding when the shelf is slid on the rails. I partially planed this one for the show side.
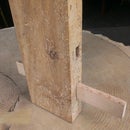
Step 2: Create the Hanging Arms.


I used some clamps to temporarily hang the shelf from the door tracks to test the clearance. I created a matrix of holes that will be used to adjust the height once installed. Affix the hanging arms to the shelf, I also added a small 45 deg brace to help with the load.
Step 3: Nail Carrier


I made a carrier for the nails so they can be inserted all at once. The carrier can then be secured with a screw so that the vibrations of the door operation don't work them loose.
The carrier has the nails press fit through it. The holes in the legs are slightly slip fit.
Step 4: Clearance

Test the nail carrier and trim the nails to be clear of any moving parts. Also, be sure to tuck the release pull into the door linkage. Failure to do so could get costly quick. Worst case, you'd have a broken door opener, track and projector... I don't think it would happen in my instance, but again, build and use this design at your own risk.
Step 5: Projector Provisions


I used an old barbeque grate as a platform to increase airflow as well as add some finer adjustment to the assembly.
Using some scrap wood and finish nails, I made some slide guides to allow the bbq grate shelf to slide fore and aft. In order to keep the grate from being unintentionally separated from the main shelf, I used another nail through a slip hole over the grate as a pin on each side. This keeps it from lifting as well as sliding when the pins are engaged. You may want to secure the projector to the shelf as well.
Add some cable management along the top of the shelf to keep things tidy, and to keep them clear of the moving parts.
Step 6: Enjoy!


set up your projector and enjoy!


