

Introduction: Advanced Cookies Cutter Generator


![Game O Verre ! Play with your glasses ! [DIY version]](https://content.instructables.com/FC4/O1TS/IVMPY6SD/FC4O1TSIVMPY6SD.jpg?auto=webp&crop=1%3A1&frame=1&width=130)

Hello all,
Here is a simple guide to how design and 3D print his own cookie cutter !
My first 3D cookie design was a 5 inch tall dinosaur build with 6 cookie glued together with concentrated milk. It was pretty terrifying and tasty !
This script allow so much more and it's easier, the only limit you have is your imagination (and the size of your oven) !
Lets design, print and bake the cutest, the dumbest, the greatest (etc...) cookies of the word !
I hope you will enjoy it and bake a lot of cookies ! :)
Note : No cookie recipe here, only designs tricks for 3D printing. ;)
Note2 : This Instructables is an introduction to the 3D cookies, others ones should follow for more complex designs, with surface reliefs or real 3D cookies (like the Dino).
Step 1: Install the Softwares

Before start you will need to download and install a few softwares. ALL the software I used for this project are free and Open-source and are multi platforms (Windows, Linux, Mac and more)
The mains softwares
Inkscape : Inkscape is a professional vector graphics editor for Windows, Mac OS X and Linux. It's free and open source. We will use it to make the designs of our cookies cutters.
If you used to use an other vector graphic editor you will be able to easy import your files in Inkscape.
OpenSCAD : OpenSCAD is a software for creating solid 3D CAD objects by programing. We will use it to convert vector files into 3D ready to print .stl
Install them both, and add the Path2Cookies extension to Inkscape.
Paths To Cookies Inkscape extension : Paths 2 Cookies is a script I developed to convert an Inkscape vector into a pre-configured OpenScad cookie cutter file.
You can download the extension here or on Github (soon). To install it you just have to copy the contents of the .zip directly on the "extensions" file of Inkscape.
On Windows it should be on C:/Programs/Inkscape/share/extentions or something like $HOME/.config/inkscape/extensions for Linux (should be similar for Mac). Do not forget to take the admin rights when you do this. ;)
Printing software
Then, if you have your own FDM 3D printer or have a FabLab near to your home, I advice to use Slic3rfor the slicing. Keep the profiles simple and everything should be nice.
If you are a MakerBot user (as I am) I advice to NOT use the MakerBot desktop software that is very bad on slicing thin walls objects (as the cookies cutter) and will produce empty area on the walls and make the cookie cutter fragile and useless.
Healths questions
For the plastics, personally I'm using classic PLA, cleaning it with soap water not too warm and it's fine. Some FDA approved for food contact plastics are existing, if you are baking cookies for small kids or for sell them I recommend to use them to minimizes the risks. (even if they already very low)
And if you really want to be food safe, also to change your printer nozzle for one in stainless steel (and not brass like usually that contain some lead).
Attachments

Step 2: Design Your Cookie on Inkscape


Inkscape is an OpenSource software, free and multi platform to make vector drawings.
If you don't have it yet you can download it here : https://inkscape.org/en/
You can find a lot of information about how to use it on Internet, you can take a look to the FLOSS Manuals for example : http://en.flossmanuals.net/inkscape/
The aim of this Instrucables is not to make you an Inkscape pro but give you the good tips to how to use the Cookie Generator Script.
Page setup
The page dimension are not relevant on the final export but are a good tool to have an scale reference.
I usually set my page to an 10x10cm size. (I like big cookies) Keep in mind that the cookie size in Inkscape will be the same of the exported 3D file, do not work in an A3 workspace. ;)
You can click on you object and show what's their global size at any moment. (on image comment)
Draw your cookies
If you never used Inkscape I invite you to look to some tutorials for the basis. It's not very hard to make a draw with it.
If you used to draw with Illustrator or any other vector draw editor you can easy import .svg files into Inkscape.
If you really have a lot of difficulties with Inkscape you can import high contrast bitmaps and use the automatic vectorization tools.
Make only one united object at the time
The script can handle more than one object at the time but it can produce error and a will make spend a lot of computing time for nothing.
If you have an object with multiple shape that have to be united, select all of them and click on "Union" on the path menu. If one have to be subtracted from an other, select the two shapes and click on "Difference".
Keep it SIMPLE !
Remember that is for 3D printed cookie cutter, and after that for actual cookies. You will lose details on every steps, so try to focus on the principals shapes to keep it nice looking during all the process.
Now you have finished your drawing, it's time to use the Path2Cookies script !
Step 3: Using Path to Cookies Script


Now that you have the shape that you want to cut it's time to use the script !
Just select the object you want to export (if you select more than one object they will all be exported, if they close one from others they may be mixed.
Launch the script, click on "Extensions" menu, "generate from paths" and finally "Path2Cookies".
If the script does not appear on the list check in your extensions files that you installed it well.
The Path to Cookies menu should open.
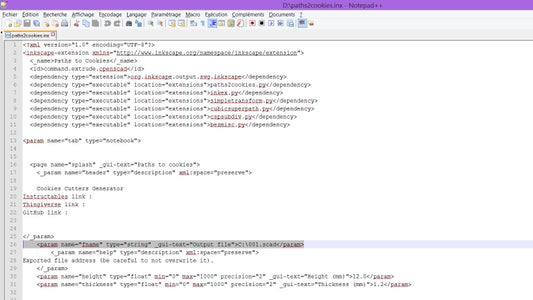
You have to setup the "Output file" box by entering a local address with a file name with .scad extension. (Inkscape extensions API does not allow a classic "Save as" menu so it's by hands...)
You can click on "Apply" without changing anything and a .scad file should be created on the file you ask.
Launch OpenSCAD and open the file you just created.
You should get a view close to the one on the second screenshot, nothing in 3D yet, to launch the computing you just have to click on the Render button (or press F6) on the top of the editing area.
Their is also a preview button (F5) but with heavy files OpenSCAD crash sometimes. (on windows when system say that OpenScad is not responding, just wait, when the render will be finished it will back to normal)
/!\ Rendering a file may be LONG ! /!\
Rendering files, depending of shape complexity and settings may be instant or sometime more than 30mn sometimes. It may be long but library used by OpenSCAD produce very clean 3D objects (but slowly).
Once the object render it appear on the 3D view box. It's time to export it in .stl on the top of the editing area.
You now have your cookie cutter file ready to print !


Step 4: Print and Cook !


Print the cookies cutter.
No need special profiles or plastics. With the thin walls it will be automatically fill at 100% with 2 or 3 shells.
If you have a MakerBot, do not use the Makerbot software for this, it will make empty wall very fragile and very hard to clean. Prefer Slic3r, you can convert the .gcode into .x3g with replicat.org software.
For baking I use a basic sugar cookies recipe, use the printed cookies cutter like any others cookie cutter. (sometime clean the edges and hollows with knife, use a lot of floor for cutting, drip your cutter on floor before to use etc...)
Cooked in oven, wait them cold and finish some with chocolate spread. And here I have an unique batch of cookies ! :)
For cleaning warm watter (but not too hot, PLA get soft at 60°C) soap and dish brush should do the job. Avoid the dishwasher.
And for eating, if you don't know how to do I can help you, I'm accepting food packages (cookies usually does shipping travel pretty well)
Step 5: Path to Cookies Settings

Ok, we successfully export our first Cookie Cutter (I hope) !
Now it's time to check the advanced settings and be adapt as close as our need the exported files. ;)
Let's look to the parameters we have !
The main tab
Output file : Ok we already see it, localization and name of the exported .scad
Height : Will define the height of the final cookie cutter.
Thickness : Will define the thickness of the cookie cutter walls. Tips, use a multiple of your 3D printer nozzle for better results.
(Tips : Use a multiple of your 3D printer nozzle for this setting for better results, 1.2 is good for most of printers (0.3 and 0.4mm nozzles))
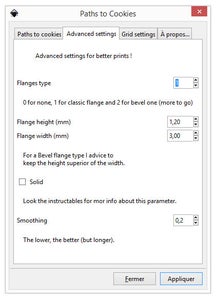
Advanced settings tab
Flange type : Will define the look of the flanges of the cookie cutter, chose 0 for no flange, 1 for the classic one and 2 for a bevel. Note, the last one (2) is longer to render.
Flange height : Will define how thick is the flange.
Flange width : Will define how large will be the flange.
Note : With Flange type 2 those two last settings will change the bevel angle, to keep an angle at 45° make the height and the width equal.
Solid : Will produce solid filled objects. May be usefull for some 3D printer profiles or for make stamps objects.
Smoothing : Will define how smooth the vector shape will be converted, more the value is low, more the export will be precise (and long to render). If you do not need extreme details 0.2 is a good value.
Grid settings tab
Last tab is a bit specific, I'll do a special step for it.
Step 6: Using the Support Grid


For some multi elements cookie cutters you will need a back grid to keep them in place.
To use the grid you just have to check the "Enable Grid" on the grid Tab on export.
Here is the parameters list and how to use them :
barsThickness : Define the thickness of the grid bars, usualy chose a value that is a multiple of your printer noozle size.
barsSpacing : Define the space between each bars of the grid.
rotateZ : Allow to rotate the grid on Z axis for some adjustments too.
Hidden parameters :
Some parameters are hard coded directly on the .scad file, some can be useful on some special cases, if you want to change them you edit them on the .scad file on the parameters list.
gridThickness : Change the thickness of the grid, on basic the grid thickness is equal to the borders thickness.
shiftX : Value to make some small adjustments on the grip position on X axis.
shiftY : Value to make some small adjustments on the grip position on Y axis.
maxGridX and maxGridY : Maximum size of the grid, it's define at 300mm, if you build a bigger cookie cutter you will have to adapt this parameter, you can even reduce it if you only design small cookies to save a bit of computing time.
Step 7: Edit the Initial Saving Path Location
The save as box with Inkscape extensions is not optimal...
If you are using the script regularly on the same computer you can "hard change" the initial saving location in the path2cookies.inx file.
To change the location you just have to open the file on a text editor, and change on the line 26 the initial path location.
YOUR FILE PATH
Save and now when you open the script again the initial saving location should be the one you chose. ;)
Note : You may need the admin right on your text editor to edit the .inx file.
Step 8: Example 1 : Cute Multi-cookies Panda


A quick application of the script.
The cute panda cookies ! (easy to do and sooo cute...)
You can easy vectorized a picture on Inkscape and build some layers. Why not do the same with cookies ?
This cookie is build with 3 cookies glued together with chocolate spread (without palm oil). I play with the contrast between the basic cookie and the chocolate spread to make the panda colors.
We can also do some colored doughs or multi color frosting ? Have fun !!!


Step 9: Example 2 : Weird Kitty Face Cookie.


Same as the cute panda with weird results ! ^^
I tried to make a kitty version of a famous french schoolboy cookie.... As I say, I tried ! :)
Let's say it's an alien version !
As I wrote it before, cookie baking is not an exact science, sometimes the drawing on the computer doesn't look exactly the same on cookie, keep this in mind. ;)


Step 10: Example 3 : Tamgram Mega Cookie Cutter


This one is another example of what it's possible using some specials settings.
To get the design of this file I design the Tam Gram with lines, set them thin (0.2mm) and then I vectorized the lines, I set the wall thickness 0.2mm smaller than usual, export with the solid box checked(I don't want the script clear the lines])
And TADAM !
It's an easy way to make multi cookies cutter ! Why not try this with some children animals puzzles ? With a bit of color it could make a great snack. ;)


Step 11: More to Go


Real 3D cookies like this Cookynnosaurus Rex or hyper realists ones like the Nyan cat.
We are just at the beginning of 3D baking !
I will continue to work on this project and I hope be able to share new Instructables soon. ;)
Hope you liked it do not hesitate to share your creations on the comments on on Thingiverse.
Note : As the good French I am, it's probably full of language mistakes => Sorry :p

Participated in the
3D Printing Contest


