

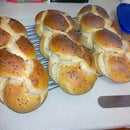
Introduction: Almost No-Knead Egg Challa (including Braiding Instructions)


This recipe is based on the excellent work by Jeff Hertzberg and Zoe Francois of Artisan Bread in Five fame. It has been modified somewhat for an easily braided loaf.
I have been baking bread for years. I don't have room in my kitchen for a large mixer, so would spend a good 20 to 30 minutes kneading by hand for a well developed gluten in my dough. Jeff and Zoe's innovation of making a very quick very wet dough and letting it rise for hours is the most exciting thing to happen to bread making since dry yeast!
This recipe makes 3 large braided loaves. In principle you can bake part of it and refrigerate the rest to bake later, but note that raw eggs make this more of a health risk than a simple basic recipe (watch the videos on the Artisan Bread in Five site).
I started out making this recipe with 100% unbleached white, then moved to 25% whole wheat, and then to 50% white, 25% whole wheat and 25% whole spelt. I will give the proportions for each of these options.
Update: I have gradually weaned my children off of white flour, and am now using a 50:50 whole wheat:spelt mixture. If your whole wheat flour is very dark and heavy, you may want to adulterate slightly with regular unbleached.
Step 1: Equipment and Ingredients


Equipment:
* Digital Kitchen Scale (makes life easy).
* Measuring cups (at least one of 2C / 500ml size).
* Measuring spoons.
* Fork.
* Plastic dough scraper / rubber spatula.
* Large bowl - at least 4.3 Liters - with cover (cover doesn't need to seal - use a large plate or a plastic bag if necessary).
* small jar with cover to keep the egg for basting if you want.
* pastry brush
* fingers
* Baking sheet, Baking paper
Ingredients:
1 KG flour: any combination you like e.g. all white unbleached, 750gr white + 250gr whole wheat, 500gr white + 250gr whole wheat + 250gr whole spelt, 500gr whole wheat + 500gr spelt, 1000gr ww... .
1 Tablespoon salt
1 Tablespoon instant dried yeast (the kind with really small granules; you don't need to dissolve it first, just mix it in with the flour before adding the liquids).
2 or 3 eggs or egg replacer / 4 T golden ground flaxseed + 1/2 C water
6 Tablespoons sugar / 120 gr sweetener of choice
1/2 C olive oil [optional]
Warm water. Water can be replaced with other liquids including steamed and blended vegetables. 600gr of sweet potato or beets cooked and then blended with the steaming/cooking water and cooled to warm is a nice variation.
Optional: seeds to sprinkle on top of the loaves - whatever you fancy. I like poppy and nigella, sesame is nice too.
Step 2: A Note on Measurements and Why Not Just Follow Ain5's Recipe and Video
For those of you who don't have a digital scale, the basic Ain5 recipe is:
6.5 C flour.
1.5 T salt.
1.5 T yeast (too much in my opinion).
3 C warm water.
I am increasing the flour by about 10%, reducing the salt, reducing the yeast, adding sugar, and replacing part of the water with eggs and oil; generally reducing the liquids by about 5%.
This gives a slightly firmer dough which can be kneaded after the first long rise (see step 4).
The Ain5 recipe is a very wet and very sticky dough, which is fine for minimal shaping, but not so good for making braids.
On replacing the white flour with other flours the liquid ratio changes too. Professional bakers use the percent by weight notation for liquids, where the base weight of the flour/dry ingredients is 100%. So, for instance a 50% recipe would mean you have 1 KG of flour, and 500 gr of liquids. This method gives a more consistent dough than one that uses volume measures.
According to my calculations, Ain5 base recipe is about 74%.
My recipe is 70% for white, 82% for the 1:3 whole wheat:white recipe, 89% for the 1:1:2 spelt:whole wheat:white recipe, and 96% for the 1:1 whole wheat:spelt recipe.
For those of you who don't yet own a scale, in terms of flour my recipe would be about 6.75 C white, or 5 C white + 2 C WW, or 3.33 C white + 2 C WW + 2 C spelt, or 4 C WW + 4 C spelt. I think you can see why a digital scale makes things a lot easier.
Step 3: Making the Dough


1) Put your bowl on the scale and hit 'tare' to zero.
2) Weigh out your flour(s) until the scale shows 1 kg.
3) Measure in the yeast and salt, mix with your fingers.
4) Break eggs into the large measuring cup. Beat with fork until uniform. Pour off some into your small jar (about enough to cover the bottom with 2 or 3 mm of egg). You can skip this if you don't want to baste with egg: water basting is just slightly less shiny. If you are using flaxseed instead of eggs, grind 4 Tablespoons of golden flax, mix with 1/2 Cup of warm water.
5) Measure sugar into eggs, beat a bit more with fork so it starts to dissolve.6) Add oil to egg mixture (I pour directly from the bottle and measure it in the same cup, noting how high the egg mixture was before I began). Beat a little more so the oil is not separate from the egg.
7) If you have a scale zero it. Add warm water to dilute the egg/oil/sugar mixture, mix and then pour into the flour, topping up with more warm water until you have 700 gr if this is the all white recipe, or 820 gr for the 1/4 whole wheat, or 890 gr for the white/whole/spelt combo, or 960 gr for the ww:spelt version.
If you don't have a scale aim to measure the equivalent in mililiters. 1 Cup is about 235 ml, so the all white recipe needs 3 C of liquids, 1/4 ww needs a little under 3.5 C, white/ww/spelt needs about 3.75 C, and ww/spelt needs about 4 C .
8) With one hand and fingers mix the liquids into the flour until they are all incorporated. The dough will be wet and sticky. Scrape the dough from your hand with a dough scraper or spatula, and scrape down the dough from the edges of the bowl.
9) Cover (don't seal!) and place in a warm place for 2 to 5 hours (the top of my fridge is perfect). Don't worry, if the bowl is at least 4.3 liters it will not overflow.
Step 4: The 'almost' of the 'almost No-knead'


Dust your work surface generously with flour and turn the dough onto it, scraping the bowl out as well as you can. Use the dough scraper to turn in the sticky edges and sprinkle a little more flour over the top. Now knead gently for a few turns, just until the dough has picked up the extra flour and is nice and stretchy and bouncy; maybe 10 or 15 turns, about 1 minute of kneading. Use more flour if necessary.
Roll into a ball and place back in bowl. Cover and return to warm corner for second rise.
This takes about an hour in my kitchen: this time the dough will rise above the edge of the bowl picking up the cover if you let it get past you.
Step 5: Shape, Last Rise, Oven Pre-heat


Steam helps this bread, so put an empty metal pan on the bottom of the oven.
Put baking paper on baking sheet. I like to spray lightly with oil and then sprinkle cornmeal on the paper.
Dust work surface with flour and turn out the dough. Cut into three with your dough scraper or a knife (I like to shape it into a rough circle, then cut from the middle to one edge, and then open the cut into an empty 'quarter' of the circle. Then cut the other 'quarter' lines, and it comes out a good approximation of even thirds). Depending on what kind of braid you want (3 strand, 4 strand, 6 strand...) cut each third into further pieces. I like to make a 4 strand with two long doubled over snakes (see Appendix in step 7).
Roll your pieces into snakes, braid into loaves. Place loaves on baking sheet. Cover loaves with plastic wrap or a plastic bag to keep them from drying out during rise.
If you have an empty dishwasher, it can become an easy raising chamber: just pour some boiling water in the bottom to make the atmosphere warm and steamy, and close the door. Make sure nobody turns the dishwasher on!
Pre-heat oven to 250 C (about 480 F, or just the max for your oven).
The last rise is the most important one for a light loaf. Give them at least 20 minutes, they should be about doubled. When poked gently with a wet finger they should spring back slowly. if they deflate it has been too long a rise (never happened to me...), and they might come out a bit flatter than you want.
2 minutes before putting them in the oven, take the reserved egg, dilute with a little water, baste the loaves and sprinkle the seeds on top.
Step 6: Bake... and Enjoy


Boil a cup of water.
Put the loaves in the oven and pour the boiling water into the pan at the bottom of the oven.
If you are using a baking stone, slide the baking paper off the baking sheet onto the stone. This takes a little practice, so if you are nervous about it, do it 10 minutes into the baking time.
Lower heat to 220 C (about 420 F) and time for 10 minutes.
After 10 minutes lower heat to 200 C (about 390 F) and time for another 10 minutes.
After 20 minutes check color; if it looks done try to pry one up with a metal spatula, and check the bottom. Tap the bottom, if it sounds hollow, it is done. Otherwise give another few minutes until you can't bear the smell, take them out of the oven and try to wait until dinner.
Step 7: Appendix: Making a Four Strand Braid With 2 Doubled Strands


For years I made as many dough 'snakes' as needed for the braid: 3, 4, 6. The rules were simple:
- three braid: under one each time.
- four braid: under two, back over one.
- six braid: under three, back over one.
But when working with dough, time is of the essence. Splitting a batch of dough into so many pieces, getting them even, rolling them into snakes, braiding... the first loaf would get a good extra 10 or 15 minutes of rising time.
So I started making two extra long snakes, doubling them over, and then counting 'under two, over one'... . The start where I looped the two snakes around each other was always the problem, sometimes it looked right, sometimes it looked wrong.
Preparing this 'ble, I decided it was time to rationalize this. I watched TIAT . I played around with some pieces of paracord.
Here is the general rule I arrived at: start by looping one strand around the middle of the other, crossing the two ends.
You will have a top pair of strands and a bottom pair of strands.
The bottom pair has a crossing thus making each end 'above' or 'below'.
For each subsequent crossing, the top strand on the side of the 'below' strand of the lower pair goes over, while the top strand on the side of the 'above' strand of the lower pair goes under and then over its pair. See the pictures and notes.
Participated in the
Bread Contest


