

Introduction: An Arduino, Hydroponics, and You: a Solar Powered Microcontroller Garden


After buying an Arduino and learning how to use it, I immediately started wondering, "What can I build with this thing that I can call my own?" So I started listing the things that I like: Solar panels, living "off the grid", self sustaining systems, becoming a more knowledgeable and independent person, etc. and naturally I came to the obvious conclusion that I should build a nuclear fusion chamber. Within 10 seconds I realized that would be kind of hard, so I moved on to the next idea: An Arduino powered garden.
Step 1: Basic Theory
The basic idea was simple enough. Build a garden that will water itself and turn on grow lights when it isn't getting enough sunlight. I wanted to keep it indoors, so I decided to build it in an old fish tank. I needed to grow something that could grow in small areas and under many conditions, so I chose a spice (cilantro) and lettuce. I also wanted it to be compact so it doesn't take up too much space, so I kept that in mind while building everything.
To power the Arduino without a USB, I plugged the 12V directly into the Vin pin on the Arduino, while making sure the 12V power supply, a battery in this case, and the Arduino share a common ground. This is important! The Arduino has a built in voltage regulator so anything between 6-20V will power the Arduino.
Step 2: Materials


The materials came from a variety of sources. For anyone with the intent to build their own garden, use whatever resources you have available! I used what I had lying around to save a significant amount of money. Many of the electronic parts I used came from the Arduino Starter Kit, which cost $100, but was extremely worth it in that it taught me the basics of using an Arduino and electronics. Many of the ideas in this project were pulled from the beginner projects in the Starter Kit book.
Link to starter kit:
https://www.arduino.cc/en/Main/ArduinoStarterKit
Arduino Starter Kit - $100
1/4" Vinyl Tubing - $5
1/8" Vinyl Tubing - $5
Fish Tank - $25 off Craigslist
NTE2395 MOSFET N-Channel Transistors - $10 for two
Potting Soil - $15
360 Degree Spray Nozzles - $5 for a pack of six
Seeds - $5
10W LED Grow Lights - $30 for five strips
http://www.amazon.com/Hydroponic-Flowers-Vegatable...
Added up I spent about $100 on parts (not including the Arduino Starter Kit). I had a battery lying around, but if you have to buy a battery, expect to spend around $50 - $60 for an appropriate one.
Step 3: Sealing the Tank

The tank I found was pretty old and needed to be resealed, so I placed some silicone sealant along all the edges to make sure the tank was water proof. Pretty simple.
Step 4: Watering System


We had a water reservoir and attached motor lying around that was from a car's windshield sprayers. These are perfect for a project like that since they run on 12V DC and the pumps are more than powerful enough for this application. If you need one of these, simply go to a junkyard and grab one. I wouldn't expect it to cost any more than $10 for everything.
To start out I placed my tank on an old table that we had lying around the house. Conveniently this table was on wheels which was an added benefit. I mounted the reservoir + motor onto the side of the table using screws and an L-bracket.
I then attached a tube from the motor (I believe the motor used a 3/8" tube), and using a couple tube adapters we had lying around, hooked up my tubes after cutting them to the right lengths. I found that Command Strip wire holders were perfect for holding the tubes down to the tank. Find all these parts these at any hardware store, ideally Lowe's or Home Depot.
I ran the tube from the motor to a tube splitter adaptor under the soil, then each to the 360 degree sprayer. To hold the sprayers up I just used a zip tie and secured to the tube + sprayer to chopsticks sticking out of the dirt.
One wire from the motor is then connected to the "drain" on the NTE2395 transistor. I chose this transistor because of its capability to handle high current across the drain and source, and its capability of dispersing heat. I burned a couple of different transistors before learning this. The other wire from the motor is connected directly to 12V on the breadboard. The "source" on the NTE2395 is connected to ground, and the "gate" is connected to the Arduino's digital pin through a 10M resistor. When the Arduino turns on 5V across the gate, it closes the drain and source, allowing current to flow from the 12V battery and through the pump.
I attached an IN4007 diode (it's cheap), in parallel with the motor to take care of the surge from turning the motor off. The motor is an inductor after all, so a change in voltage will mean the motor wants to resist that change by creating a sharp voltage in the opposite direction which is why the diode seems to be placed backwards in the circuit at first. Don't forget this or you could damage your Arduino!
Lastly I added a button in so I can water the plants whenever I want. Just plug it into a digital pin on the Arduino with a 10K resistor.
Step 5: Moisture Sensors


I kept things simple here. I soldered wire directly to two galvanized nails and stuck them in opposite ends of the tank. Use plenty of solder here to make sure you get a good and strong connection. The Arduino then reads the resistance between the two nails, and thus the resistance of the soil, to determine how much moisture is in the soil. It will then decide if it needs to turn on the watering pump based on these moisture readings.
One nail is attached directly to the Arduino's 5V power supply, and the other is connected to ground through a 10K resistor so not too much current flows to the Arduino. The blue wire in the picture goes to an Analog In pin that reads the resistance between the two pins.
Step 6: Temperature Sensor, Light Sensor, and the LCD Display.


I decided to mount these three things on a separate circuit board outside the tank to avoid any chance of water getting on them. I then hung it outside the tank in a visible place so I could read off the LCD display. All three of these things and the wires and parts on this circuit came from the Arduino Starter Kit.
To connect this circuit board to the breadboard and Arduino, I used and old computer monitor cable. Again, just use what you have lying around! You'd be surprised at how you can reuse "junk". I cut the end of the cable off to expose the wires, then soldered the wires to my circuit board (the LCD uses quite a few wires!). I pretty much followed the circuit diagram from the starter kit book to wire up the LCD display.
The temperature sensor was just a standard TMP36, which changes resistance based on the temperature. We then read the voltage across the TMP36 using an Analog In pin and convert this to a temperature. The photoresistor works in just about the same way, except with light. I hooked a 10K resistor up in series with the photoresistor and another Analog In pin again to make sure we limit the current through the Arduino's pins.
Solder Male Arduino Connector Pins to each wire on the other end of the cable so we can plug into the Arduino. Wrap it up in electrical tape so nothing touches anything it shouldn't. Safety first!
The positive voltage for everything in this step is the ARDUINO 5V, NOT 12V. Things will probably blow up if you used 12V.
In the picture, W is "Water", L is "Light" and T is "Temperature (in C)".
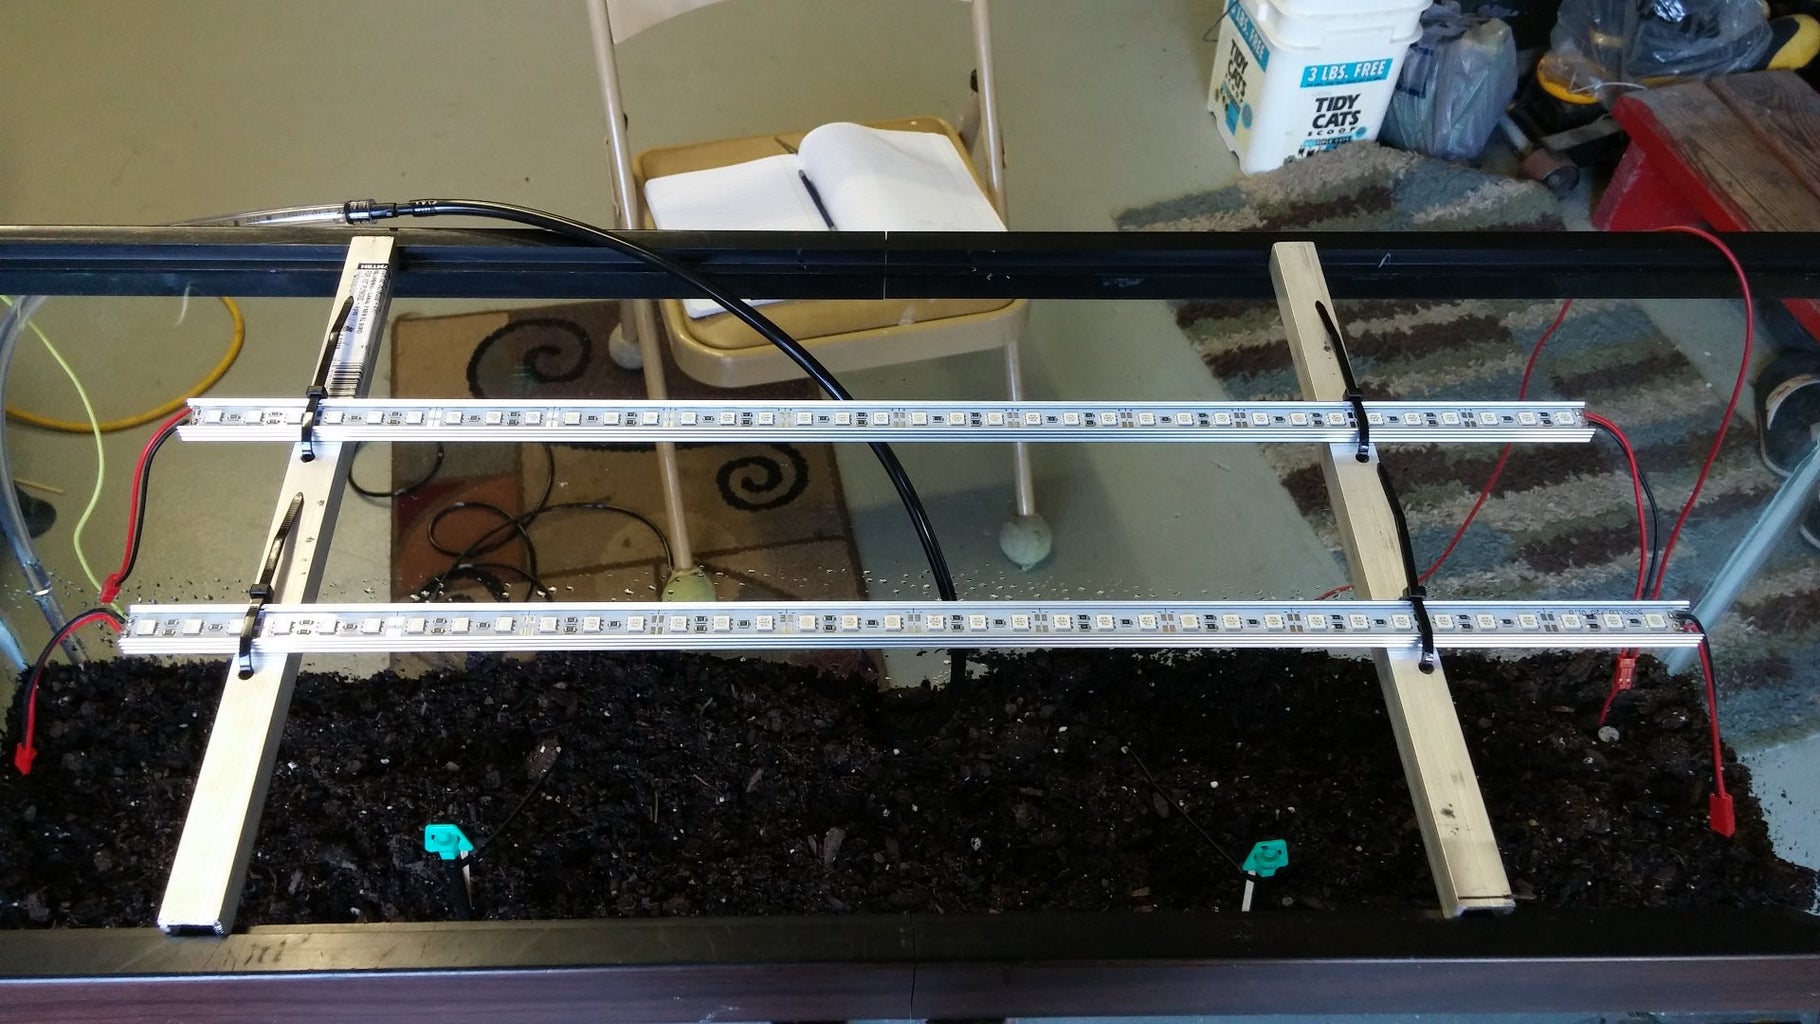
Step 7: Grow Lights


Grow lights are the most power intensive part of the project, so it was important to use as little energy as possible, so naturally try and use higher power LEDs. I found strips of 12V LEDs (each strip 10W) on Amazon. I decided to only use two strips as a balance between power consumption and making sure my plants get enough light.
Generally speaking, plants optimum wavelength for growth is around 660nm (red light) and 440nm (blue light), so these LEDs are only either red or blue. This is why plants are green; we see the green light because plants don't use it for photosynthesis as much.
Using some scrap metal lying around, I created a simple support for the lights to hang from. I used zip ties to secure the lights to the metal bars.
The wiring is essentially the same as hooking up the motor, minus the diode (LEDs do not act as inductors). I used the same kind of transistor, an NTE2395, and hooked to Arduino up to the gate with a 10M resistor. Note the positive sides of the lights is hooked directly to 12V and the other is hooked to the drain on the transistor.
Step 8: Solar Panel


I'm using an old 12V battery charging solar panel from a car. It surprisingly puts out about 20V when in direct sunlight! Bu the current isn't too much so this is fine for charging the 12V deep cycle battery we had lying around. I don't know what the capacity on this battery is. All I know is it is huge because it came from a camper. Just hook the solar panel up in parallel across the 12V battery and it will charge it while it runs.
Alternatively if this solar panel proves to not be enough, I will hook up my 45W solar panels which are significantly bigger and will definitely provide enough to charge the battery.
Step 9: Plants


I used lettuce and cilantro, as these grow fine with each other. Any spice (oregano, rosemary, mint, etc.) would be fine too as they are small and don't grow too tall. I pour a small amount of liquid plant food into the water reservoir when I fill it up to make sure my plants are nice and healthy. An alternative to store bought plant food would be leftover water from boiling vegetables or something along those lines.
Step 10: Power Considerations
The power draw of this system breaks down as follows. All these are rough estimates:
Arduino - 50 mA
Grow lights - 1 A, for a max of 12 hours a day (like on a rainy day).
Water pump - 1.5 A, but only for 10 second watering cycles once or twice a day.
LCD - 40 mA
When we calculate this power consumption in a day we get:
(0.05 A * 24 hr) + (1 A * 12 hr) + (1.5 A * 0.005hr) + (0.04A * 24 hr) = 14.17 Ah.
So we need a battery that can supply about 15 Ah a day, and once we consider that batteries fall below 12V before they use up all this energy, I'd say a 12V battery with 20+ Ah would be sufficient for powering this project. Again, the one I'm using used to power a camper so it obviously way more than this. A battery this size is around $40, but to err on the safe side I would go for anything above 25 Ah if possible.
Step 11: The Code
I thought it'd be easier and more organized to upload the code in a Google doc:
https://docs.google.com/document/d/1NLgMJqJjs_tmA_...
Essentially I broke the code into separate little tasks.
1. First check the button
2. Check the moisture level
3. Turn on the motor if there isn't enough moisture in the soil
4. Check temperature
5. Check light
6. Turn on grow lights if there isn't enough light
The RunningAverage library can be downloaded here:
http://playground.arduino.cc/Main/RunningAverage
It allows me to have smooth values and makes the system as a whole much less volatile.
Step 12: Conclusion

The garden seems to work very well. All that remains is to see if the plants are receiving enough water and light. This is just a matter of tweaking two number in the code and some long term testing. I will update this Instructable with pictures and comments when my plants begin to grow! I am very happy with the results so far though. This is just my version of it using what I had lying around, so don't be afraid to take my ideas and run with them if you have something that works better for you!
Comment below with any questions, comments or concerns and let me know what you think! This project was a blast to work on and I highly recommend it to anyone interested in growing their own plants.
Thanks for reading!
Email: shawnzamperini@gmail.com
UPDATE (9/10/15): After building the project I moved it to my apartment, which is on the 9th floor. Unfortunately, the windows have a special UV (or some sort of wavelength) tint which cuts my solar panel power rate down by a factor of 10. In other words, the panel is useless with these windows. I am explicitly not allowed to hang anything, like the solar panel, outside my window by agreement with my lease, so as of now the project is on hold until I can move it somewhere else. But the lettuce is growing very well as I've been watering it on my own since the battery has died. So the tank works fine!


