

Introduction: Anti-Rape Gloves


The idea for this intructable came about through the urge to protect my sister. She is a small, sweet, lovely woman and works in the bad part of town. I often worry about her as she travels home by herself in the early hours of the morning. I have regularly thought of ideas of things that she could have on her to protect her, however there are many problems with self-defence items because of obvious reasons.
I did some research on anti-rape devices and there are many but a lot are after the fact items. I wanted to prevent, not cure. No woman wants to say "well it happened but at least they got hurt." I want women to say "Well he tried" Or even better, in a perfect world, "That does not happen ever".
My design criteria had to be:
Something that was able to be carried that you didn't have to think about or be on the alert
Something that was preventative rather then after-the-assault effective
Something that is hard to be used by the attacker against the victim
Something that was convenient and compact that women would wear.
I wanted to see how women fought in fights. I have seen women fight in martial arts but they are trained. So where do you find raw fights? Jerry springer? Nooo, YouTube. I watched heaps of women fighting in all sorts of situations and noticed a few things. Women tend to slap and go for the face, they grapple, pull and push as opposed to direct punching or kicking people. So the idea was born. Introducing the anti-rape gloves.
P.s. These might not always stop a rape from happening, but they will leave evidence on the attacker and can cause some serious injury. They WILL hurt the attacker or even be fatal!! If you are going to make these, I take no responsibility for what you do to anyone with them. Nice little disclaimer :)

Step 1: Things You Will Need.


Here are some tools you need for this project.
From left to right.
M5 Stainless screws 40mm
M5 tap
4.5mm Drill bit
5.5mm Drill bit
Permanet marker
Automatic centerpunch
2 pieces of marine grade stainless 12mm wide (half inch) 120mm long (about 5 inch) 2mm Thick (5/64 inch)
(Marine grade is important because it resists rust from sweat and will last the distance.)
Vernier Calipers
Also you will need
Angle gringer
Belt sander or files
Dremel tool
A set of gloves. I chose these women's cycling gloves because they were made well and have lots of padding, are tight-fitting and hard to take on and off and have a velcro strap as opposed to button-on, making them hug tight to the hand.
Step 2: Measure Gloves


Here you want to measure your gloves and where you want your plates to go. I kept in mind when the hand is closed, the small blades sit between the index and second finger and the third and pinky fingers. It just makes it a bit more comfy for the wearer.
Step 3: Marking Out Steel.


Once you have your measurement in my case 50mm (2inch) you will need to mark that from each end. I am marking out one plate and will drill both together. The hole marks are about 12mm in from each end but will depend on your personal project.
I chose to do only 2 blades to ensure the pressure of pressing on an arm say is only spread between two points, meaning they will go in.
Next I set my vernier to half the width of the plate (roughly) and used the vernier to scribe the plate from both sides to give me two small centrelines. Now you have a dot and you know where to centerpunch on the centre.
Step 4: Automatic Centerpunch.


An automatic centerpunch has a spring and a release that activates when a certain amount of pressure is applied to it. This motion fires a hardened steel pin into the steel leaving a small dent. The small dent allows your drill to stay in place upon starting and not slide all over the steel. This is especially important in my case when I don't have a drill press and my drill chuck is loose.
I then taped the two pieces of steel together before drilling.
Step 5: Drilling the Steel


Now it's time to drill. If you don't have a drill press, placing a piece of timber underneath your steel will help when your drill drops through. I used a quick clamp to hold this down. I'm using the 4.5mm drill here and this will be drilled through both plates.
My plates skewed a bit which wasn't optimal, but hey, thats how you learn. Next time, I might use a better clamp.
As a general rule with steel you want a high amount of pressure downwards and low rpm. A cutting lubricant also helps. I used wd 40. Kerosene would also work.
Step 6: Tapping the First Plate


Metal taps are used to create a thread in a piece of steel. They have a hardened piece of tool steel with a thread that has scollops cut out of the side. The scollops allow the edge of the hardened thread to act as a cutting edge to remove steel. They are also tapered ever so slightly to ease into the thread as it cuts.
To use the tap, wind it downwards in a clockwise direction with a lot of pressure holding it as vertical as possible. As soon as it bites, turn it a full rotation. You will feel the tap start to seize up - stoooooooop! Reverse a half a turn and continue in the same fashion. If you keep turning a tap one direction it will break. Its a horrible thing a broken tap because it's very hard to remove.
Check to see if all your bolts will screw in when done.
Note: Only one plate is threaded.
Step 7: Drilling the Second Plate


Next is drilling your second plate. Simply drill your 4.5mm holes out to 5.5mm. Use cutting lubricant, it should be easy cutting with a new bit. I deburred all holes on both plates by sanding the plates after this.
Step 8: Cutting the Plates


You now have two plates. One has a hole that the bolt can freely go through and the other is threaded.
Bolt these together and cut them off at the 50mm mark with the angle grinder. I prefer to use Pferd 1mm discs for stainless steel. They are thin, fast cutting and don't explode like cheap discs.
Step 9: Cleaning Up the Plates.


Now it's time to spend a while with the sander cleaning up the edges and making everything look nice. Sand away and be creative.
Step 10: Cut the Bolts


If your local supply shop did not have the bolts in the right size like mine, then you will have to cut them. I cut mine about 12mm long (half inch).
You can now see what they will sorta look like.
Step 11: Grinding Your Blades


I thought about the design of the blades quite a bit, taking in mind when something as awful as rape happens your average person is not thinking straight. Having points would hurt but not cause to much damage and having straight spikes or blades assume direct angles are involved. The american eagle came to mind (seriously it did, and I'm Australian!) and also the velociraptor claw out of jurassic park that the weird guy carries around. A curved claw is that way for a reason. It hooks in with minimal effort and if any movement is applied, it works its way in. Nature is genius by design.
First thing I did was to flat grind the screw tips shown in the first pic. Next I used the dremel to hollow grind the mid section. This will ensure maximum slicing effect once the points are in. Wow this is gore.. "but hey they deserve it. :)"
Next round the front of the screw downwards to make it more claw-like.
Step 12: Finishing the Blades


For finishing the blades I clamped the screws into a set of vice grips and rounded the tops and made sure the front part of the claw shape had a small flat section to increase point sharpness. Why? "Because that's the point".
Step 13: Finishing Plates


Now it's time to pull apart the plates and deburr all edges, including all edges that touch the glove. You don't want the steel to cut the leather.
Sit them on the gloves and have a look.
Step 14: Fitting the Plates


I put the plates on the gloves and decided where they were to sit. Remember to place those blades in between fingers.
Make a mark through one of your plates and use a 5mm punch to make the holes with a pice of leather or similar to protect the back of the glove.
Now put your blades through and tighten them up.
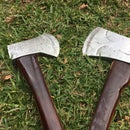
Step 15: Finish


Now you can see what they look like.
Although the bolt heads weren't rounded, I had a few women try these on and they didn't complain about the hex head bolts, however in future I would probably use a torx-style dome head screw for even more comfort. I would also leave a little more thread on the screws to help with fixing them onto the gloves. They gave me a bit of trouble when fixing the plates together.
Seeing her face light up when I pulled them out made my day - she said she immediately felt safer having them on.
Thanks Bene for modelling the gloves. I hope you enjoy them!

Participated in the
Protected Contest


