

Introduction: Arduino Automatic Temperature& Humidity Controller for Pets


Jack and Jose, a pair of beautiful hamster, has accompanied me over 100 days and nights. Their soft white fur makes me quiet and warm, especially when I coding in the winner.
But the very tragic things happened in the last week. As the cold air from Siberia, Shenzhen has suffered low temperature and humidity for than 10 days. The temperature is about 10 degree, makes me fell chilling every day. The very bad thing happened: Jack and Jose, leaved me away……
It was such a sad afternoon. After I buried them, I had a new idea on my way home: I need to create a house, a house with floor heating, air conditioning, for my further new friends.
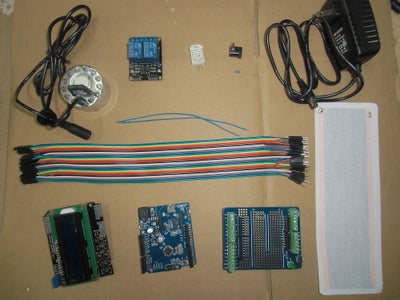
Step 1: Module Preparing
As a software engineer, I am not good at hardware, So i decided to use the most easy-to-use platform: Arduino
After browsing on the web, I got the following modules:
1. Crwoduino: an Arduino compatible platform, with some upgrading features to make it easy to use.
2. Temperature & Humidity Sensor and a 4.7K Resistor. I need this sensor to report the controller the current temperature and humidity.
3. LCD Keypad Shield. With this LCD I can monitor the current temperature and humidity, thus to make this project practical in my daily life.
4.2-Channel Relay Module. As the Ultrasonic Nebulizer uses power more than 5V, so a relay module was used to control the Ultrasonic Nebulizer on/off.
5.A Ultrasonic Nebulizer to increase the air humidity.
6. Screw Shield , this shield helps me connecting the wires easier.
7. Thermal Tablet: this thermal tablet acts as heater for the pet house.
8. Some Wires or Wires would be needed
Basically, the temperature& humidity sensor reports to the Crowduino how cold it is now. If the Crowduino “think” it is too cold, then it will open the thermal tablet to warm the hamster or the ultrasonic nebulizer to begin the air humidification.
Step 2: Temperature& Humidity Measurement
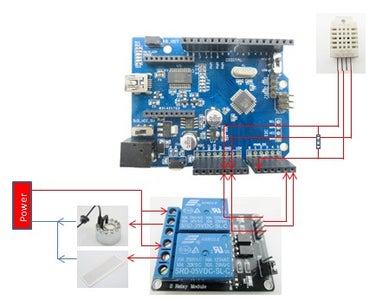

The Basic Connection of all the modules(Crowduino, temperature sensor, relay module…) as above image.
First, connect the temperature& humidity sensor AM2302 to Crowduino board. Using the wire jumper, connect the AM2302 power supply pins to Corwduino VCC and GND, connect the “SIG” pin of AM2302 to A1 of Crowduino.
Note that a 4.7K pull up resistor is needed between “SIG” of AM230 and VCC. Actually, you can also find many temperature and humidity module that had integrated the pull up resistor on the module, so you do not need to add the pull up resistor by yourself and thus the story would be easier .
Step 3: Connect the Relay to Crowduino, to Control the Ultrasonic Nebulizer and Thermal Tablets.


Connect the “IIN1”and “IN2” of the 2-channel relay module to A4 and A5 pin of Crowduino (or Screw Shied), power the relay module using jumper wires. In this way, Crowduino can control the 2 relays separately to power on/off the ultrasonic nebulizer and thermal tablets.
At last, connect the ultrasonic nebulizer and thermal tablets to relays. For the ultrasonic nebulizer, I cut off it is positive wire, and connect its one end to the relay1 “COM” port (the port in the middle), connect the other end to relay1”NO” terminal. For the thermal tablets, it would easier, solder its terminals to DC jack and connect to relay2 with the same way of ultrasonic nebulizer
After the connecting, the basic hardware for hamster new house completed.
To monitor the current temperature and humidity, I added a keypad shield to my system. Plug the Keypad Shield on the Screw shield. Actually, this shield is optional if you do not care about the measured current temperature and humidity.
Step 4: Upload the Programs to Crowduino

Download the below program and open it on your Arduino IDE.
In this program, I set the trigger temperature to 9 degree and the trigger humidity to 45, that is, when the temperature measured by the sensor is below 9 degree, the crowduino would control the relay module to power on the thermal tablets, to make the hamster warm; when the relative humidity below 45%, the ultrasonic nebulizer would be powered on to increase the humidity of air.
Of cause, if you want the change the trigger temperature or humidity, just modify the "temLowTrigger" and "humLowTrigger" to temperature&humidity that you want to trigger the thermal tablet and ultrasonic nebulizer.
i f you are not familiar with Arduino and its programming, you can refered this page.

Step 5: Test and Install


While system is running, the current temperature& humidity can be monitored via the LCD Keypad Shield.
Insert the thermal tablet at the bottom of the hamster house, i also added some wood flour as they keep the house warm like quilt. The thermal tablet will be active when the temperature below 9 degree and can be up to about 40 degrees; Put the ultrasonic nebulizer in water with depth of about 0.3 meters, it will be active when the relative humidity below 45%.
After testing, the system works perfect, the thermal tablet begin to warm up when the temperature is low, and the ultrasonic nebulizer begin to work, with beautiful blinking LED. With this system, I believe my hamster would be happy when I keep pet next time.
Wish my Jack and Jose happy and warm in the heaven!

Second Prize in the
Pet Contest

Participated in the
Arduino Contest


