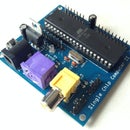
Introduction: Arduino BASIC Shield
Hi all, this is my first instructable documenting the creation of my project, the Arduino UNO BASIC shield which turns the Arduino UNO into a computer running the BASIC programming language.
As microcontrollers are essentially low performance computers on a chip (they have a processor, RAM and ROM) they can be used to create small computer systems. The aim of this project was to use AVR microcontrollers to create a computer capable of running the BASIC programming lanuage.
During learning about the Arduino and creating various sketches, I came across the TinyBASIC project which turns the Arduino into a computer by running a BASIC interpreter. After testing the TinyBASIC sketch on my Arduino UNO, I found the available program memory to TinyBASIC to be fairly low at around 1KB which led me to purchasing an ATmega 1284P. After successfully getting TinyBASIC to run on the 1284P, I found the program memory available to be more than 13KB meaning more than a 13x increase in available memory compared to the Arduino UNO.
Being able to run TinyBASIC on the 1284P then led me to think about standalone computers based on the 1284P and TinyBASIC. I alerted the TinyBASIC sketch to include the TVout library and the PS/2 keyboard library but it would not work (due to the PS/2 library and TVout library not being compatible with each other) meaning I needed a second AVR running either the PS/2 library or the TVout library to allow the computer to function correctly.
I decided to use the Arduino UNO which is based on the ATmega 328 to run the TVout sketch while the 1284P would run the TinyBASIC sketch (with the PS/2 library included); it was done this way around to give TinyBASIC the maximum amount of SRAM possible as TVout requires a RAM buffer.
I knew from previous projects that TVout runs fine on the Arduino UNO and after testing TinyBASIC with the PS/2 library on the 1284P (which worked correctly) I decided to place all components on an Arduino UNO shield.
Step 1: Required Components
The components required for the shield PCB are as follows:
1 x ATmega 1284P
1 x DIP40 IC Holder Socket (0.6" wide)
1 x RCA Socket
1 x PS/2 Socket
1 x 470Ω Resistor
1 x 1KΩ Resistor
1 x 220Ω Resistor
1 x 40pin Male Header Strip (to be cut down)
1 x 40pin Female Header Strip (to be cut down)
1 x 5mm LED (This PCB uses an orange LED)
1 x PCB / Arduino Prototype Shield / Stripboard (dependent on how the shield will be made; I created a PCB)
Additionally, solder, a soldering iron, optionally desoldering braid and tools (wire cutters and needle-nose pliers) are needed.
Note this PCB is dual layer. Due to the way I designed this PCB, I also used some 0Ω resistors as jumpers and some tinned copper wires to jump between the layers. The final setup also requires an Arduino UNO, PS/2 keyboard, RCA capable display (such as an LCD TV), RCA cable and a power source (such as a wall mounted PSU).
Step 2: The Circuit
The circuit diagram (and the PCB) were created in the program Fritzing. The circuit diagram is not very complex and consists mainly of the 1284P, PS/2 socket, RCA socket, an LED, some pin headers and some resistors.
The Arduino UNO is responsible for generating a video signal and prints characters received from the serial port to the TV while the 1284P runs TinyBASIC and reads the PS/2 keyboard input. Any input from the keyboard or output from TinyBASIC is sent serially to the Arduino UNO and printed on the connected TV.
After looking at the PS/2 library, the file called "PSKeyboard.h" shows the known interrupt pins of supported AVR microcontrollers (AVR microcontrollers which can run the Arduino bootloader and support this library). An interrupt pin must be used for the keyboard clock line meaning pins 2, 10 and 11 can be used as the clock pin on the 1284P; I chose to use pins 10 and 11 for the data and clock lines of the keyboard.
The TVout library uses pin 7 for video and pin 9 for sync on the Arduino UNO so the RCA socket was connected to the appropriate pin headers. An LED was also included onboard to indicate if the shield was being powered.
TinyBASIC supports the IO pins of the 1284P so these were broken out using female pin headers. Port A (PA0-PA7), port B (PB0-PB7) and port C (PC0-PC7) are connected to female headers to allow the shield to be connected to other devices or components such as LEDs. Two other headers are onboard to allow connections to the power pins (5V and GND) and to allow the serial communication between the 1284P and the UNO to be connected to.
The image shows the circuit diagram with an ATmega 644 (the 1284P and 644 are pin compatible) and the Fritzing project file and circuit diagram PDF can be found attached (as a RAR archive).
Attachments
Step 3: The PCB
Once the PCB had been designed in the Fritzing program, it was sent to a PCB manufacture to be produced using the isolation milling process. I designed the PCB to be double sided to reduce the number of jumper parts needed and to make the PCB designing process simpler (it would be harder to keep the PCB single sided due to its small size). Also, through hole plating would be needed to keep the PCB single sided as the pin headers need to be soldered on the top side.
As the PCB production process does not have through hole plating, I had to use vias to jump between layers. A small piece of tinned copper wire is placed in the via hole and soldered on either side to make a connection between the top and the bottom layers.
To reduce the number of components in the circuit, no crystal was used as the 1284Ps clock source, instead its internal 8MHz oscillator is used.
One of the images shows a copper coloured PCB. This is a manufacturing reject board as the PCB manufacturers milling machine did not produce this board correctly (the holes are slightly out). The reason this board is copper coloured is because it is not tinned. The tinned PCB was correctly produced and used to create the shield.
An alternative to creating a PCB is to use the Arduino prototype shield or some double sided strip/perf board. Note, the PCB could also be optimised in various ways. The Fritzing file for the PCB is included in the RAR archive on the circuit page.
Step 4: The Firmware
When first testing TinyBASIC on the 1284P it would not run as the SRAM requirements of TinyBASIC exceed the SRAM of the 1284P. To remove this issue, the kRamSize number in TinyBASIC had to be altered by changing this line from:
#define kRamSize (RAMEND - 1160 - kRamFileIO - kRamTones)
To the following:
#define kRamSize (RAMEND - 2768 - kRamFileIO - kRamTones)
The higher this number, the lower the SRAM used on the AVR (in this case the 1284P). After the SRAM usage had been lowered to not exceed the 1284Ps SRAM, the PS/2 library was added. The PS/2 header file was added, the clock (irq) and data pins defined and the library started by adding the appropriate code to the setup function.
Without alterations, TinyBASIC uses the serial port for user interaction meaning it needs to be altered to read the keyboard input instead of the serial input. To do this, all calls to "Serial.available()" and "Serial.read()" were replaced with calls to the PS/2 library ("kb.available()" and "kb.read()"). It may be possible to also include the serial reading communications to allow any device connected to the serial header to interact with TinyBASIC but it is currently removed. Serial transmission code was left alone as there was no need to change it (the Arduino UNO reads the serial output of the 1284P and prints to a TV).
The TVout code running on the Arduin UNO simply continuously reads the serial port and if any input is present, it prints it to the TV. Both sketches can be found attached (as a RAR archive).
The bootloader used for the 1284P can be found here: https://github.com/fakufaku/mighty-1284p.
The original TinyBASIC project can be found here: https://github.com/BleuLlama/TinyBasicPlus.
The TVout project for Arduino can be found here: https://code.google.com/p/arduino-tvout/.
Please note, TinyBASIC Plus, Arduino software (bootloaders, IDE etc) and TVout all hold there own software licences which must be followed if using any of the creators code.
Attachments
Step 5: Completed Shield
Once the PCB had been designed and manufactured, it was soldered and tested. One issue which arose was serial communications from the 1284P were not being received by the Arduino UNO. To find the cause of this issue, a multimeter was used and a short was found between the TX pin of the 1284P (the RX pin of the Arduino UNO) and ground. Once the short was fixed, the shield operated correctly.
When connecting a TV and a PS/2 keyboard to the shield (as well as a power supply connection), I was met with the TinyBASIC start-up messages which indicate the amount of memory available and the software version showing everything was working OK. The images show the setup with TinyBASIC being displayed on the connected TV and the fully assembled PCB.
Step 6: Future Versions
A future version of the shield could implement the following:
- Ardunio Mega shield (this would allow a greater TVout resolution such as 720x480 - see the update below)
- SD card (this would allow BASIC programs to be stored and run from the SD card)
- Onboard features such as LEDs, potentiometers etc
- Sound support (TinyBASIC has a TONE command which may hold the possibility to allow another RCA socket to be connected to the 1284P allowing simple sound output)
It may also be possible to extend the functionality of TinyBASIC by adding more commands such as communication support (I2C, Serial, SPI etc). A shield for the Arduino Due could also be created (as the Due has much more RAM available for BASIC programs) but this means moving away from 8-bit systems.
Thank you for taking the time to read my instructable. Any feedback is appreciated.
Update:
I have been informed it is not possible for the Arduino Mega to output the resolution of 720x480. This means the second version of this shield (if it was based on an Arduino Mega) would possibly allow higher RCA resolutions due to the higher SRAM compared to the Arduino UNO but it will not allow the resolution of 720x480 to be produced.

Participated in the
123D Circuits Contest

Participated in the
Full Spectrum Laser Contest


