

Introduction: Arduino Firefly-Programmed LEDs on Handmade Felted Tote Bag


This was my very first project that required coding. My idea was to create a felted bag that had some LEDs that would fade in and fade out randomly, like fireflies. It had to be pretty and not too geeky, so I worked hard on the felted design. Inspired by Kandinsky's Squares with Concentric Circles, I created a design that I liked. This Instructable will walk you through the steps I took to create the bag, add the electronics, and program the Lilypad Simple Board. If you want to learn how to make a felted tote bag, there are many great tutorials online. I'm just a crafter who likes to tinker with electronics, and I did a lot of searching online for the code that would work for my project. Thankfully, the Arduino community likes to share, so I found all sorts of sample code that I could copy and tweak for my project. Perhaps that is one of the best ways to begin programming. I must say that the HTML course I took back in 1998 gave me a beginning idea of how coding might work and it helped me understand some conventions of coding. Of course I have a lot to learn, but completing this project proved to me that I'm not too old to learn new things, that geeky technology can also be fashionable, and that any idea is worth building, even if you have no idea if it will really work!
Materials needed:
- Felted bag - actually any textile project that you want to add LEDs to would work
- 5mm LEDs
- 5MM LED holders (optional but I like how they stabilize the LED)
- Conductive thread and needle (from SparkFun)
- Lilypad Arduino Simple Board (from SparkFun)
- LiPo battery
- Resistors (I have no idea if they are really necessary here, but I used them anyway since they came free with the LEDs I bought on eBay. I know they have something to do with Ohm's Law, but I figured it wouldn't hurt. I'm assuming that the low voltage battery I was using would not start a fire or blow out my LEDs, so I didn't fret too much about this. Yes, I know I need to know forward voltage and all that. Someday I will learn this stuff).
- Arduino for LilyPad, download from HERE.
Step 1: Make Felted Bag or Use Any Textile Bag


I like to create felt, so I created a bag with the firefly LEDs in mind. There are many great felting tutorials online and many Instructables on this site. Here, I cut some Prefelt (available from HERE) into graduated circles and briefly needle-felted them together. Then I added them to the front of a felted bag, wet-felting them in place. After the bag was formed and dried, I needle felted more wool in place to define the circles, and I used some black yarn to define the 4x4 grid. The LEDs would be placed at the center of the smallest circles.
Once your bag is made, you are ready to add LEDs and sew them to the Lilypad Arduino Simple Board.
Step 2: Attach the LEDs and Resistors


- With an awl or other sharp object, poke holes where you want your LEDs to be, but don't make them too big. Felt is a great material because it doesn't fray or stretch out of shape. Make sure the holes are just big enough to hold the LEDs and their holders snugly. I like to add LED holders, the plastic casing around the LED. It stabilizes the LED and protects it. The first picture is from another felt project, but I included it to show the LEDs, the holders, and the size of the holes you need to make.
- Mark the negative (shorter) leg with a permanent marker so you don't lose track of the positive and negative sides of the LED. Trust me, this is an important step. It's very easy to lose track of which leg is negative or positive, and in order for the lights to work, you need to be 100% correct with your positive and negative legs.
- Insert the LED into its holder, and then place into the hole you created for the LED. Repeat for all LEDs.
- Optional, but recommended: Glue the LEDs into place where they poke through to the other side of the bag. Hot glue would work, but I used Weldbond and let it dry before proceeding.
- With needle-nose pliers, form the legs into loops with a diameter large enough to sew around it several times with conductive thread.
- Resistors: I don't know much about resistors, but I used them here. I used the resistors that came free with my order of LEDs from eBay, assuming they are the correct type. I attached them to the positive leg of each LED. If you are using resistors, twist one side of the resistor onto the leg and solder into place, and form the other side of the resistor into a sew-able loop like you did with the other LED leg.
Step 3: Design the Firefly Pattern and Sew With Conductive Thread


- Sketch your design on paper and use colors to indicate which pin the circuit is connected to. I had five pins available to me, pins 5, 6, 9, 10, and 11. I divided the 16 squares into groups of three or four. (See picture).
- Draw connections from the + sides of each group to end at the appropriate pin.
- Draw connections from the - sides of each group to eventually arrive at the negative (ground) connection on the board. Again, see the pictures - it will make more sense if you see the diagram.
- IMPORTANT: Make certain that no lines are crossed - otherwise there will be a short-circuit and the lights will not illuminate.
- When you are happy with your design, transfer the sketch to the inside of the bag. The different colors of the permanent markers are very helpful here.
- Using conductive thread and a needle, sew your circuits, leaving 18" of conductive thread free to eventually connect to the LilyPad Arduino Board. Use a short running-stitch and wrap around the circles of the LED legs several times to make sure you have a strong connection. Trim all "tails" to ensure there are no "flags" flying around - these can touch other circuits, causing short-circuits. And if you have to remove stitching and re-sew to correct a mistake, make sure that the tiny fragments of conductive thread are carefully removed from the project. Even those tiny fragments can cause short circuits!
- Don't sew the connections to the LilyPad Arduino Simple Board just yet. You want to test the code to be sure you have completed everything correctly and that you are happy with the code.
Step 4: Program the Lilypad Arduino and Test
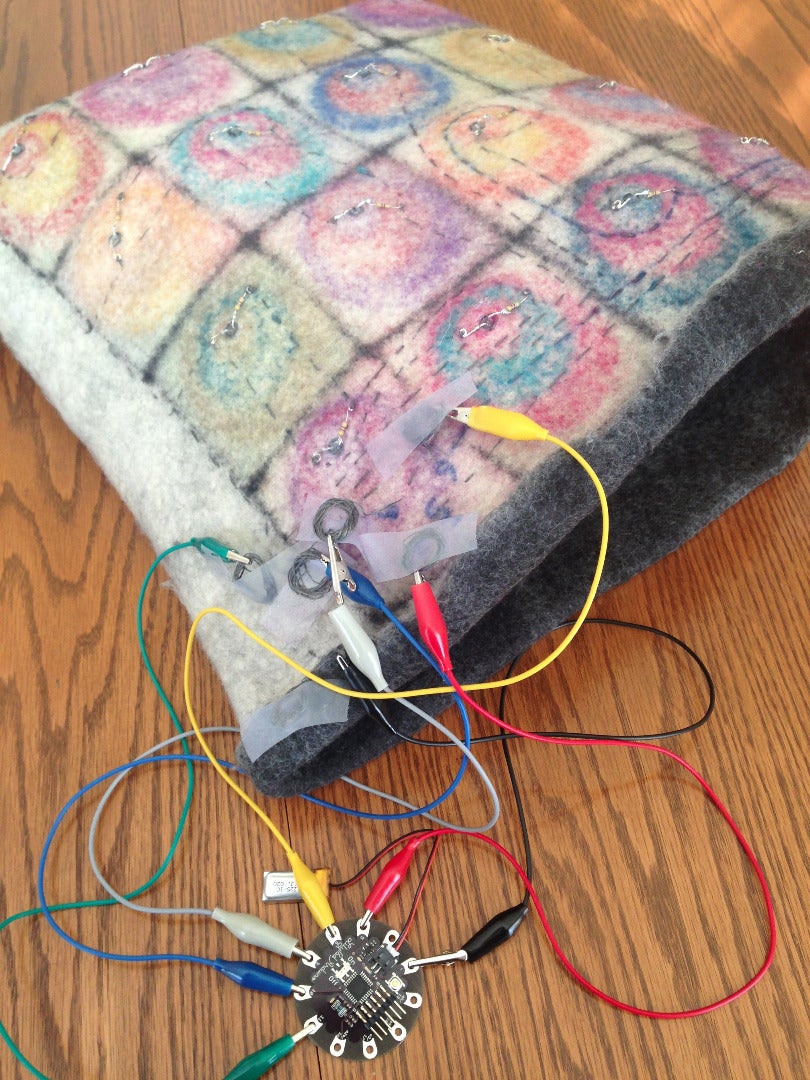
Before you finalize your LEDs and connect to pins the on the LilyPad Arduino Simple Board, it's a good idea to prototype your idea first.
- Install the appropriate version of Arduino to your computer, and follow directions to connect your board to your computer. Some download and additional information is located HERE.
- Find some firefly code you like and copy and paste it into a new Arduino Sketch. I did some surfing online and discovered a very nice person named Fran who has a nicely written tutorial on programming a Firefly Jar! Her tutorial is posted HERE. We exchanged a few notes back and forth via twitter (I think) and she was especially helpful! Note: That's what I love about the "Maker" community - people are incredibly helpful to each other and are willing to share their code for others to copy, tweak, improve upon and then share again. Thank you, Fran!! Her jar was the closest I could come to my concept, so that's where I started. I also did a search online for Firefly Arduino code and found several examples. Another angle is to look for programming Christmas Tree lights. In the end, I'm not sure what code I copied - so I can't give credit other than to Fran, who just assured me that I was headed in the right direction.
- Once you find some code you like, take a look at the code and the pin numbers, and tinker with the values a bit. Change one variable, upload it, test, see what happens. You can always undo! Undo is your friend!
- When you have settled on code that comes closest to your idea, go ahead and upload it to the Arduino board.
- Test again using the hook-up wires and clips. If all looks good, you can connect the leads from the bag to the board. Test after every step you take. Make sure you have the + and - legs of the LEDs in the correct positions. Nothing is more frustrating than finding that after you've sewn and finalized everything, you discover a simple mistake that causes NONE of your lights to work. Ripping out sewing and re-sewing is no fun. Ask me how I know!!
Step 5: TA DA!


Now go out and show off that cool bag of yours! Here are some ideas for taking it further:
- The pictures and short video above are for a second bag, with a closer representation of Kandinsky's Circles. Instead of programming, I used a Lily Twinkle, the one used for the Firefly Jar kit from SparkFun. Duh, I could have done that in the first place, except that the twinkle limits my fireflies to four (or four chains of connected LEDs). Plus, I wouldn't have had the satisfaction of using Arduino and having some control over how the LEDs illuminated. Knowledge is Power, right?
- Add LEDs to clothing, a hat, a bracelet, and code a pattern. Super Awesome Sylvia has some really good ideas on her site. I especially like the one that uses a pulse sensor to illuminate the LEDs based on your heartbeat!
- Have fun with this. I'd love to see examples of what you come up with after working through this Instructible!

Runner Up in the
Coded Creations


