

Introduction: Arduino : How to Control Servo Motor With Arduino


This instructable is the written version of my "Arduino : How To Control Servo Motor with Arduino" YouTube video that I've uploaded recently. I strongly recommend you to check it out.
Step 1: Tutorial
Servo motors are great devices that can turn to a specified position.
Usually, they have a servo arm that can turn 180 degrees. Using the Arduino, we can tell a servo to go to a specified position and it will go there. As simple as that!
Servo motors were first used in the Remote Control (RC) world, usually to control the steering of RC cars or the flaps on a RC plane. With time, they found their uses in robotics, automation, and of course, the Arduino world.
Here we will see how to connect a servo motor and then how to turn it to different positions.
Step 2: Hardware Required

Hardware Required :
- Arduino
- Servo Motor
- Jumper Cables
- Battery & Buckle
Step 3: Connections

Following are the steps to connect a servo motor to the Arduino:
- The servo motor has a female connector with three pins. The darkest or even black one is usually the ground.
- Connect this to the Arduino GND. Connect the power cable that in all standards should be red to 5V on the Arduino.
- Connect the remaining line on the servo connector to a digital pin on the Arduino.
*** I recommend! You not connect directly the servo motor to arduino. I suggest you use external power to the servo.
SG90 Mini RC servo motors can be used. This can damage the Arduino MG996 instant high torque. MG996 Stall Torque: 9.4kg / cm (4.8V) - 11 kg / cm (6.0V) and Operating voltage: 4.8 ~ 6.6v. I wanted to tell in this tutorial; connections, code generation and motor control. So I did not give more details about the engine.
Step 4: Programming

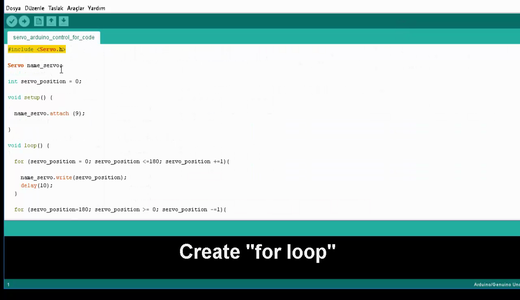
1) Make sure you include Servo.h library
2) Define Servo name
3) Define Servo signal input pin (PWM)
Get Code :
Step 5: If I Was Helpful

First of all, I would like to thank you for reading this guide ! I hope it helps you.
If you want to support me, you can subscribe my channel and watch my videos.


