

Introduction: Arduino Internet Time Client


UPDATE! 11/15/2015
Added a WiFi and rechargeable battery option (step 10).
UPDATE!
Added 12h/24h switch and Standard / Daylight Savings Time Switch! See steps 7 & 8.
Have you ever wanted a clock that kept accurate time to a official time source? There are official time servers on the internet that you can attach to and sync your time. Most people have their computers set up to do this, now the Arduino can as well. (For GPS Time Client, see http://arduinotronics.blogspot.com/2014/03/gps-on-lcd.html and for a standalone DS1307 clock, see http://arduinotronics.blogspot.com/2014/03/the-arduino-lcd-clock.html)
All you need is an Arduino and a Ethernet shield, but we will be adding a LCD display as well. We may add alarm clock functions later.
Arduino UNO
Arduino Ethernet Shield
Optional:
I2C LCD Display
Step 1: Connecting the Hardware
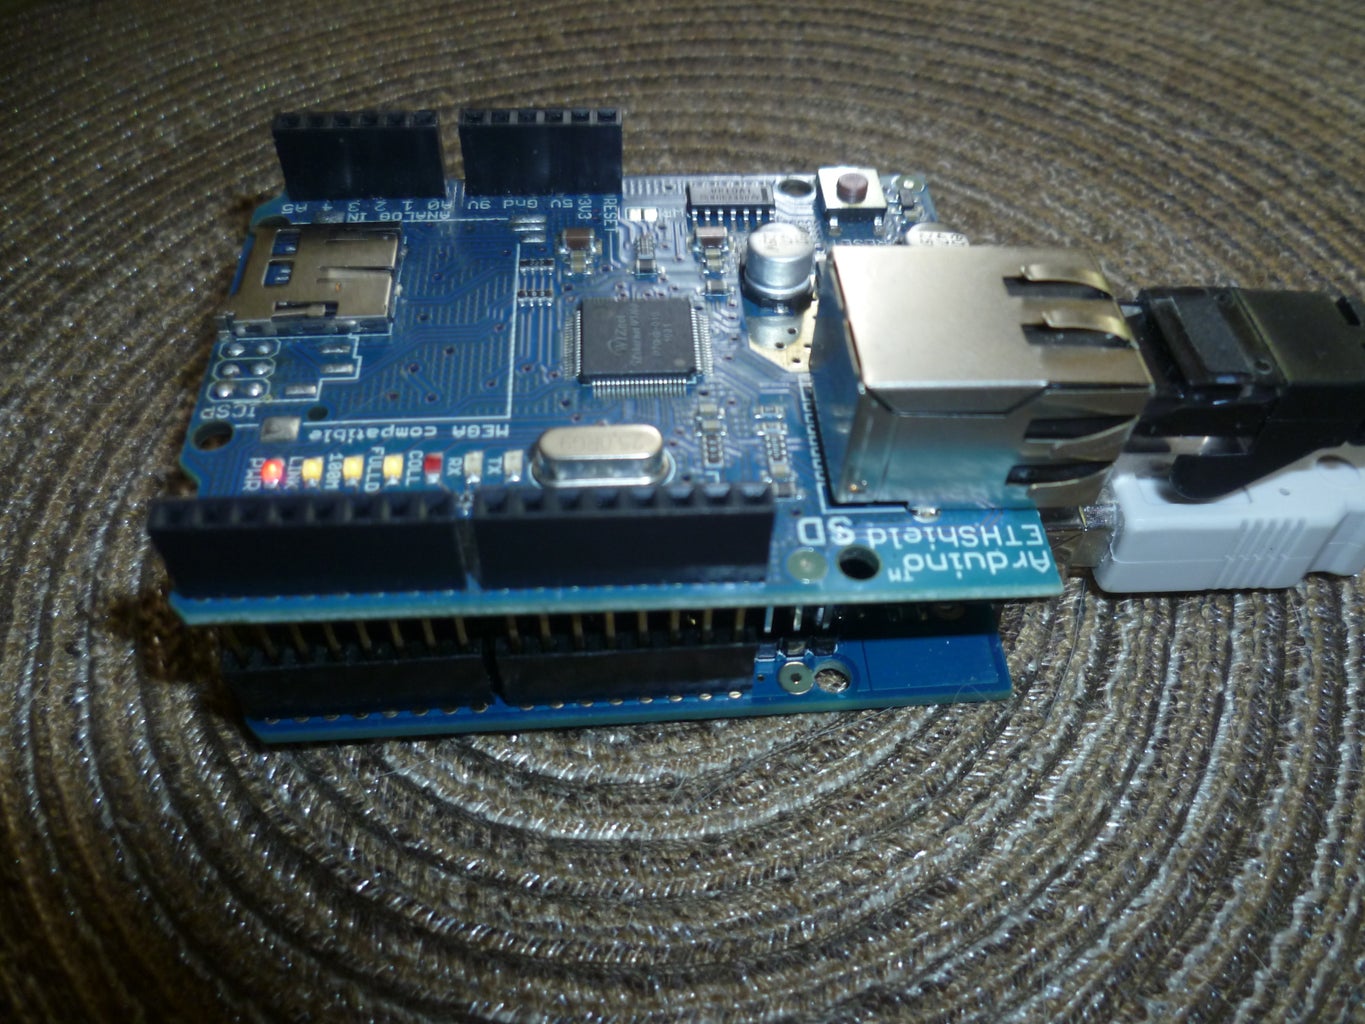
First, write down the MAC address printed on the bottom of your ethernet shield. You will need it for the next step.
It looks something like 90 A2 DA 00 23 36 but will get inserted into the code as 0x90, 0xA2, 0xDA, 0x00, 0x23, 0x36
Plug the Ethernet Shield on top of the Arduino UNO. Connect it to your internet router with a Ethernet cable.
Step 2: Code

Only one additional library needs to be installed into your Arduino libraries folder. That is the Time Library available at http://www.pjrc.com/teensy/td_libs_Time.html
You will need the mac address from the bottom of your Ethernet Shield, but IP, Gateway and Subnet mask are all obtained throgh DHCP. You will also need the time server address (see next step)
The code that needs to be uploaded to your Arduino is as follows:
//sample code originated at http://www.openreefs.com/ntpServer
//modified by Steve Spence, http://arduinotronics.blogspot.com
#include <SPI.h>
#include <Ethernet.h>
#include <EthernetUdp.h>
#include <Time.h>
/* ******** Ethernet Card Settings ******** */
// Set this to your Ethernet Card Mac Address
byte mac[] = { 0x90, 0xA2, 0xDA, 0x00, 0x23, 0x36 };
/* ******** NTP Server Settings ******** */
/* us.pool.ntp.org NTP server
(Set to your time server of choice) */
IPAddress timeServer(216, 23, 247, 62);
/* Set this to the offset (in seconds) to your local time
This example is GMT - 4 */
const long timeZoneOffset = -14400L;
/* Syncs to NTP server every 15 seconds for testing,
set to 1 hour or more to be reasonable */
unsigned int ntpSyncTime = 3600;
/* ALTER THESE VARIABLES AT YOUR OWN RISK */
// local port to listen for UDP packets
unsigned int localPort = 8888;
// NTP time stamp is in the first 48 bytes of the message
const int NTP_PACKET_SIZE= 48;
// Buffer to hold incoming and outgoing packets
byte packetBuffer[NTP_PACKET_SIZE];
// A UDP instance to let us send and receive packets over UDP
EthernetUDP Udp;
// Keeps track of how long ago we updated the NTP server
unsigned long ntpLastUpdate = 0;
// Check last time clock displayed (Not in Production)
time_t prevDisplay = 0;
void setup() {
Serial.begin(9600);
// Ethernet shield and NTP setup
int i = 0;
int DHCP = 0;
DHCP = Ethernet.begin(mac);
//Try to get dhcp settings 30 times before giving up
while( DHCP == 0 && i < 30){
delay(1000);
DHCP = Ethernet.begin(mac);
i++;
}
if(!DHCP){
Serial.println("DHCP FAILED");
for(;;); //Infinite loop because DHCP Failed
}
Serial.println("DHCP Success");
//Try to get the date and time
int trys=0;
while(!getTimeAndDate() && trys<10) {
trys++;
}
}
// Do not alter this function, it is used by the system
int getTimeAndDate() {
int flag=0;
Udp.begin(localPort);
sendNTPpacket(timeServer);
delay(1000);
if (Udp.parsePacket()){
Udp.read(packetBuffer,NTP_PACKET_SIZE); // read the packet into the buffer
unsigned long highWord, lowWord, epoch;
highWord = word(packetBuffer[40], packetBuffer[41]);
lowWord = word(packetBuffer[42], packetBuffer[43]);
epoch = highWord << 16 | lowWord;
epoch = epoch - 2208988800 + timeZoneOffset;
flag=1;
setTime(epoch);
ntpLastUpdate = now();
}
return flag;
}
// Do not alter this function, it is used by the system
unsigned long sendNTPpacket(IPAddress& address)
{
memset(packetBuffer, 0, NTP_PACKET_SIZE);
packetBuffer[0] = 0b11100011;
packetBuffer[1] = 0;
packetBuffer[2] = 6;
packetBuffer[3] = 0xEC;
packetBuffer[12] = 49;
packetBuffer[13] = 0x4E;
packetBuffer[14] = 49;
packetBuffer[15] = 52;
Udp.beginPacket(address, 123);
Udp.write(packetBuffer,NTP_PACKET_SIZE);
Udp.endPacket();
}
// Clock display of the time and date (Basic)
void clockDisplay(){
Serial.print(hour());
printDigits(minute());
printDigits(second());
Serial.print(" ");
Serial.print(day());
Serial.print(" ");
Serial.print(month());
Serial.print(" ");
Serial.print(year());
Serial.println();
}
// Utility function for clock display: prints preceding colon and leading 0
void printDigits(int digits){
Serial.print(":");
if(digits < 10)
Serial.print('0');
Serial.print(digits);
}
// This is where all the magic happens...
void loop() {
// Update the time via NTP server as often as the time you set at the top
if(now()-ntpLastUpdate > ntpSyncTime) {
int trys=0;
while(!getTimeAndDate() && trys<10){
trys++;
}
if(trys<10){
Serial.println("ntp server update success");
}
else{
Serial.println("ntp server update failed");
}
}
// Display the time if it has changed by more than a second.
if( now() != prevDisplay){
prevDisplay = now();
clockDisplay();
}
}
Step 3: Time Server Address

If you know the IP address of a working time server, enter it into your code.
Look for this section of your code:
/* ******** NTP Server Settings ******** */
/* us.pool.ntp.org NTP server
(Set to your time server of choice) */
IPAddress timeServer(216, 23, 247, 62);
Otherwise, run this sketch to get a valid time server ip. If you really want to get techy, merge the following code into the main sketch so that it finds a valid time server on every update. Don't forget to update your MAC address below.
/*
DHCP-based IP printer
This sketch uses the DHCP extensions to the Ethernet library
to get an IP address via DHCP and print the address obtained.
using an Arduino Wiznet Ethernet shield.
Circuit:
* Ethernet shield attached to pins 10, 11, 12, 13
created 12 April 2011
by Tom Igoe
*/
#include <SPI.h>
#include <Ethernet.h>
#include <Dns.h>
// Enter a MAC address for your controller below.
// Newer Ethernet shields have a MAC address printed on a sticker on the shield
byte mac[] = { 0x00, 0xAA, 0xBB, 0xCC, 0xDE, 0x02 };
// Initialize the Ethernet client library
// with the IP address and port of the server
// that you want to connect to (port 80 is default for HTTP):
EthernetClient client;
void setup() {
// start the serial library:
Serial.begin(9600);
pinMode(4,OUTPUT);
digitalWrite(4,HIGH);
// start the Ethernet connection:
if (Ethernet.begin(mac) == 0) {
Serial.println("Failed to configure Ethernet using DHCP");
// no point in carrying on, so do nothing forevermore:
for(;;)
;
}
// print your local IP address:
Serial.print("My IP address: ");
for (byte thisByte = 0; thisByte < 4; thisByte++) {
// print the value of each byte of the IP address:
Serial.print(Ethernet.localIP()[thisByte], DEC);
Serial.print(".");
}
Serial.println();
IPAddress testIP;
DNSClient dns;
dns.begin(Ethernet.dnsServerIP());
dns.getHostByName("pool.ntp.org",testIP);
Serial.print("NTP IP from the pool: ");
Serial.println(testIP);
}
void loop() {
}
Step 4: Time Offsets

You need to plug in your time offset for your time zone. As I am currently on East Coast Day Light Savings Time, I used -14400, which is the number of seconds off GMT. Here is a chart to help you determine your offset:
http://www.epochconverter.com/epoch/timezones.php
Look for this section in the code:
/* Set this to the offset (in seconds) to your local time
This example is GMT - 4 */
const long timeZoneOffset = -14400L;
Step 5: Is It Working?

At this point, with the hardware connected (UNO and Ethernet Shield), and plugged into your router, with your MAC address and time server address plugged in (and of course uploaded to the Arduino), you should see something similar to the following:
Step 6: Adding the LCD

If you are using the Serial LCD Display, connect it now. There is an additional library you will need, the I2C LCD library. You can find that at http://arduinotronics.blogspot.com/2014/02/sainsmart-i2c-lcd.html
LCD Arduino UNO
SCL A5
SDA A4
VCC +5v
GND Gnd
The preceding NTP code with the LCD additions are below:
//sample code originated at http://www.openreefs.com/ntpServer
//modified by Steve Spence, http://arduinotronics.blogspot.com
#include <SPI.h>
#include <Ethernet.h>
#include <EthernetUdp.h>
#include <Time.h>
#include <Wire.h>
#include <LCD.h>
#include <LiquidCrystal_I2C.h>
//LCD Settings
#define I2C_ADDR 0x3F // <<----- Add your address here. Find it from I2C Scanner
#define BACKLIGHT_PIN 3
#define En_pin 2
#define Rw_pin 1
#define Rs_pin 0
#define D4_pin 4
#define D5_pin 5
#define D6_pin 6
#define D7_pin 7
LiquidCrystal_I2C lcd(I2C_ADDR,En_pin,Rw_pin,Rs_pin,D4_pin,D5_pin,D6_pin,D7_pin);
/* ******** Ethernet Card Settings ******** */
// Set this to your Ethernet Card Mac Address
byte mac[] = { 0x90, 0xA2, 0xDA, 0x00, 0x23, 0x36 };
/* ******** NTP Server Settings ******** */
/* us.pool.ntp.org NTP server
(Set to your time server of choice) */
IPAddress timeServer(216, 23, 247, 62);
/* Set this to the offset (in seconds) to your local time
This example is GMT - 4 */
const long timeZoneOffset = -14400L;
/* Syncs to NTP server every 15 seconds for testing,
set to 1 hour or more to be reasonable */
unsigned int ntpSyncTime = 3600;
/* ALTER THESE VARIABLES AT YOUR OWN RISK */
// local port to listen for UDP packets
unsigned int localPort = 8888;
// NTP time stamp is in the first 48 bytes of the message
const int NTP_PACKET_SIZE= 48;
// Buffer to hold incoming and outgoing packets
byte packetBuffer[NTP_PACKET_SIZE];
// A UDP instance to let us send and receive packets over UDP
EthernetUDP Udp;
// Keeps track of how long ago we updated the NTP server
unsigned long ntpLastUpdate = 0;
// Check last time clock displayed (Not in Production)
time_t prevDisplay = 0;
void setup() {
lcd.begin (16,2);
lcd.setBacklightPin(BACKLIGHT_PIN,POSITIVE);
lcd.setBacklight(HIGH);
Serial.begin(9600);
// Ethernet shield and NTP setup
int i = 0;
int DHCP = 0;
DHCP = Ethernet.begin(mac);
//Try to get dhcp settings 30 times before giving up
while( DHCP == 0 && i < 30){
delay(1000);
DHCP = Ethernet.begin(mac);
i++;
}
if(!DHCP){
Serial.println("DHCP FAILED");
for(;;); //Infinite loop because DHCP Failed
}
Serial.println("DHCP Success");
//Try to get the date and time
int trys=0;
while(!getTimeAndDate() && trys<10) {
trys++;
}
}
// Do not alter this function, it is used by the system
int getTimeAndDate() {
int flag=0;
Udp.begin(localPort);
sendNTPpacket(timeServer);
delay(1000);
if (Udp.parsePacket()){
Udp.read(packetBuffer,NTP_PACKET_SIZE); // read the packet into the buffer
unsigned long highWord, lowWord, epoch;
highWord = word(packetBuffer[40], packetBuffer[41]);
lowWord = word(packetBuffer[42], packetBuffer[43]);
epoch = highWord << 16 | lowWord;
epoch = epoch - 2208988800 + timeZoneOffset;
flag=1;
setTime(epoch);
ntpLastUpdate = now();
}
return flag;
}
// Do not alter this function, it is used by the system
unsigned long sendNTPpacket(IPAddress& address)
{
memset(packetBuffer, 0, NTP_PACKET_SIZE);
packetBuffer[0] = 0b11100011;
packetBuffer[1] = 0;
packetBuffer[2] = 6;
packetBuffer[3] = 0xEC;
packetBuffer[12] = 49;
packetBuffer[13] = 0x4E;
packetBuffer[14] = 49;
packetBuffer[15] = 52;
Udp.beginPacket(address, 123);
Udp.write(packetBuffer,NTP_PACKET_SIZE);
Udp.endPacket();
}
// Clock display of the time and date (Basic)
void clockDisplay(){
Serial.print(hour());
printDigits(minute());
printDigits(second());
Serial.print(" ");
Serial.print(day());
Serial.print(" ");
Serial.print(month());
Serial.print(" ");
Serial.print(year());
Serial.println();
lcd.setCursor (0,0);
if (hour() < 10){
lcd.print("0"); }
if (hour() > 12){
lcd.print("0");
lcd.print(hour()-12); } else {
lcd.print(hour()); }
lcd.print(":");
if (minute() < 10){
lcd.print("0"); }
lcd.print(minute());
lcd.print(":");
if (second() < 10){
lcd.print("0"); }
lcd.print(second());
if (hour() > 12){
lcd.print(" PM"); }
else {
lcd.print(" AM"); }
lcd.setCursor (0,1);
if (month() < 10){
lcd.print("0"); }
lcd.print(month());
lcd.print("/");
if (day() < 10){
lcd.print("0"); }
lcd.print(day());
lcd.print("/");
lcd.print(year());
}
// Utility function for clock display: prints preceding colon and leading 0
void printDigits(int digits){
Serial.print(":");
if(digits < 10)
Serial.print('0');
Serial.print(digits);
}
// This is where all the magic happens...
void loop() {
// Update the time via NTP server as often as the time you set at the top
if(now()-ntpLastUpdate > ntpSyncTime) {
int trys=0;
while(!getTimeAndDate() && trys<10){
trys++;
}
if(trys<10){
Serial.println("ntp server update success");
}
else{
Serial.println("ntp server update failed");
}
}
// Display the time if it has changed by more than a second.
if( now() != prevDisplay){
prevDisplay = now();
clockDisplay();
}
}
Step 7: 12h Vs. 24h Time

Originally I built this sketch for 24h time, so 1pm actually displayed as 13. Many folks prefer a 12h clock, with AM/PM, so I modified the final sketch for that instead. Now I'm having second thoughts, so I'm adding a switch to choose which format you prefer to see.
First, we need to read a switch to determine the format, then we need to switch some code based on the results of that read.
We will use pin 5 for the switch, as the Ethernet Shield itself uses pins 4, 10, 11, 12, & 13.
Connect a switch between pin 5 and ground. You don't need a pullup resistor, as we will use the one built into the arduino using the INPUT_PULLUP command.
Here is the affected code as it currently stands:
lcd.setCursor (0,0);
if (hour() < 10){
lcd.print("0"); }
if (hour() > 12){
lcd.print("0");
lcd.print(hour()-12); } else {
lcd.print(hour()); }
lcd.print(":");
if (minute() < 10){
lcd.print("0"); }
lcd.print(minute());
lcd.print(":");
if (second() < 10){
lcd.print("0"); }
lcd.print(second());
if (hour() > 12){
lcd.print(" PM"); }
else {
lcd.print(" AM"); }
Here is how the new code with the option of switching back and forth would look like:
//12h_24h (at top of sketch before void setup
int timeFormatPin = 5; // switch connected to digital pin 5
int timeFormatVal= 0; // variable to store the read value
//put in void setup replaceing the original code listed above
lcd.setCursor (0,0);
if (hour() < 10){
lcd.print("0"); }
//12h/24h
pinMode(timeFormatPin, INPUT_PULLUP); // sets the digital pin 5 as input and activates pull up resistor
timeFormatVal= digitalRead(timeFormatPin); // read the input pin
if (timeFormatVal == 1) {
if (hour() < 10){
lcd.print("0");}
lcd.print(hour());
} else {
if (hour() > 12){
if (hour()-12 < 10){
lcd.print("0");}
lcd.print(hour()-12); } else {
lcd.print(hour()); }
}
lcd.print(":");
if (minute() < 10){
lcd.print("0"); }
lcd.print(minute());
lcd.print(":");
if (second() < 10){
lcd.print("0"); }
lcd.print(second());
if (timeFormatVal == 1){
lcd.print(" 24");
} else {
if (hour() > 12){
lcd.print(" PM"); }
else {
lcd.print(" AM"); }
}
Step 8: Standard Vs. Daylight Savings Time

Originally I built this sketch for my current time, and we are on Daylight Savings time, which is GMT -4. When we switch back to Standard time (GMT -5), the clock code would have to be edited and re uploaded, so lets add a switch to eliminate that headache.
First, we need to read a switch to determine the format, then we need to switch some code based on the results of that read.
We will use pin 6 for the switch, as the Ethernet Shield itself uses pins 4, 10, 11, 12, & 13.
Connect a switch between pin 6 and ground. You don't need a pullup resistor, as we will use the one built into the arduino using the INPUT_PULLUP command.
To make this work, you need to RESET or power cycle your Arduino between changes, as the switch code is not in void loop.
Here is the affected code as it currently stands:
/* Set this to the offset (in seconds) to your local time
This example is GMT - 4 */
const long timeZoneOffset = -14400L;
change to /* Set this to the offset (in seconds) to your local time
This example is GMT - 4 */
long timeZoneOffset;
add this before void setup:
//DST Switch
int dstPin = 6; // switch connected to digital pin 5
int dstVal= 0; // variable to store the read value
and change out the whole int getTimeAndDate() function with the code below:
// Do not alter this function, it is used by the system
int getTimeAndDate() {
// Time zone switch
pinMode(dstPin, INPUT_PULLUP); // sets the digital pin 6 as input and activates pull up resistor
dstVal= digitalRead(dstPin); // read the input pin
if (dstVal == 1) {
timeZoneOffset = -14400L;
} else {
timeZoneOffset = -18000L;
}
int flag=0;
Udp.begin(localPort);
sendNTPpacket(timeServer);
delay(1000);
if (Udp.parsePacket()){
Udp.read(packetBuffer,NTP_PACKET_SIZE); // read the packet into the buffer
unsigned long highWord, lowWord, epoch;
highWord = word(packetBuffer[40], packetBuffer[41]);
lowWord = word(packetBuffer[42], packetBuffer[43]);
epoch = highWord << 16 | lowWord;
epoch = epoch - 2208988800 + timeZoneOffset;
flag=1;
setTime(epoch);
ntpLastUpdate = now();
}
return flag;
}
Step 9: Future Upgrades

- An automatic function for finding a available time server
- Auto switching of Daylight Savings Time
- Alalrm Clock functions with a audible alarm, gradually brightening light, and / or relays.
- RTC for power failure with no network startup
Step 10: WiFi Rechargeable Version

This version of the Internet Clock uses WiFi instead of Ethernet, and an onboard rechargeable Lithium Ion Battery. There is a power switch that turns the clock off, and it resync's time with the internet on powerup. It notifies you when the battery is low with a led, and just plug in a USB cable to recharge.
Adafruit Powerboost Lipo Shield
Arduino WiFi Shield (retired, there is a newer version out)
Arduino UNO

Participated in the
Arduino Contest


