

Introduction: Arduino Nano Compatible LEDs


In this tutorial we will learn how to flash 3 LEDs sequentially and simultaneously.
This tutorial is designed to be used with the Arduino Nano compatible Robo-Geek kits only.
Step 1: How LEDs (Light Emitting Diodes) Work
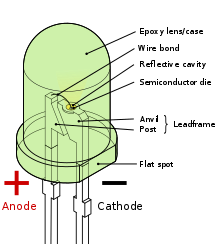
LEDs are great electronic components that make any project come alive. LEDs can be found everywhere from our TVs at home to traffic lights and billboard signs. Turning your first LED on and off with your Arduino is perhaps one of the most fun things to do. To learn more about how LED work, check out this great YouTube video and if you really want to know a lot more, check out the Wikipedia link below.
Step 2: The Circuit
Before working on this circuit, make sure you disconnect the USB cable from your laptop.
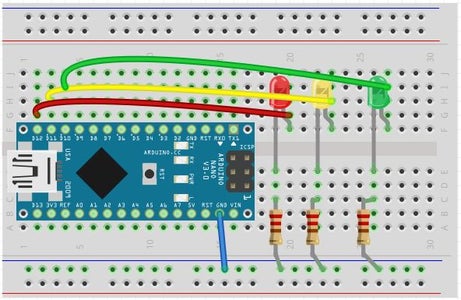
The wiring diagram for this circuit is displayed with a Fritzing diagram with a picture of the same circuit using similar color coding.
Important: Please note that the cables in your kit may be different colors so use this reference as a guide.
Three resistors are required - one for each LED. Use RED, YELLOW and GREEN LEDs.
1. Connect the GND pin to the blue line in the breadboard. This will give you a common ground for your circuit.
2. Connect one leg of your resistors to the ground and the other leg to one of the LED. Repeat for each LED as shown in the diagram.
3. Connect Pin 12 to the other leg of the RED LED.
4. Connect Pin 11 to YELLOW LED
5. Connect Pin 10 to GREEN LED.
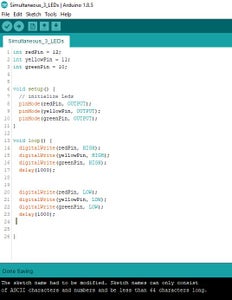
Step 3: The Code - Sequential LED

This code is very simple. We turn each LED on and off; first the RED, then the YELLOW and finally the GREEN. This sequence is repeated every 6 seconds.
To make the code to work:
1. Create a new project by selecting New from the File menu.
2. Delete the code that comes by default.
3. Copy paste the code below
4. Check connections circuits from prior Step.
5. Connect the USB and upload your program.
int redPin = 12;
int yellowPin = 11; int greenPin = 10;void setup() { // initialize Leds pinMode(redPin, OUTPUT); pinMode(yellowPin, OUTPUT); pinMode(greenPin, OUTPUT); }
void loop() { digitalWrite(redPin, HIGH); delay(1000); digitalWrite(redPin, LOW); delay(1000); digitalWrite(yellowPin, HIGH); delay(1000); digitalWrite(yellowPin, LOW); delay(1000);
digitalWrite(greenPin, HIGH); delay(1000); digitalWrite(greenPin, LOW); delay(1000);
}
Step 4: The Code: Simultaneous
Using the same circuit, as in prior step we will create a new program and this time we will turn on all LEDs simultaneously for 1 sec and then turn all LEDs off for 1 sec, this sequence will repeat every 2 seconds.
int redPin = 12;
int yellowPin = 11; int greenPin = 10;void setup() { // initialize Leds pinMode(redPin, OUTPUT); pinMode(yellowPin, OUTPUT); pinMode(greenPin, OUTPUT); }
void loop() { digitalWrite(redPin, HIGH); digitalWrite(yellowPin, HIGH); digitalWrite(greenPin, HIGH); delay(1000);
digitalWrite(redPin, LOW); digitalWrite(yellowPin, LOW); digitalWrite(greenPin, LOW); delay(1000); }
Step 5: Troubleshooting

When troubleshooting:
1. Check if you have any error uploading the program. If so then check your program or the settings in Arduino.
2. If you have no errors uploading the program, then we must check the circuit. Double check you have wired the circuit properly - do this only while the circuit is disconnected. Do not move cables or components while your circuit is powered.
3. Check the orientation of the LED diode. Refer to this tutorial to ensure the LED is working: https://www.instructables.com/id/Arduino-Nano/
4. Still not working? Take a break. Sometimes when we are tired, we don't see obvious things. Once rested, come back repeat steps above and try again.
5. Rarely you may have a defective component or wired but it's possible.
If you are sure all the other steps were done properly, replace the micro-switch with another micro-switch and test again. If everything else fails and you feel you are really stuck, please e-mail us at info@robo-geek.ca with evidence you purchase the kit from Robo-Geek and pictures of your circuit or the error you are getting.
If you want to add a comment to this tutorial, remember ensure to read Instructables Be nice policy before commenting.
Step 6: Challenges

If you would like to challenge yourself and do more, we suggest:
1. Create a program that turns LEDs on sequentially RED, YELLOW, GREEN, then it turns off first the GREEN, then the YELLOW and finally RED. With this logic RED will be turn on the longest.
2. Add 3 more LEDs and create 2 rows, one that turns on sequentially and the other simultaneously.


