

Introduction: Arduino "Pick N Place" Android Robot


Pick N Place robot is a basic level robot for beginners and leaders to learn all about the laws & concepts of Physics, Electronics & Mechanics hence it helps one to inherit this knowledge as one is implementing it. It helps you to get a feel of what robotics is all about.
Features:
- Arduino programming
- Bluetooth Application based Android smartphone control
- Wheel with track belt drive
- Pick and place operation by gripper
- Easy circuit implementation
Step 1: Video: Testing and Full Designing Process
Step 2: Components Required
- Robotic arm kit(which includes 4 geared motors, 4 wheels with track belts and arm gripper)
- Arduino Uno R3 board (or any other arduino board)
- HC05 or HC06 Bluetooth module
- 2 X L293D motor driver IC
- 12V Battery
and
- Android Smartphone or Tablet
- Android App and Arduino code (download it from Github)
Full working project kit is available at sgprojects.co.in for Indian customers.
Step 3: Structure and Working
About Robot body: The Robotic arm kit is made of two section. The bottom driving unit takes the robot to left, right, forward and backward motion. The top gripper unit is to pick and place any object. The driving unit has two motors and also the gripper unit has two motors. The Robot is strong enough to handle a task like bomb diffusing, transporting, rescue operation etc.
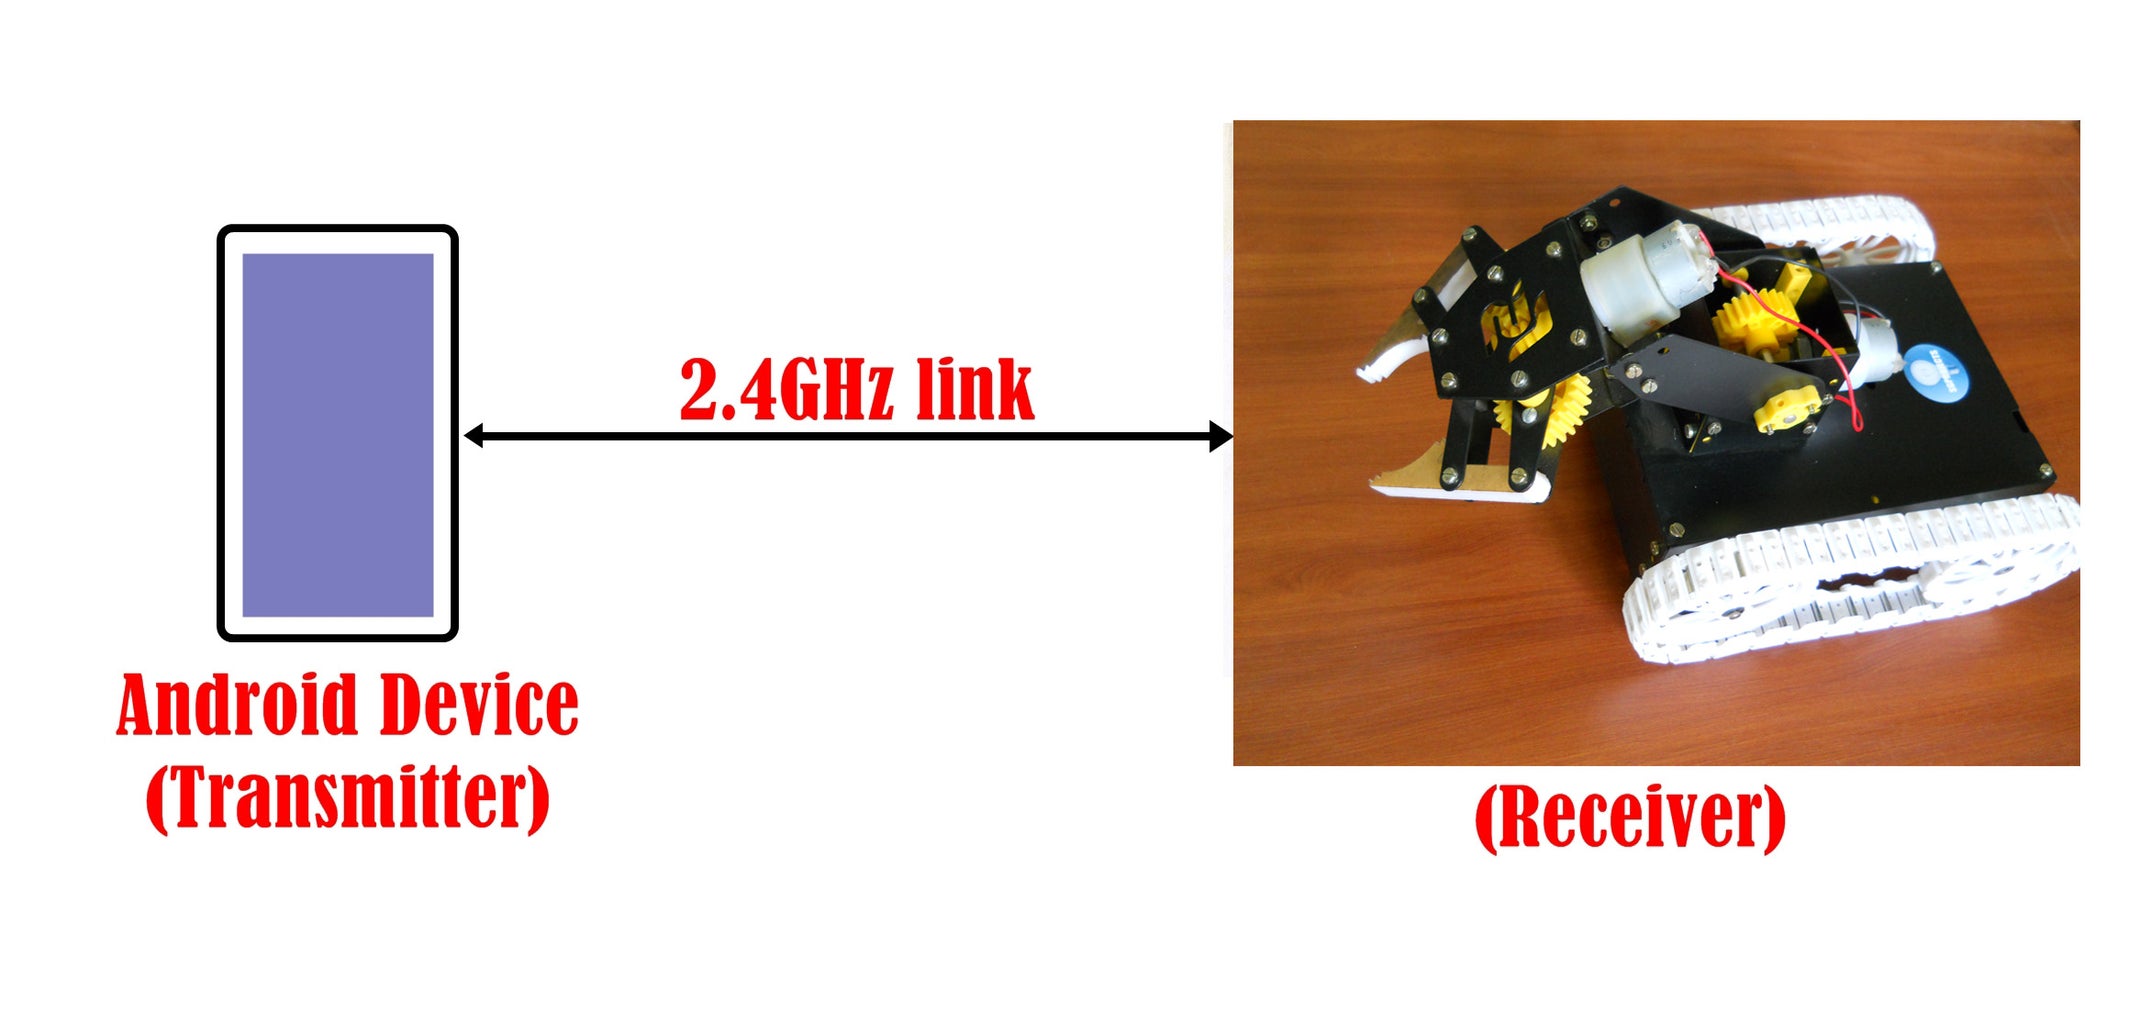
How It Works: The robot is connected to the smartphone via bluetooth and takes command from that. Each time when we touch the button on the screen of the phone, robot activates in action.
Step 4: Circuit Schematic
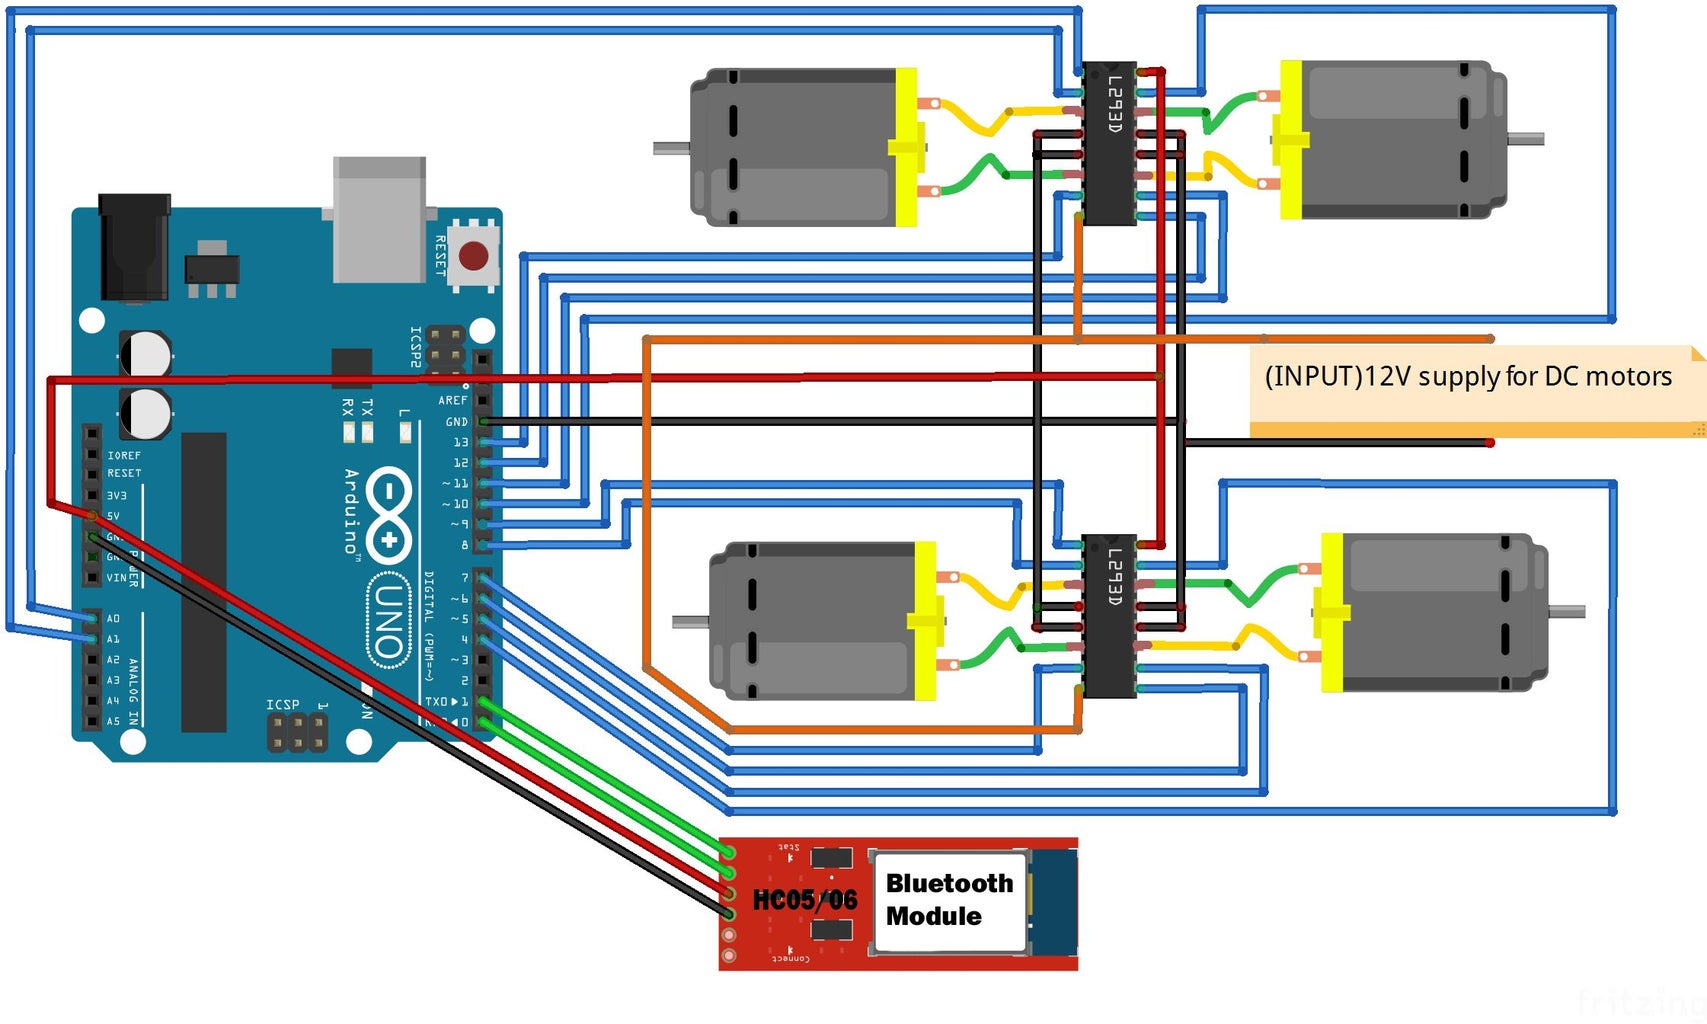
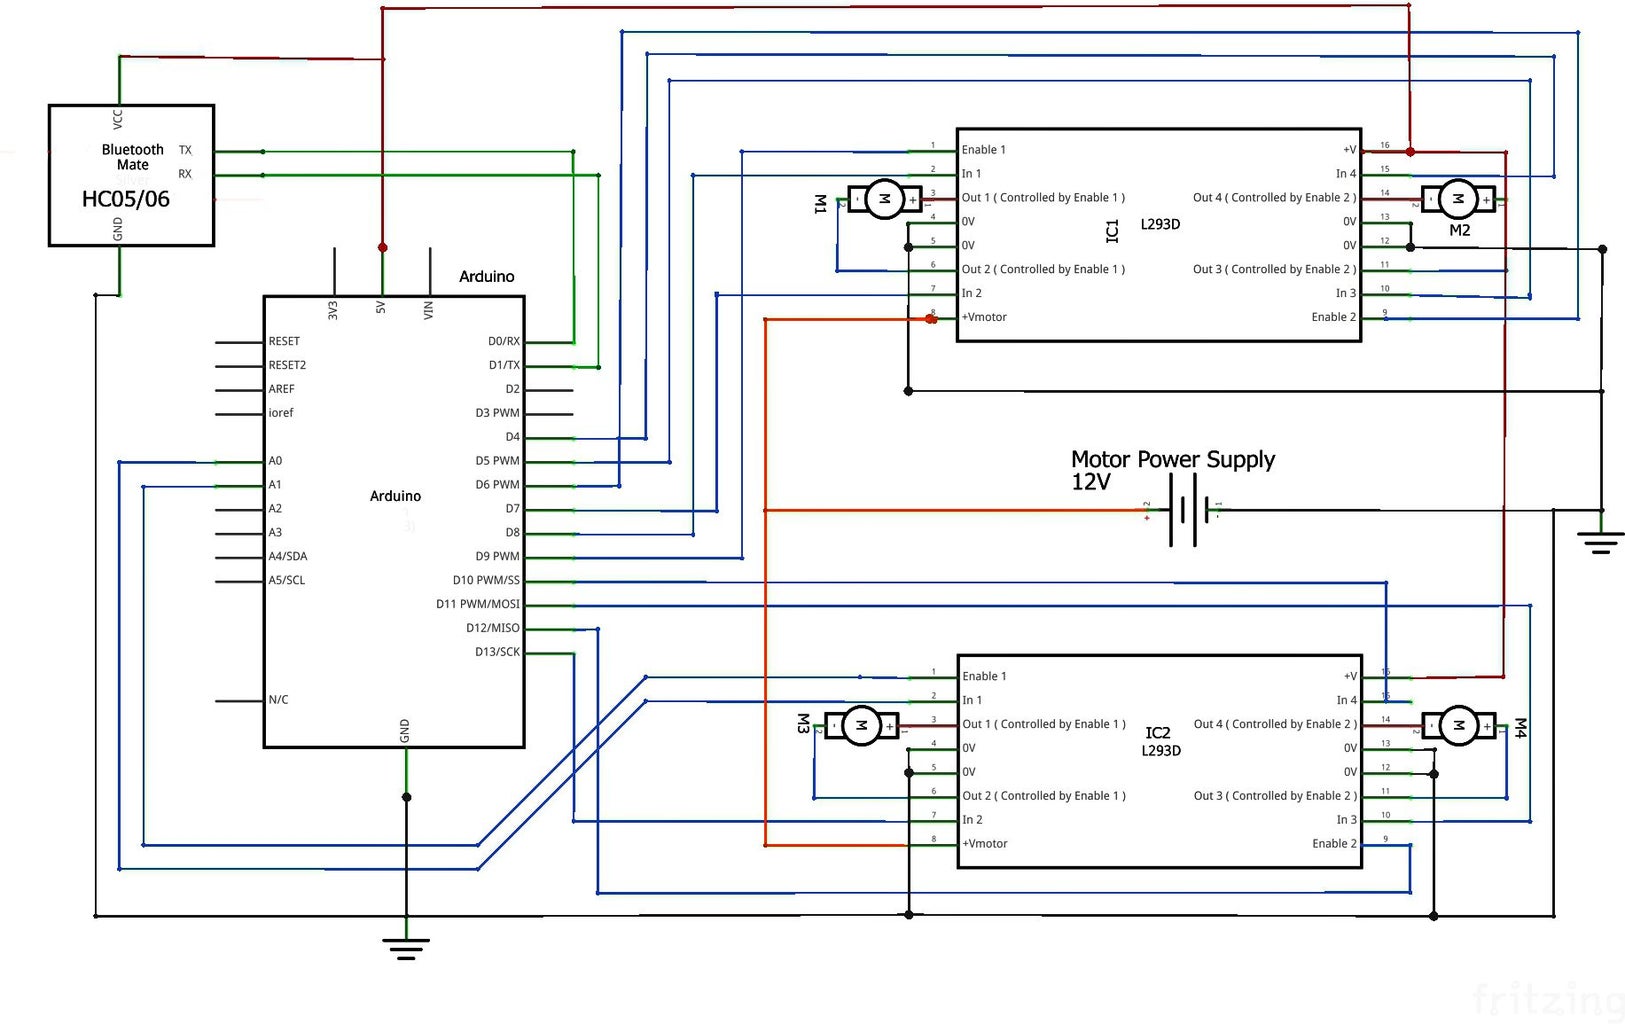
The circuit is very simple to design. Don't be confused !
The arduino board receives the command from the bluetooth module and provides the digital signal to the motor driver IC L293D. Motor driver IC takes signal from the arduino pins and drive the motors by using 12V battery power. Two motors are for grippers and the other two motors are for tracking wheel drivers.
Step 5: Uploading the Arduino Sketch
/*
* Project : Pick N Place Robot * Date : January 2015 * Developer : Sameer Gupta (Administrator at www.sgprojects.co.in ) */int motor1Pin1 = 8; // pin 2 on L293D IC int motor1Pin2 = 7; // pin 7 on L293D IC int enable1Pin = 9; // pin 1 on L293D IC int motor2Pin1 = 5; // pin 10 on L293D IC int motor2Pin2 = 4; // pin 15 on L293D IC int enable2Pin = 6; // pin 9 on L293D IC int motor3Pin1 = 14; // pin 2 on L293D IC int motor3Pin2 = 13; // pin 7 on L293D IC int enable3Pin = 15; // pin 1 on L293D IC int motor4Pin1 = 11; // pin 10 on L293D IC int motor4Pin2 = 10; // pin 15 on L293D IC int enable4Pin = 12; // pin 9 on L293D IC int state; int flag=0; //makes sure that the serial only prints once the state
void setup() { pinMode(motor1Pin1, OUTPUT),pinMode(motor1Pin2, OUTPUT),pinMode(enable1Pin, OUTPUT); pinMode(motor2Pin1, OUTPUT),pinMode(motor2Pin2, OUTPUT),pinMode(enable2Pin, OUTPUT); pinMode(motor3Pin1, OUTPUT),pinMode(motor3Pin2, OUTPUT),pinMode(enable3Pin, OUTPUT); pinMode(motor4Pin1, OUTPUT),pinMode(motor4Pin2, OUTPUT),pinMode(enable4Pin, OUTPUT); Stop(); Serial.begin(9600); }
void loop() { if(Serial.available() > 0){ state = Serial.read(); flag=0; } if (state == 'F'){ Forward(); if(flag == 0)Serial.println("Go Forward"),flag=1; } else if (state == 'B'){ Reverse(); if(flag == 0)Serial.println("Go Reverse"),flag=1; } else if (state == 'L'){ Left(); if(flag == 0)Serial.println("Go Left"),flag=1; } else if (state == 'R'){ Right(); if(flag == 0)Serial.println("Go Right"),flag=1; } else if (state == 'S'){ Stop(); if(flag == 0)Serial.println("STOP!"),flag=1; } else if (state == 'P'){ Pick(); if(flag == 0)Serial.println("Pick"),flag=1; } else if (state == 'Q'){ Place(); if(flag == 0)Serial.println("Place"),flag=1; } else if (state == 'H'){ Hold(); if(flag == 0)Serial.println("Hold"),flag=1; } else if (state == 'I'){ Free(); if(flag == 0)Serial.println("Unhold"),flag=1; } }
void Forward(){ digitalWrite(motor1Pin1, LOW); digitalWrite(motor1Pin2, HIGH); digitalWrite(motor2Pin1, HIGH); digitalWrite(motor2Pin2, LOW); digitalWrite(enable1Pin, HIGH); digitalWrite(enable2Pin, HIGH); }
void Reverse(){ digitalWrite(motor1Pin1, HIGH); digitalWrite(motor1Pin2, LOW); digitalWrite(motor2Pin1, LOW); digitalWrite(motor2Pin2, HIGH); digitalWrite(enable1Pin, HIGH); digitalWrite(enable2Pin, HIGH); }
void Left(){ digitalWrite(motor1Pin1, HIGH); digitalWrite(motor1Pin2, LOW); digitalWrite(motor2Pin1, HIGH); digitalWrite(motor2Pin2, LOW); digitalWrite(enable1Pin, HIGH); digitalWrite(enable2Pin, HIGH); }
void Right(){ digitalWrite(motor1Pin1, LOW); digitalWrite(motor1Pin2, HIGH); digitalWrite(motor2Pin1, LOW); digitalWrite(motor2Pin2, HIGH); digitalWrite(enable1Pin, HIGH); digitalWrite(enable2Pin, HIGH); }
void Pick(){ digitalWrite(motor3Pin1, LOW); digitalWrite(motor3Pin2, HIGH); digitalWrite(enable3Pin, HIGH); }
void Place(){ digitalWrite(motor3Pin1, HIGH); digitalWrite(motor3Pin2, LOW); digitalWrite(enable3Pin, HIGH); }
void Hold(){ digitalWrite(motor4Pin1, LOW); digitalWrite(motor4Pin2, HIGH); digitalWrite(enable4Pin, HIGH); }
void Free(){ digitalWrite(motor4Pin1, HIGH); digitalWrite(motor4Pin2, LOW); digitalWrite(enable4Pin, HIGH); }
void Stop(){ // Stop the motors digitalWrite(enable1Pin, LOW); digitalWrite(enable2Pin, LOW); digitalWrite(enable3Pin, LOW); digitalWrite(enable4Pin, LOW); digitalWrite(motor1Pin1, LOW); digitalWrite(motor1Pin2, LOW); digitalWrite(motor2Pin1, LOW); digitalWrite(motor2Pin2, LOW); digitalWrite(motor3Pin1, LOW); digitalWrite(motor3Pin2, LOW); digitalWrite(motor4Pin1, LOW); digitalWrite(motor4Pin2, LOW); }
Step 6: How to Operate the Robot
For the first time user, you have to install the android app on your smartphone or tablet. Now turn on the Robot by connecting the battery and then turn on the bluetooth of your phone and search for the available devices and pair it. Finally open the application and connect it with the Robot. Hence the Robot is ready to receive your command.
Enjoy my instructable and for more projects goto my web at sgprojects.co.in

Participated in the
Robotics Contest 2016

Participated in the
Make it Move Contest 2016

Participated in the
First Time Author Contest 2016


