

Introduction: Arduino Controlled L293D Robot ( Part 1 - Update 1.0 )


Here is part 1 of the Arduino and L293D Robot.This is part of a series of instructables leading to a Line follower Robot.
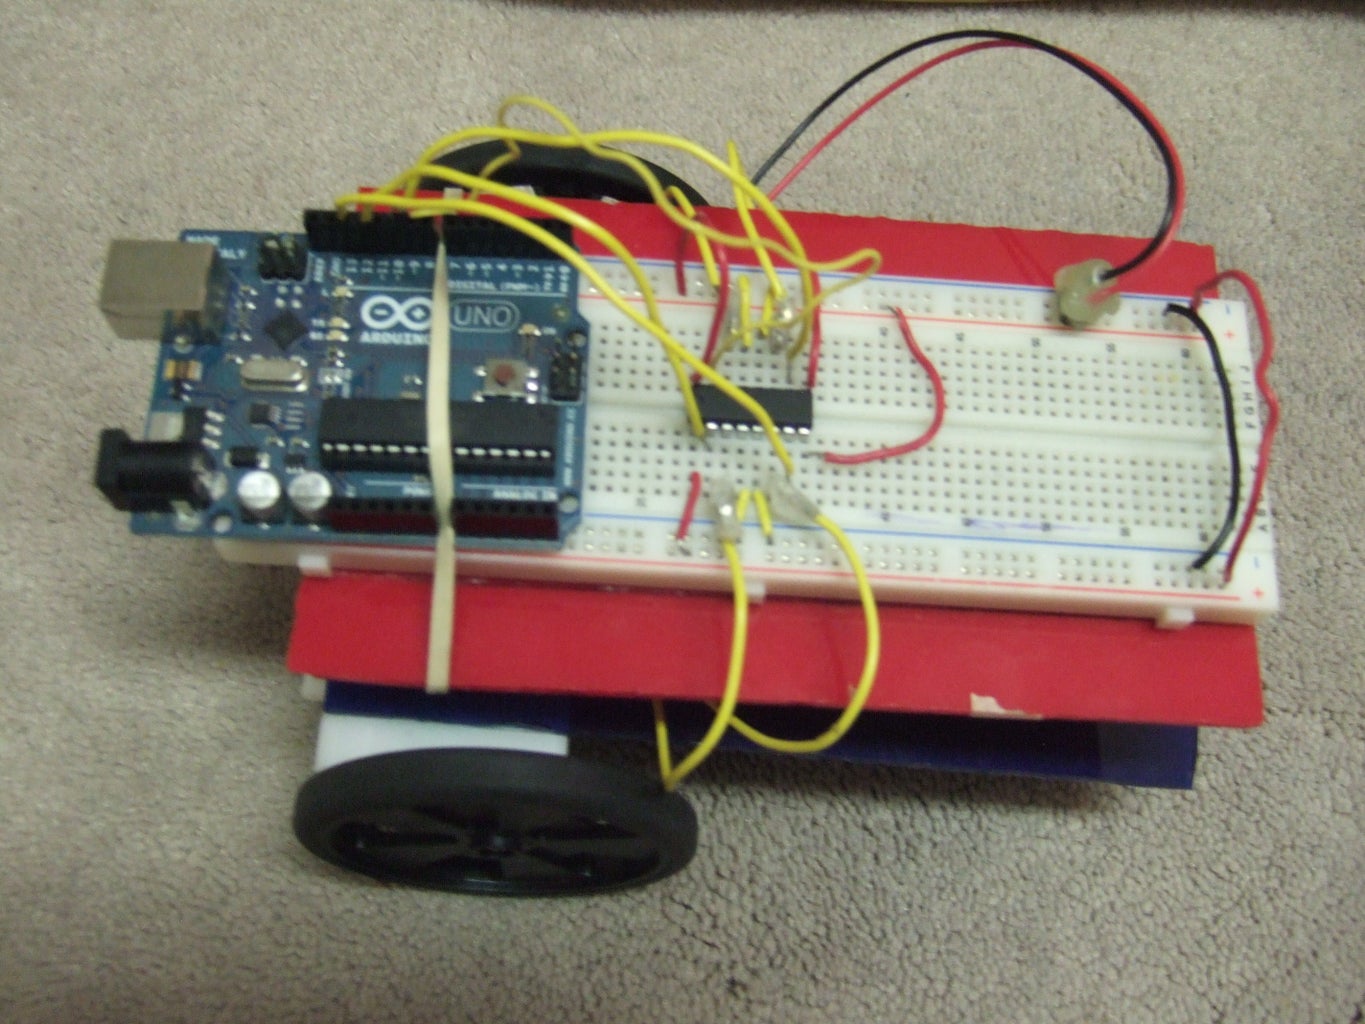
This is a basic Robot made by controlling two motors via the L293D chip through an Arduino Board.
I have done this project in the past with similar set up just not with an Arduino Board.
Do let me know what you think of this project and if I made any mistakes.
Step 1: Parts
Arduino Board
Breadboard
L293D Chip
Two Motors
9 Volt Battery
6 Volt Battery Pack
Step 2: Wiring the L293D Chip


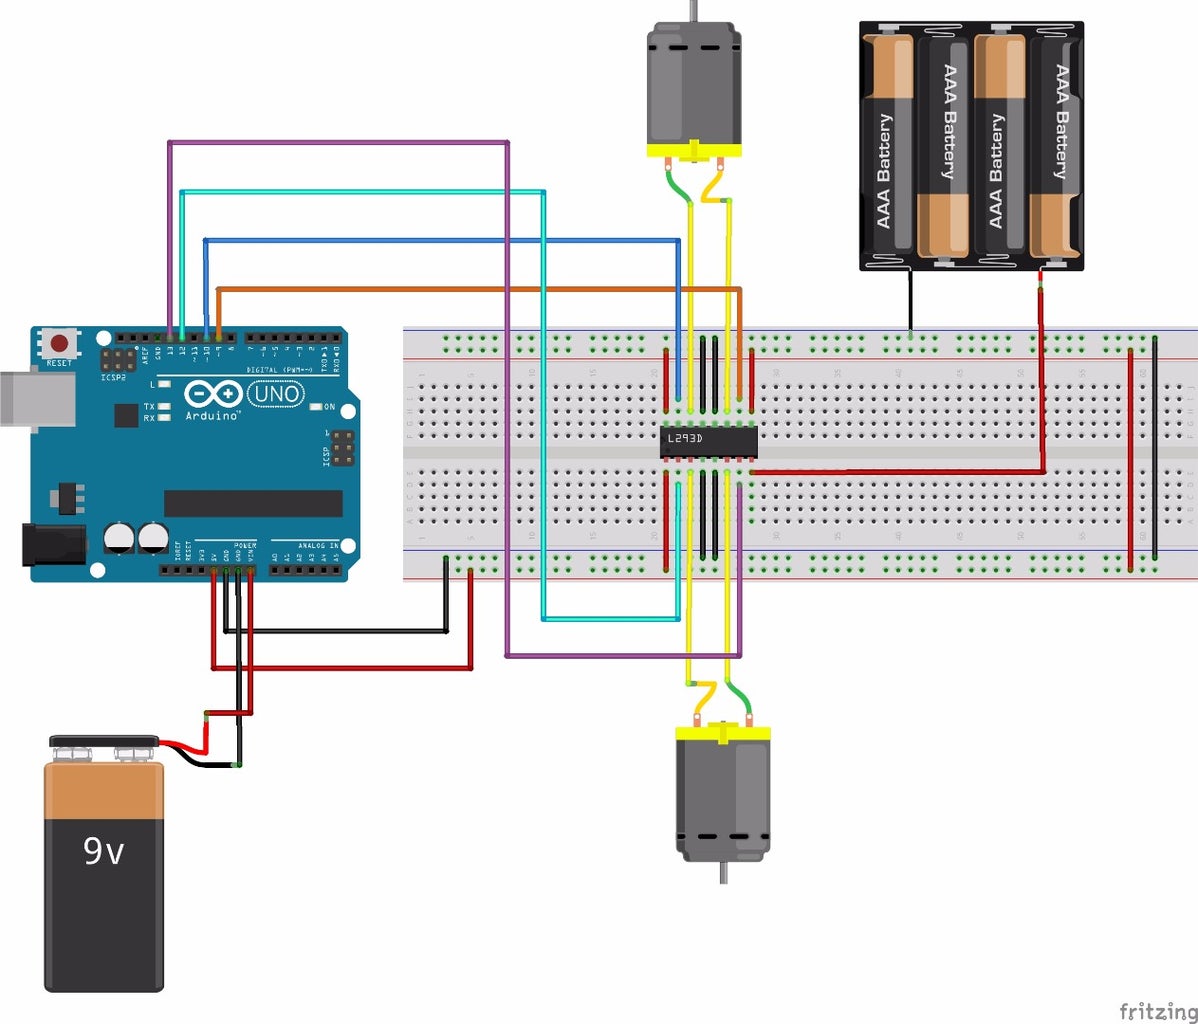
Pin 4 ,Pin 5,Pin 12 and Pin 13 from L293D Chip Connect to Ground (Negative On Breadboard)
Pin 1,Pin 9 and Pin 16 from L293D Chip Connect to 5 Volts (Positive On Breadboard)
Pin 8 from L293D Chip Connects to 6 Volts (Positive Lead of Battery Pack)
Pin 3 from L293D Chip Connects to Right Motor
Pin 6 from L293D Chip Connects to Right Motor
Pin 11 from L293D Chip Connects to Left Motor
Pin 14 from L293D Chip Connects to Left Motor
Output pins on Arduino to control Right Motor :
Pin 2 from L293D Chip Connects to Output Pin on Arduino
Pin 7 from L293D Chip Connects to Output Pin on Arduino
Output pins on Arduino to control Left Motor :
Pin 10 from L293D Chip Connects to Output Pin on Arduino
Pin 15 from L293D Chip Connects to Output Pin on Arduino
Step 3:
Step 4: Connecting the Motors to L293D Chip
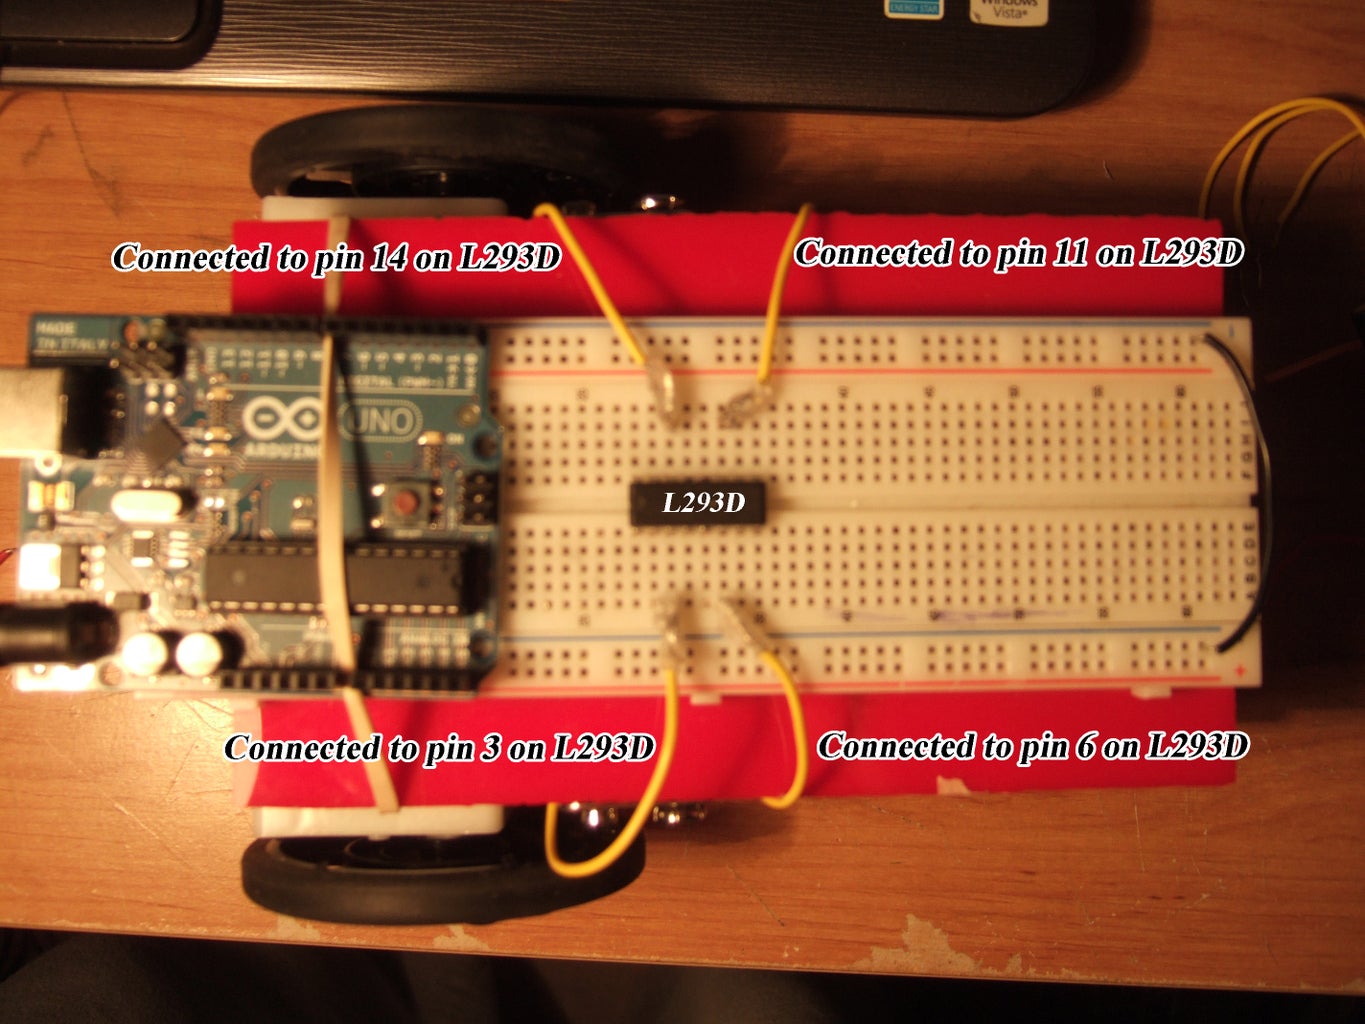
Pin 3 from L293D Chip Connects to Right Motor
Pin 6 from L293D Chip Connects to Right Motor
Pin 11 from L293D Chip Connects to Left Motor
Pin 14 from L293D Chip Connects to Left Motor
Step 5: Connecting the Pins to 5 Volts and Ground
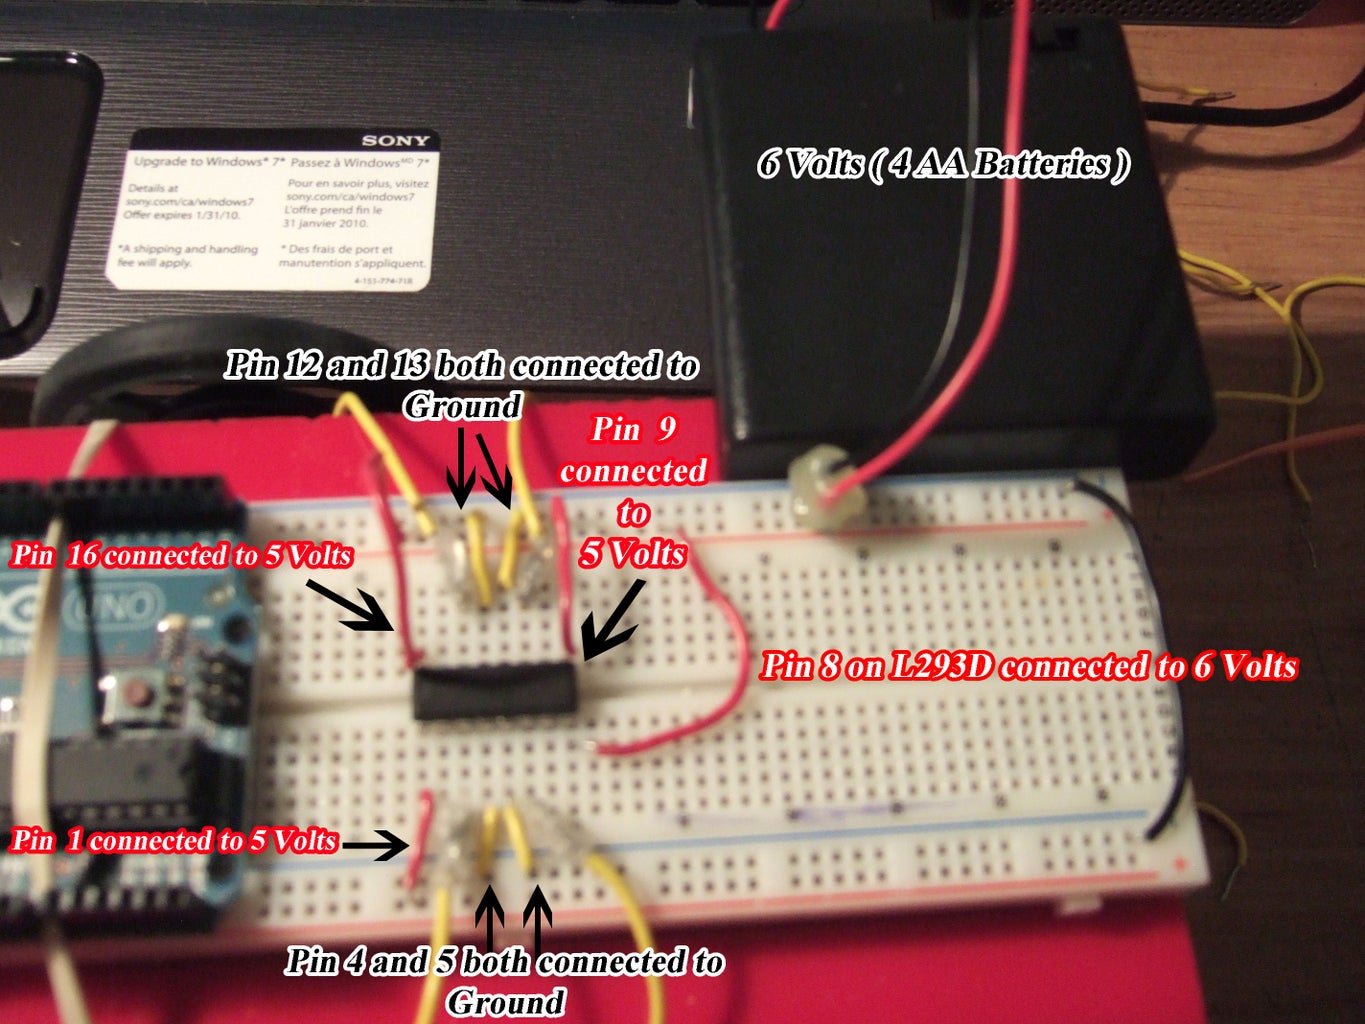
Pin 4 ,Pin 5,Pin 12 and Pin 13 from L293D Chip Connect to Ground (Negative On Breadboard)
Pin 1,Pin 9 and Pin 16 from L293D Chip Connect to 5 Volts (Positive On Breadboard)
Pin 8 from L293D Chip Connects to 6 Volts (Positive On Breadboard)
Step 6: Output Pins on Arduino to Control the Motors
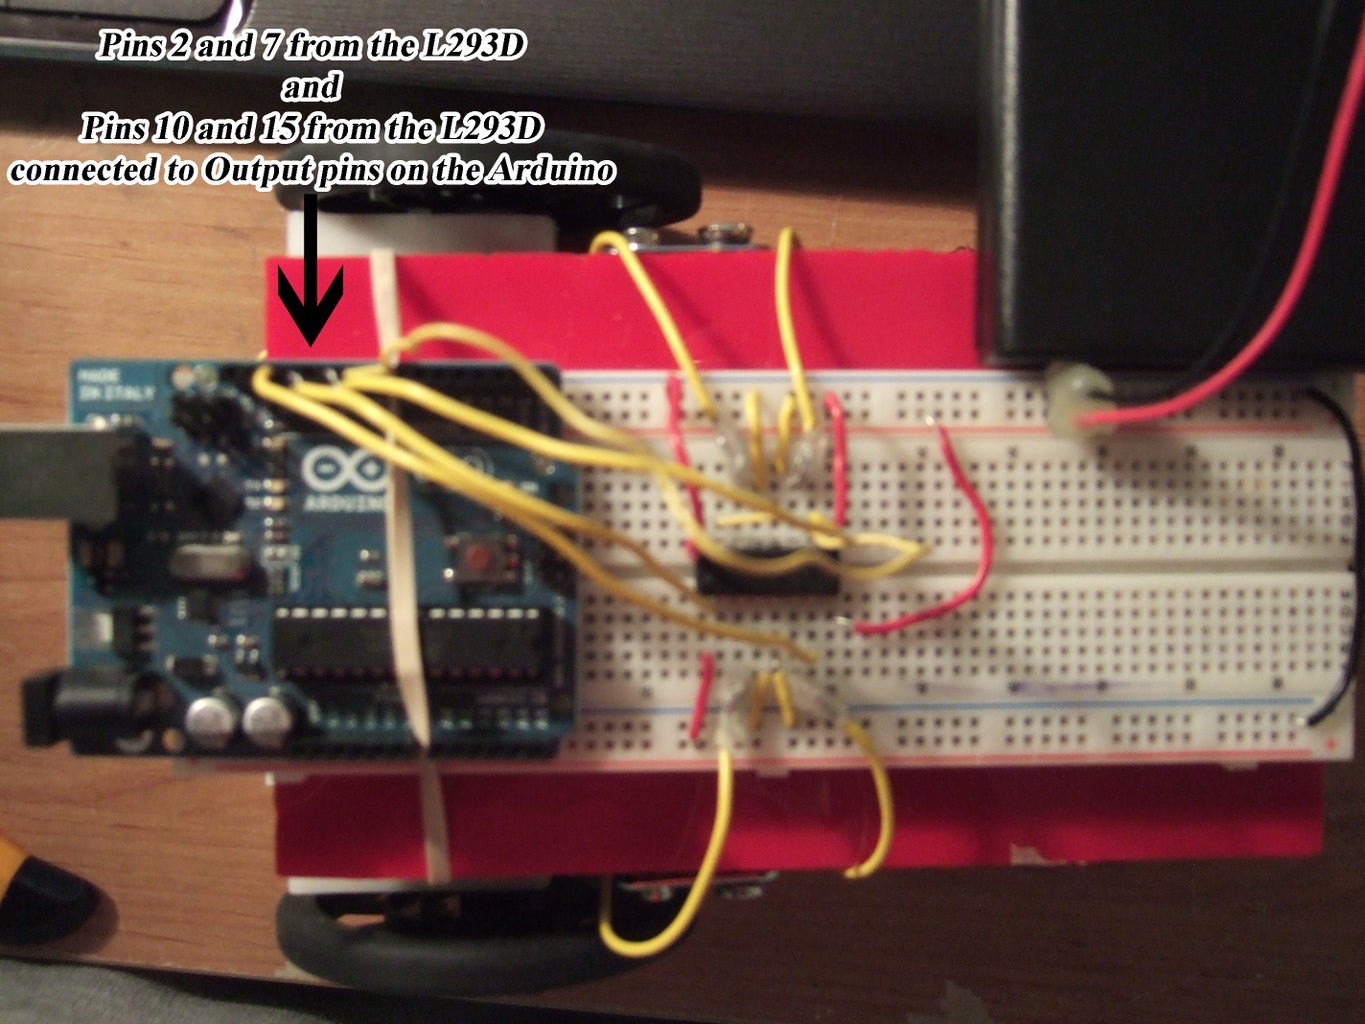
Output pins on Arduino to control Right Motor :
Pin 2 from L293D Chip Connects to Output Pin on Arduino
Pin 7 from L293D Chip Connects to Output Pin on Arduino
Output pins on Arduino to control Left Motor :
Pin 10 from L293D Chip Connects to Output Pin on Arduino
Pin 15 from L293D Chip Connects to Output Pin on Arduino
Step 7: Power
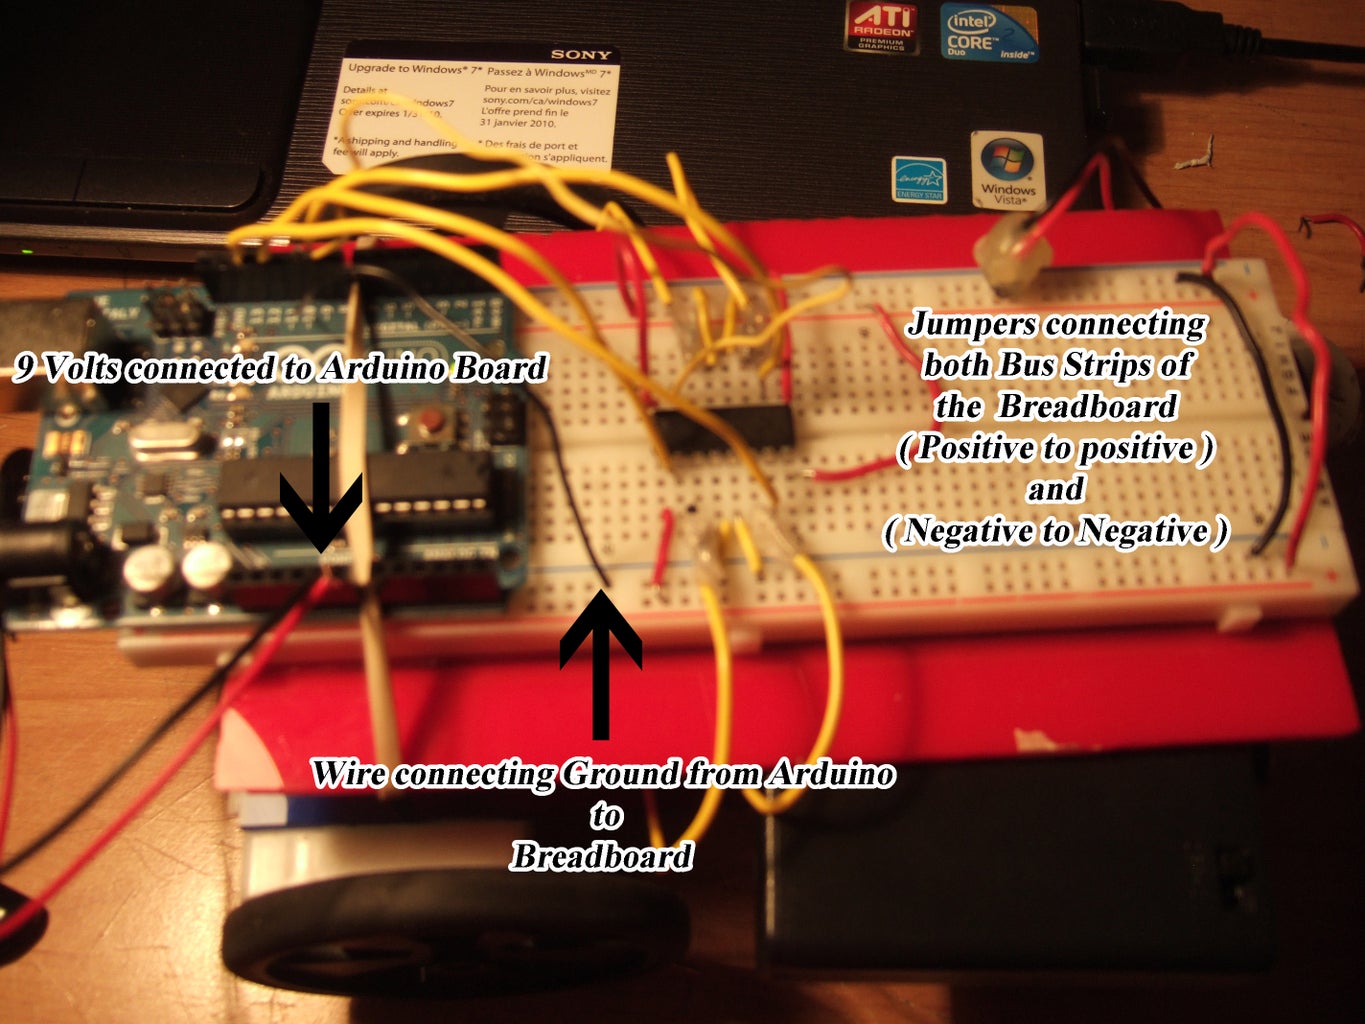
9 Volts powering the Arduino Board
6 Volts(4 Double A 1.5 Volts batteries) connected to the Breadboard powering the motors.
Step 8: Basic Code to Go Straight
// The following is the basic Arduino code which runs a loop that makes the Robot go straight forward.
int LeftMotorForward = 10; // Pin 10 has Left Motor connected on Arduino boards.
int LeftMotorReverse = 9; // Pin 9 has Left Motor connected on Arduino boards.
int RightMotorForward = 12; // Pin 12 has Right Motor connected on Arduino boards.
int RightMotorReverse = 13; // Pin 13 has Right Motor connected on Arduino boards.
void setup()
{
pinMode(LeftMotorForward, OUTPUT); // initialize the pin as an output.
pinMode(RightMotorForward, OUTPUT); // initialize the pin as an output.
pinMode(LeftMotorReverse, OUTPUT); // initialize the pin as an output.
pinMode(RightMotorReverse, OUTPUT); // initialize the pin as an output.
}
// The following Loop is to make the Robot go staright
void loop()
{
digitalWrite(RightMotorForward, HIGH); // turn the Right Motor ON
digitalWrite(LeftMotorForward, HIGH); // turn the Left Motor ON
delay(10000); // wait for 10 seconds
digitalWrite(RightMotorForward,LOW); // turn the Right Motor OFF
digitalWrite(LeftMotorForward, LOW); // turn the Left Motor OFF
delay(10000); // wait for 10 seconds
}
Step 9: Basic Code to Go Right
int LeftMotorForward = 10; // Pin 10 has Left Motor connected on Arduino boards.
int LeftMotorReverse = 9; // Pin 9 has Left Motor connected on Arduino boards.
int RightMotorForward = 12; // Pin 12 has Right Motor connected on Arduino boards.
int RightMotorReverse = 13; // Pin 13 has Right Motor connected on Arduino boards.
void setup()
{
pinMode(LeftMotorForward, OUTPUT); // initialize the pin as an output.
pinMode(RightMotorForward, OUTPUT); // initialize the pin as an output.
pinMode(LeftMotorReverse, OUTPUT); // initialize the pin as an output.
pinMode(RightMotorReverse, OUTPUT); // initialize the pin as an output.
}
// The following Loop is to make the Robot go Right
void loop()
{
digitalWrite(RightMotorForward, LOW); // turn the Right Motor OFF
digitalWrite(LeftMotorForward, HIGH); // turn the Left Motor ON
delay(10000); // wait for 10 seconds
digitalWrite(RightMotorForward,LOW); // turn the Right Motor OFF
digitalWrite(LeftMotorForward, LOW); // turn the Left Motor OFF
delay(10000); // wait for 10 seconds
}
Step 10: Basic Code to Go Left
int LeftMotorForward = 10; // Pin 10 has Left Motor connected on Arduino boards.
int LeftMotorReverse = 9; // Pin 9 has Left Motor connected on Arduino boards.
int RightMotorForward = 12; // Pin 12 has Right Motor connected on Arduino boards.
int RightMotorReverse = 13; // Pin 13 has Right Motor connected on Arduino boards.
void setup()
{
pinMode(LeftMotorForward, OUTPUT); // initialize the pin as an output.
pinMode(RightMotorForward, OUTPUT); // initialize the pin as an output.
pinMode(LeftMotorReverse, OUTPUT); // initialize the pin as an output.
pinMode(RightMotorReverse, OUTPUT); // initialize the pin as an output.
}
// The following Loop is to make the Robot go Left
void loop()
{
digitalWrite(RightMotorForward, HIGH); // turn the Right Motor ON
digitalWrite(LeftMotorForward, LOW); // turn the Left Motor OFF
delay(10000); // wait for 10 seconds
digitalWrite(RightMotorForward,LOW); // turn the Right Motor OFF
digitalWrite(LeftMotorForward, LOW); // turn the Left Motor OFF
delay(10000); // wait for 10 seconds
}
Step 11: Basic Code to Reverse
int LeftMotorForward = 10; // Pin 10 has Left Motor connected on Arduino boards.
int LeftMotorReverse = 9; // Pin 9 has Left Motor connected on Arduino boards.
int RightMotorForward = 12; // Pin 12 has Right Motor connected on Arduino boards.
int RightMotorReverse = 13; // Pin 13 has Right Motor connected on Arduino boards.
void setup()
{
pinMode(LeftMotorForward, OUTPUT); // initialize the pin as an output.
pinMode(RightMotorForward, OUTPUT); // initialize the pin as an output.
pinMode(LeftMotorReverse, OUTPUT); // initialize the pin as an output.
pinMode(RightMotorReverse, OUTPUT); // initialize the pin as an output.
}
// The following Loop is to make the Robot Reverse
void loop()
{
digitalWrite(RightMotorReverse, HIGH); // turn the Right Motor ON
digitalWrite(LeftMotorReverse, HIGH); // turn the Left Motor ON
delay(10000); // wait for 10 seconds
digitalWrite(RightMotorForward,LOW); // turn the Right Motor OFF
digitalWrite(LeftMotorForward, LOW); // turn the Left Motor OFF
delay(10000); // wait for 10 seconds
}
Step 12: Code to Make Robot Go Forward,Right,Left,Reverse and Stop All in a Loop
int LeftMotorForward = 10; // Pin 10 has Left Motor connected on Arduino boards.
int LeftMotorReverse = 9; // Pin 9 has Left Motor connected on Arduino boards.
int RightMotorForward = 12; // Pin 12 has Right Motor connected on Arduino boards.
int RightMotorReverse = 13; // Pin 13 has Right Motor connected on Arduino boards.
//-----------------------------------------------------------------------------
void setup()
{
pinMode(LeftMotorForward, OUTPUT); // initialize the pin as an output.
pinMode(RightMotorForward, OUTPUT); // initialize the pin as an output.
pinMode(LeftMotorReverse, OUTPUT); // initialize the pin as an output.
pinMode(RightMotorReverse, OUTPUT); // initialize the pin as an output.
}
//-----------------------------------------------------------------------------
// The following Loop is to make the Robot go staright
void loop()
{
void Driveforward();
digitalWrite(RightMotorForward, HIGH); // turn the Right Motor ON
digitalWrite(LeftMotorForward, HIGH); // turn the Left Motor ON
delay(10000); // wait for 10 seconds
digitalWrite(RightMotorForward,LOW); // turn the Right Motor OFF
digitalWrite(LeftMotorForward, LOW); // turn the Left Motor OFF
delay(10000); // wait for 10 seconds
//-----------------------------------------------------------------------------
void Rightturn();
digitalWrite(RightMotorForward, LOW); // turn the Right Motor OFF
digitalWrite(LeftMotorForward, HIGH); // turn the Left Motor ON
delay(10000); // wait for 10 seconds
digitalWrite(RightMotorForward,LOW); // turn the Right Motor OFF
digitalWrite(LeftMotorForward, LOW); // turn the Left Motor OFF
delay(10000); // wait for 10 seconds
//-----------------------------------------------------------------------------
void Leftturn();
digitalWrite(RightMotorForward, HIGH); // turn the Right Motor ON
digitalWrite(LeftMotorForward, LOW); // turn the Left Motor OFF
delay(10000); // wait for 10 seconds
digitalWrite(RightMotorForward,LOW); // turn the Right Motor OFF
digitalWrite(LeftMotorForward, LOW); // turn the Left Motor OFF
delay(10000); // wait for 10 seconds
//-----------------------------------------------------------------------------
void Reverse();
digitalWrite(RightMotorReverse, HIGH); // turn the Right Motor ON
digitalWrite(LeftMotorReverse, HIGH); // turn the Left Motor ON
delay(10000); // wait for a 10 seconds
digitalWrite(RightMotorReverse, LOW); // turn the Right Motor ON
digitalWrite(LeftMotorReverse, LOW); // turn the Left Motor ON
delay(10000); // wait for a 10 seconds
//-----------------------------------------------------------------------------
void Allstop();
digitalWrite(RightMotorReverse, LOW); // turn the Right Motor ON
digitalWrite(LeftMotorReverse, LOW); // turn the Left Motor ON
delay(10000); // wait for 10 seconds
digitalWrite(RightMotorForward,LOW); // turn the Right Motor OFF
digitalWrite(LeftMotorForward, LOW); // turn the Left Motor OFF
delay(10000); // wait for 10 seconds
//-----------------------------------------------------------------------------
}

Participated in the
Hurricane Lasers Contest


