

Introduction: Arduino and VCO Melody Maker


The circuit, sketches and process described here will allow you to produce melodies using an Arduino and a VCO. The sketches provided already have the melody for Mary Had a Little Lamb. You can easily change the melody in the code and potentially build upon this project to make polyphonic music with one Arduino and six VCOs.
Materials needed:
• Arduino and USB cable
• Breadboard
• Potentiometer
• 8Ω Speaker or connection to an audio amplifier
• VCO & Low pass circuits
1x 7555 Timer
2x 10kΩ Resister
2x 1kΩ
1x 1µF capacitor
2x 100µF capacitor
• Guitar tuner, Musical Instrument or well trained musical ear.
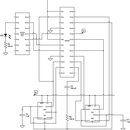
Step 1: Build VCO Using 7555 Astable Oscilator

Use wire diagram below to build the VCO on your breadboard. Though not pictured, please connect the 5v pin from the Arduino to the Vcc rails on your breadboard and ground on the Arduino to the ground rails on your breadboard.
Step 2: Finding the Notes
Run the Melody Maker Tuning Sketch to find the numbers (between 0 and 255) that relate to the pitches of a scale.
Turn the potentiometer connected to the Arduino to control the PWM output and thus the pitch of the VCO.
Use a guitar tuner, an instrument or your well trained musical ear to find the notes in a major scale (root through octave).
View the serial monitor and write down the numbers associated with each scale degree.
Copy all code below and paste into Arduino:
/*
This program reads a potentiometer and sets PWM and serial output.
Use the serial monitor to determine what PWM values are associated with pitches
on a 7555 astable oscillator.
Connect the middle pin (wiper) of a potentiometer to analog pin 0)
Connect the digital pin 3 (PWM) to a low pass filter.
Connect the output of the low pass filter to pin 5 on the 7555
See instructables page for more details/schematics
2012 NYU Music Technology Program
.lcc
*/
// Delcarations
int myOutPin = 3;
int myOutValue = 0;
void setup() {
Serial.begin(9600);
pinMode(myOutPin, OUTPUT);
}
void loop() {
// read the potentiometer position and putput a value between 0 and 255
myOutValue= analogRead(0)/4;
// print the this reading to the serial monitor
Serial.print(myOutValue);
// write the potentiometer reading as an analog output via PWM
analogWrite(myOutPin, myOutValue);
// wait a short time before repeating this process
delay(25);
}//end main loop
Step 3: Change Notes and Play
Update the notes[] array with the PWM values associated with your VCO circuit.
copy/paste code below:
/*
This sketch controls a VCO such that it will play Mary Had a Little Lamb,
Connect the middle pin (wiper) of a potentiometer to analog pin 0)
Connect the digital pin 3 (PWM) to a low pass filter.
Connect the output of the low pass filter to pin 5 on the 7555
See instructables page for more details/schematics
2012 NYU Music Technology Program
.lcc
*/
// Delcarations
int myOutPin = 3;
int myOutValue = 0;
int mysteps = 0;
// Use the melody maker tuning sketch to determine these values
int notes[] = {0,255,227,216,211,203};
// these are the pitch classes in order of the melody, zeros are rests
int PitchClass[]={3,2,1,2,3,3,3,0,2,2,2,0,3,5,5,0,3,2,1,2,3,3,3,3,2,2,3,2,1,0,0,0,0};
// keep track of how long PitchClass is, put that value here:
int LengthOfPitchClass = 32;
// this code runs once
void setup() {
Serial.begin(9600);
pinMode(myOutPin, OUTPUT);
}
// this code repeats until the unit is unplugged.
void loop() {
// increment each pass through the loop.
mysteps++ ;
// reset the loop when it reaches the number of steps in the PitchClass[] array
if(mysteps > LengthOfPitchClass){
mysteps = 0;}
// this for loop puts a very short rest between notes to help separate the events.
// comment out the code between here and //end for to remove these note and use one line of code below
for(int i=0; i< 5; i++){
if(i < 3){
// send PWM voltages to 7555 pin 5 to make notes
analogWrite(myOutPin,notes[PitchClass[mysteps]]);
}//end if
else{
// zero should make a rest
analogWrite(myOutPin, 0);
}//end else
//this delay time sets the lenght of the r
delay(25);
}//end for
// use this line of code in place of the above for loop for legato notes
//analogWrite(myOutPin,notes[PitchClass[mysteps]]);
//delay each pass through the loop, this is the tempo control
delay(analogRead(0));
// print the output of the PWM to the serial monitor for debugging.
Serial.println(notes[PitchClass[mysteps]]);
}//end main loop
Step 4: Variations (advanced)
Once you have made the circuits play Mary Had a Little Lamb, you can modify the code to produce different melodies.
To produce a new melody, you will need to replace the numbers in the pitchClass[] array with the numbers of your melody. To get the numbers for your melody, you must convert the notes of the melody to scale degrees, where 1 is the lowest note and 8 is the octave above that. Rests can be represented with zeros.
To make harmonies, add additional VCOs, and additional arrays, such as pitchClass2[], etc. The number of PWM channels on the Arduino limits the voices to six separate harmonies.

Participated in the
DIY Audio


