

Introduction: Arduino-controlled, Aluminum Archangel Costume Wings


The idea sank into the depths of my mind and had a death grip on my brain. I searched around to see if anyone had attempted it before and all I found were a few guys that made wings out of cardboard, while some went far enough to use aluminum foil. Someone had to do justice to the character! Someone had to MAKE IT REAL! So, I took it upon myself to do so.
In order to make them to scale but not too heavy to move around, I made them from 7075 aircraft grade aluminum sheets that were 1/32" thin. I have to say, that stuff is awesome. It's a bit pricey, but so strong and resistant to deformation is unbelievable.
I didnt want the wings to just be static or flop around on my back, so I decided to add in some gizmos to make them move. I wired up some gloves with push-button switches in the fingertips that controlled 4 continuous rotation servos which would in turn wind up a high strength fishing line to pull the wings closed. To open them back again, the wing panels were connected with spring hinges.
DISCLAIMERS
This is my first Instructable, so please forgive me if I dont have super detailed photos of every step. If anything is unclear just ask. Also, I'm pretty new to the maker scene so these wings were built entirely at my home where I have no shop or the tools found therein, just a dremel and a basic power drill. In hindsight, there are at least 972 things I'd do differently if I could go back. I dont claim that anything here is the best way to do it, its just the way I did it. With that said, I'd love to hear what you all think! As there are a lot of details in this project, I'll assume for this instructable that I dont need to be super explicit about things like stripping wires, soldering, connecting the arduino to a computer, etc.
More documentation and photos of the actual build process can be found here on my blog: http://adielfernandez.blogspot.com/
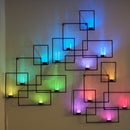
Finally, here's a video of them working. This was taken before they got the last bit of polish and detailing they have in the photo above.
Step 1: Materials
With a few exceptions, most of this stuff is pretty run of the mill Home Depot faire. Although I don't think anyone would actually try to recreate these (you'd have to be as crazy about the project as I was and I was probably certifiable), I tried to be as complete as I could be, sparing a few details, on the materials list. There are comments throughout, so feel free to just skim it or read in depth if you're curious.
Electronics
Arduino - used an Arduino Uno for prototyping and getting everything dialed in, then I moved it over to the Arduino Pro Mini to make it all sexypants.
Breadboard for prototyping
Perfboard for making it more permanent
Soldering Iron
Solder
Resistors - 8 x 10K ohm
Toggle switch
Thin gauge wire - In many instances I used very thin gauge enameled magnet wire. Do NOT do this. I was seduced by how low profile it was and foolishly ignored how easily it fatigues and breaks. Save yourself a lot of headache and get some nice thin, stranded 26+ gauge wire for all of the applications in this project.
Wire strippers
Wire cutters
Generic "Project Enclosure" box from radio shack
4 x AA battery holder from radio shack
4 Continuous Rotation Servos - I used these, the largest ones SparkFun had to offer because they were easy to get and had a decent amount of torque.
JST Jumper wire assemblies - I used four 3 wire jumpers and 2 5 wire jumpers like these.
Breakaway headers - Straight and 90 degree
Hardware
Aluminum sheet - Like I said, I used aircraft grade 7075 aluminum I got from OnineMetals.com. Despite having a 10+ ft wing span, the wings way under 20 lbs. I dont think they would have been as light and durable with regular 6061 aluminum. It took me about four 3ft x 4ft sheets of the metal.
Aluminum L channel - About 6 feet or so to use as support to keep certain wing panels from flexing.
Dremel rotary tool - Dont get the cordless one. It runs out of juice in minutes there is a LOT of cutting to do. I tried using other tools like a nibbler (shears designed to minimize distortion when you cut), but the 7075 Aluminum is just too damn hard.
Fiber-reinforced cutting wheels for Dremel - The 7075 Aluminum eats through cutting wheels like you're cutting with kraft singles, other cutting wheels would be useless. Maybe the dremel metal wheel would have been better or a band saw, but I dont know how those things handle metals, particularly hard 7075. Feel free to comment if you know.
Diamond tipped bit for Dremel - I used it to etch the patterns in the wings. It... took... forever. I wouldnt wish it on anyone, but the effect afterwards was worth it.
Spring Hinges - I used ones I bought from McMaster-Carr. It was tricky to get the ones that were strong enough. In the end I think I could have gone with bigger stronger springs, but those would have probably begged for stronger servos too which get very pricey very fast. Go to their site and search for 1613A4 to get the same ones I used.
Regular springs - got a few at Home Depot, I think they were somewhere around 3-4 pounds of pull force
Power Drill
Drill Bits - assorted sizes
Sand Paper and sponge mop - 100 grit paper puts a really nice brushed finish in the aluminum. You can wrap the sandpaper around a sponge mop and brush the aluminum sheets while on the floor to get nice, long, even strokes that leave a great brushed finish.
Sanding sponge - It helps to do some of the finer work without the sponge mop
Aluminum Backplate with Harness - Scuba divers use them to attach air tanks to their backs, this is what the wings actually attach to. I bought one from eBay (just search "aluminum backplate harness") for cheaper than they're usually found, but here's an example of another you could use.
High strength fishing line - I bought 50 lb test. I dont think there is anywhere near that much force on the line but its always nice to eliminate room for failure. To be honest, the knot you tie might have more of an effect on the project than the line you use.
Hot Glue Gun - A true godsend
Miscellaneous Fastening Hardware - By the end, I made about a dozen runs to home depot to get the right hardware to hold it all together. Sadly I didn't document the sizes of all my hardware, but if I recall correctly, its something like 50+ #4 philips head nuts and bolts (1/2" long), 12-15 # 6 nuts and bolts (1 1/2" long) and 4 eye screws with nuts and loads of #4 split lock washers.
Pencils, sharpies, rulers, scissors, etc...
Safety glasses and Ear plugs - Cutting sheet metal with a rotary tool can get a little loud and debris may fly
Optional
Scanner and Projector - These aren't really critical, but I used these to blow up the small scale model wings I made up to the full 12 foot wingspan patterns. I'm sure there are other ways.
Photo Reference - I used an amazing statue made by artist Mark Newman for Bowen Designs as a reference (photo posted in Step 2). However, I couldn't get my hands on one so I had to eyeball the wings, make a scale paper model of them then blow it up to actual size. I couldn't make them 100% to scale or I wouldn't have been able to move or walk in them.
Large pieces of cardboard/butcher paper - These were helpful for making templates of the wing shapes to use later on.
Step 2: Shaping the Wings


Note: I'm having a little trouble locating some of the photos I took while making the wings, so I'll post more as I get them.
As a photo reference, I used a statue of Marvel's Archangel created by Mark Newman for Bowen Designs. I could go on and on about how great the statue is, but suffice it to say that it was no small part of my inspiration. Again, the wings I made are not 100% to scale with the statue since they would be too big for me to walk or even move with them on. The wings are actually in six panels, each of which had to be cut out of aluminum: The main wings that have an inner and outer panel on each side and the two secondary wings.
Since I couldn't get any measurements off the statue itself I had to improvise. I created a scale model out of cardstock which allowed me to add/remove material easily to get just the right shape. Unfortunately, I've since lost the model and didnt take any photos of it :(
Once you have the right proportions in your paper model, use a scanner to get a digital copy of the wings and use a projector to blow up the image onto a wall or floor. From there you can increase or decrease the image size until the wings are the correct size. I aimed to have each wing be six feet long from base to tip. Using a large piece of butcher paper or cardboard, trace out the shape of the image. Alternatively, you could just project the image onto the aluminum sheets, but I found it helpful to have a paper template I could move around and roll up easily.
Step 3: Cutting the Wings


I first traced out the paper templates onto the aluminum sheets. I carefully positioned the paper over the sheets I had to make sure I got the most out of the 4 pieces of Aluminum I had. The secondary wings and the inner panels of the main wings were one solid piece but the large outer main wing panel had to be made from two pieces.
Use the dremel with the fiber reinforced cutting wheels to carefully cut along the patterns on the aluminum. There is a lot of cutting to do, so use safety glasses and earplugs to reduce the wear and tear on your eyes and ears.
Once the wings are cut, wrap the sandpaper around the sanding sponge and go along the edges of the aluminum to remove any burr and make it nice and dull. The wings will have a pretty wide wingspan so you could hurt a lot of people if the edges are sharp.
Step 4: Reinforce the Inner Wing Panel

I learned this the hard way, but the weight of the outer wing panel will cause the inner panel to double over. The 7075 aluminum is rigid, but flexible enough to need reinforcement.
For this, use the Aluminum L channel and cut it to size with the dremel (or band saw if you've got one) to mount it diagonally on the inner panel. Drill holes and use the #4 screws and #4 split lock washers to fix the L channel to the wing panel. This takes the stress off the inner panel and puts it on the backplate, preventing the inner panel from doubling over.
Note: This photo was taken later on in the process after I realized that the wings needed extra support. Be smart and add the support before the wings are fully assembled!
Step 5: Attaching the Wing Panels


Once you have all the panels cut, plan out how the spring hinges will attach. I say plan it out because the orientation of the spring hinges directly affect how the wings will open and close. I oriented the spring hinges so that the wings would spring open on their own from a closed position. This meant that the hinges had to be mounted behind the wearer on the joint between the backplate and inner main wing panel, but towards the front of the wings on the joint between the inner and outer panels.
Lay out panels on the floor and position them as they would be if attached. Be sure that the joints are fully vertical, i.e. the hinges are directly over one another if the wearer was standing straight up (see photos for correct and incorrect way). If not, the weight of the wings will cause them to fall forward or backward much like a door will open or close on its own if the hinges are off. In order for the opening/closing mechanism to work, the wings have to be fairly neutral. The spring hinges aren't really strong enough to support the weight of the wings and open them, only to open them if their weight is balanced.
Position the hinges and mark where the mounting holes should be. Drill out the holes and use the #4 1/2" screws and split lock washers to hold them in place.
Once you attach the main wings, attach the secondary wings with the smaller jewelry box hinges. Use the small springs to attach to these So they open by default. These wont be controlled, they just need to be held in place to look good. You can see the secondary wing in the last photo.
Step 6: Control Mechanism


Put the wings aside for now to work on the control mechanism.
For earlier prototyping I used the Arduino Uno for ease of use then moved it over to the Arduino Pro Mini on a protoboard once I wanted to make it more permanent. The circuit diagram is below. Its looks more complicated than it is. The servos get power, ground and data and the push button switches in each finger are connected to power on one side while the other connects to a data pin from the arduino with a reference to ground via a resistor. All of the resistors are 10k ohm.
The control sketch for the arduino is also below. I used a bounce library to take care of the noisy buttons. I titled this sketch "with simultaneity" because an earlier version required me to hold down the button to make the servos move. This was an issue because the arduino can only do one thing at a time. So, what I did was made it so that one button press activates the servo and a second button press turns it off. This allows the activations of multiple servos at once.
The 5 wire JST connectors were convenient to use for the gloves, making the gloves detachable from the central brain. Each glove has 5 wires: 4 lines to the arduino's data pin (one for each button) and one common power source. To go from the glove to the brain I used magnet wire. Don't do this. I was seduced by their thin low profile and managed to convince myself that they wouldn't fatigue and break under the stress.
I then used a radioshack battery case meant for 4 AA's as an enclosure. I hollowed it out then made holes in the side for the servos and gloves and a big rectangular whole in the top as a viewing port.

Step 7: Attaching Control Mechanism to the Wings


Cut little plates out of aluminum and use the #6 nuts and bolts to hold the servos onto the wings or backplate. Wind up the servos with the high strength fishing line. Be sure to pay attention to what direction you wind the fishing line around the servo and what direction the arduino is programmed to move on command. My sketch has it release line (expand wings) when moving counter clockwise and wind up the line (contract wings) going clockwise.
The photo below shows the two servos that control the inner wing panels. Two more servos attach to the wing panels themselves to control the outer wing panels.
Once the servos are attached you can put them on and test them! The first test video is seen on the Intro page.
Step 8: Wing Detailing


This took me FOREVER. To ge the brushed aluminum look, I used 100 grit sandpaper at the end of a sponge mop to put the finish on them. Using the mop instead of your hands allows you to get much longer strokes and much straighter brush lines.
Once they had the brushed finish, I used a diamond tipped dremel bit to etch lines into the panels to match the model in step 2. This took FOREVER, but I'm very happy with how it came out. I could have drawn the lines on, but the etching really pops when they catch the light giving it a much better look.
Below are the two secondary wings comparing before and after.
Note: The way I did it I had to take the wings apart after testing them to do the final detailing. I did this so I wouldnt risk damaging the finish while mounting them. If you know the best way to do it (I dont) then you could detail them, add a protective coat (I tried polyurethane and it didnt work out that well) then mount everything to them without worrying about scratching them.
Step 9: You're Done!


You're done! Put on the fruits of your labor and walk around. I promise you will turn heads.
You can wear them on their own or if you're bold enough slap together a spandex costume to fully resemble your favorite superhero: Marvel's Archangel!

First Prize in the
Metal Challenge

Finalist in the
Make It Real Challenge

First Prize in the
Arduino Challenge


