

Introduction: Arduino Mini Robot


Everyone plays motion games on their mobile ever wondered what it would to be like to control stuff using motion control . In this instructable I'm going to show you how to build a android motion controlled robot that transmit video through wifi or through VHF . This robot can also be controlled over a pc or laptop.
If you liked my project vote for me in the contest.
Step 1: Parts


1)Arduino uno
2)Cheap blutooth module from ebay
3)A set of geared motors
4)A set of wheels
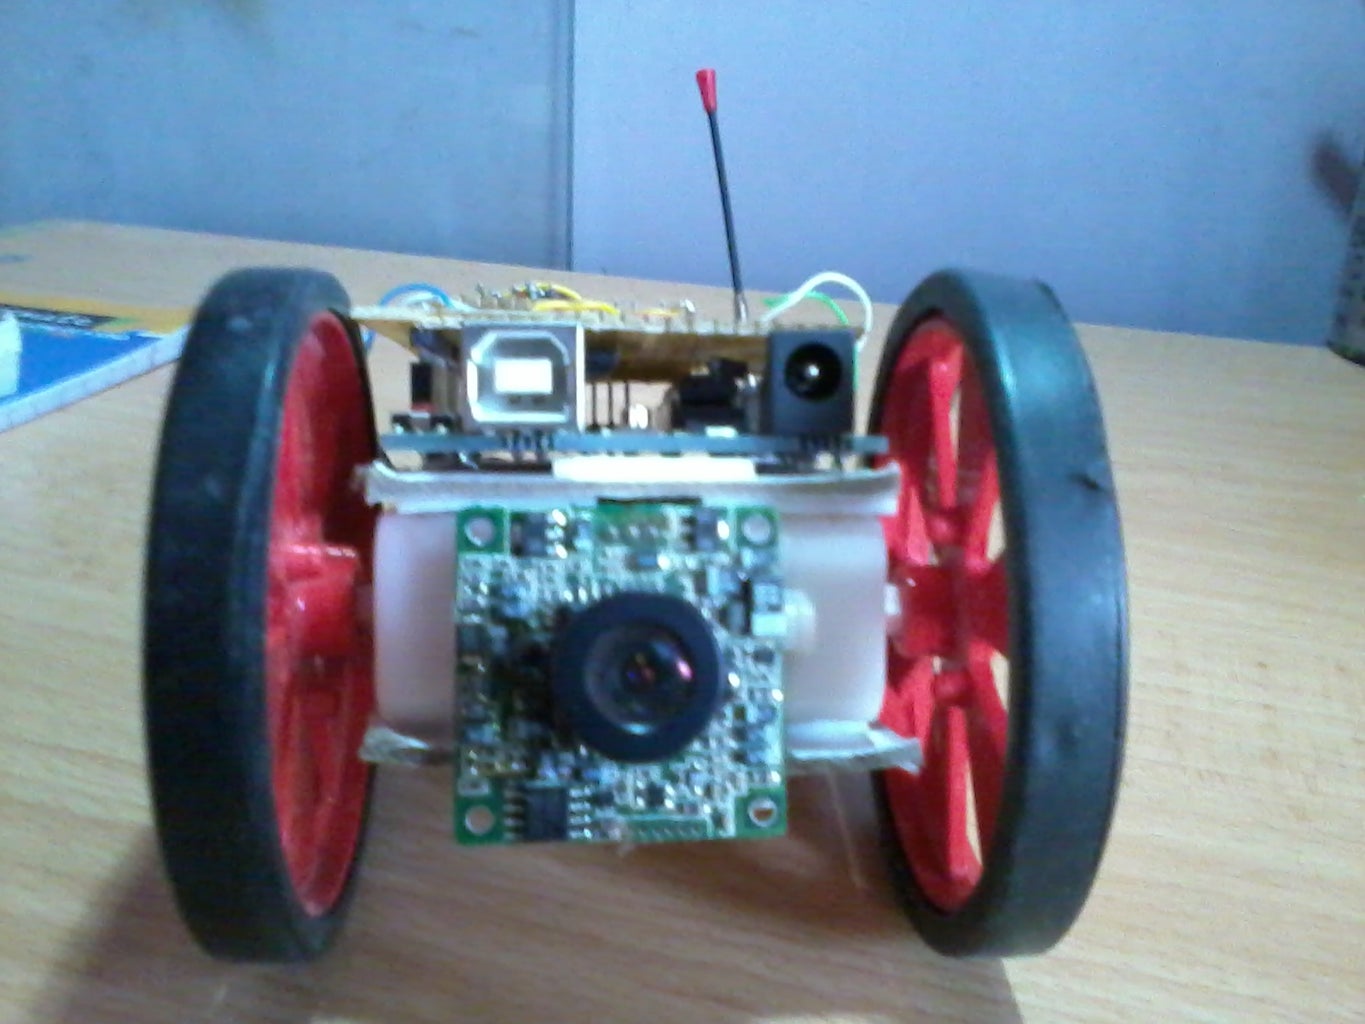
5)Wifi camera or a web camera
6)l293
7)6v rechargeable battery
8) 9v battery
9) PCB
Step 2: Motor H Bridge


For motor driver I made my own shield using l293 IC . The l293 IC is a dual h bridge IC and works up to a output of 9v. For higher load use lm 298 IC . The output 1&2 go to the right motor and output 3&4 go to the left motor.
Pins
input 1 to arduino 2
input 2 to arduino 4
input 3 to arduino 5
input 4 to arduino 7
chip inhibit to arduino 3
chip inhibit to arduino 6
vss to arduino 5v
vc to +of 6v battery
Connect the grounds together. And connect one ground to arduino and another to - 6v battery. Solder the IC to the PCB and add some pins at the end ,make sure the pins enter the arduino without damaging it.
Step 3: Bluetooth

Everyone plays motion games on their mobile ever wondered what it would to be like to control stuff using motion control . In this instructable I'm going to show you how to build a android motion controlled robot that transmit video through wifi or through VHF . This robot can also be controlled over a pc or laptop.
If you liked my project vote for me in the contest.
Step 4: Android

For communication between android and the arduino we use an app named amarino this establishes a wireless network .
Download- http://code.google.com/p/amarino/downloads/detail?name=Amarino_2_v0_55.apk&can=2&q=
plug in- http://code.google.com/p/amarino/downloads/detail?name=AmarinoPluginBundle.apk&can=2&q=
The following are the steps for
downloading the Amarino
Application:-
Download the Amarino Application and the Amarino plugin
on your computer.
Copy the Amarino App and
Amarino plugin to the Android
phone's SD card.
Install the Amarino App and the
Amarino plugin on the Android
phone.
Turn On the Bluetooth robot.
On the Android phone go to
"Settings-->Wireless and
Network-->Bluetooth Settings" .
Turn on the bluetooth and search
for your bluetooth module. Once
the bluetooth module is
discovered, pair with it but do not
connect to it.
Open the Amarino App on the
Android phone. Click the "Add
BT Device" button. Select the
bluetooth module from the list of
devices.
Your bluetooth module now
appears on the Amarino
homescreen.
Select the red file button next to
the bluetooth module's name.
Select the "Add Events" button
and select the "Accelerometer
Sensor" option.
You are now done with installing
the Software part on the Android
Phone
Step 5: Code

For arduino code
#include <MeetAndroid.h>
const int EnablePin1 = 3;
const int EnablePin2 = 6;
const int Motor_1_A = 2;
const int Motor_1_B = 4;
const int Motor_2_A = 5;
const int Motor_2_B = 7;
float data[3] = {0};
int intdata[3] = {0};
int i = 1;
MeetAndroid meetAndroid(error);
void error(uint8_t flag, uint8_t
values)
{
Serial.print("ERROR: ");
Serial.print(flag);
}
void setup() {
Serial.begin(9600);
Serial.println("\t\t
\t.----------------------.");
Serial.println("\t\t\t| Starting
Up.. |");
Serial.println("\t\t
\t'----------------------'");
pinMode(EnablePin1, OUTPUT);
pinMode(EnablePin2, OUTPUT);
pinMode(Motor_1_A, OUTPUT);
pinMode(Motor_1_B, OUTPUT);
pinMode(Motor_2_A, OUTPUT);
pinMode(Motor_2_B, OUTPUT);
delay(1000);
meetAndroid.registerFunction
(floatValues, 'A');
}
void loop()
{
meetAndroid.receive();
}
void floatValues(byte flag, byte
numOfValues)
{
meetAndroid.getFloatValues
(data);
for (int i=0; i<3;i++)
{
meetAndroid.send(data[i]);
}
if (-10<=data[0]<=10) //
This is for Forward/Reverse
{
intdata[0] = int(data[0]);
intdata[0] = intdata[0] * 24;
if (data[0] <= -2)
{
intdata[0] = abs(intdata
[0]);
digitalWrite(Motor_1_A,
HIGH);
digitalWrite(Motor_2_A,
HIGH);
digitalWrite(Motor_1_B,
LOW);
digitalWrite(Motor_2_B,
LOW);
analogWrite(EnablePin1,
intdata[0]);
analogWrite(EnablePin2,
intdata[0]);
}
else if (data[0] >= 2)
{
digitalWrite(Motor_1_A,
LOW);
digitalWrite(Motor_2_A,
LOW);
digitalWrite(Motor_1_B,
HIGH);
digitalWrite(Motor_2_B,
HIGH);
analogWrite(EnablePin1,
intdata[0]);
analogWrite(EnablePin2,
intdata[0]);
}
else if (-1<=data[0]<=1)
{
digitalWrite(Motor_1_A,
LOW);
digitalWrite(Motor_2_A,
LOW);
digitalWrite(Motor_1_B,
LOW);
digitalWrite(Motor_2_B,
LOW);
digitalWrite(EnablePin1,
LOW);
digitalWrite(EnablePin2,
LOW);
}
}
if (-10<=data[1]<=10) //
This is for Turn Left/Turn Right
{
if (data[1] <= -2)
{
digitalWrite
(Motor_1_A, HIGH);
digitalWrite
(Motor_2_B, HIGH);
digitalWrite
(Motor_1_B, LOW);
digitalWrite
(Motor_2_A, LOW);
analogWrite
(EnablePin1, intdata[0]);
analogWrite(EnablePin2,
intdata[0]);
}
else if (data[1] >= 2)
{
digitalWrite
(Motor_1_A, LOW);
digitalWrite
(Motor_2_B, LOW);
digitalWrite
(Motor_1_B, HIGH);
digitalWrite
(Motor_2_A, HIGH);
analogWrite
(EnablePin1, intdata[0]);
analogWrite
(EnablePin2, intdata[0]);
}
else if (-1<=data[1]<=1)
{
digitalWrite
(Motor_1_A, LOW);
digitalWrite
(Motor_2_A, LOW);
digitalWrite
(Motor_1_B, LOW);
digitalWrite
(Motor_2_B, LOW);
digitalWrite
(EnablePin1, LOW);
digitalWrite
(EnablePin2, LOW);
}
}
}
Step 6: Code 2

For arduino code
#include
const int EnablePin1 = 3;
const int EnablePin2 = 6;
const int Motor_1_A = 2;
const int Motor_1_B = 4;
const int Motor_2_A = 5;
const int Motor_2_B = 7;
float data[3] = {0};
int intdata[3] = {0};
int i = 1;
MeetAndroid meetAndroid(error);
void error(uint8_t flag, uint8_t
values)
{
Serial.print("ERROR: ");
Serial.print(flag);
}
void setup() {
Serial.begin(9600);
Serial.println("\t\t
\t.----------------------.");
Serial.println("\t\t\t| Starting
Up.. |");
Serial.println("\t\t
\t'----------------------'");
pinMode(EnablePin1, OUTPUT);
pinMode(EnablePin2, OUTPUT);
pinMode(Motor_1_A, OUTPUT);
pinMode(Motor_1_B, OUTPUT);
pinMode(Motor_2_A, OUTPUT);
pinMode(Motor_2_B, OUTPUT);
delay(1000);
meetAndroid.registerFunction
(floatValues, 'A');
}
void loop()
{
meetAndroid.receive();
}
void floatValues(byte flag, byte
numOfValues)
{
meetAndroid.getFloatValues
(data);
for (int i=0; i<3;i++)
{
meetAndroid.send(data[i]);
}
if (-10<=data[0]<=10) //
This is for Forward/Reverse
{
intdata[0] = int(data[0]);
intdata[0] = intdata[0] * 24;
if (data[0] <= -2)
{
intdata[0] = abs(intdata
[0]);
digitalWrite(Motor_1_A,
HIGH);
digitalWrite(Motor_2_A,
HIGH);
digitalWrite(Motor_1_B,
LOW);
digitalWrite(Motor_2_B,
LOW);
analogWrite(EnablePin1,
intdata[0]);
analogWrite(EnablePin2,
intdata[0]);
}
else if (data[0] >= 2)
{
digitalWrite(Motor_1_A,
LOW);
digitalWrite(Motor_2_A,
LOW);
digitalWrite(Motor_1_B,
HIGH);
digitalWrite(Motor_2_B,
HIGH);
analogWrite(EnablePin1,
intdata[0]);
analogWrite(EnablePin2,
intdata[0]);
}
else if (-1<=data[0]<=1)
{
digitalWrite(Motor_1_A,
LOW);
digitalWrite(Motor_2_A,
LOW);
digitalWrite(Motor_1_B,
LOW);
digitalWrite(Motor_2_B,
LOW);
digitalWrite(EnablePin1,
LOW);
digitalWrite(EnablePin2,
LOW);
}
}
if (-10<=data[1]<=10) //
This is for Turn Left/Turn Right
{
if (data[1] <= -2)
{
digitalWrite
(Motor_1_A, HIGH);
digitalWrite
(Motor_2_B, HIGH);
digitalWrite
(Motor_1_B, LOW);
digitalWrite
(Motor_2_A, LOW);
analogWrite
(EnablePin1, intdata[0]);
analogWrite(EnablePin2,
intdata[0]);
}
else if (data[1] >= 2)
{
digitalWrite
(Motor_1_A, LOW);
digitalWrite
(Motor_2_B, LOW);
digitalWrite
(Motor_1_B, HIGH);
digitalWrite
(Motor_2_A, HIGH);
analogWrite
(EnablePin1, intdata[0]);
analogWrite
(EnablePin2, intdata[0]);
}
else if (-1<=data[1]<=1)
{
digitalWrite
(Motor_1_A, LOW);
digitalWrite
(Motor_2_A, LOW);
digitalWrite
(Motor_1_B, LOW);
digitalWrite
(Motor_2_B, LOW);
digitalWrite
(EnablePin1, LOW);
digitalWrite
(EnablePin2, LOW);
}
}
}
Step 7: Camera
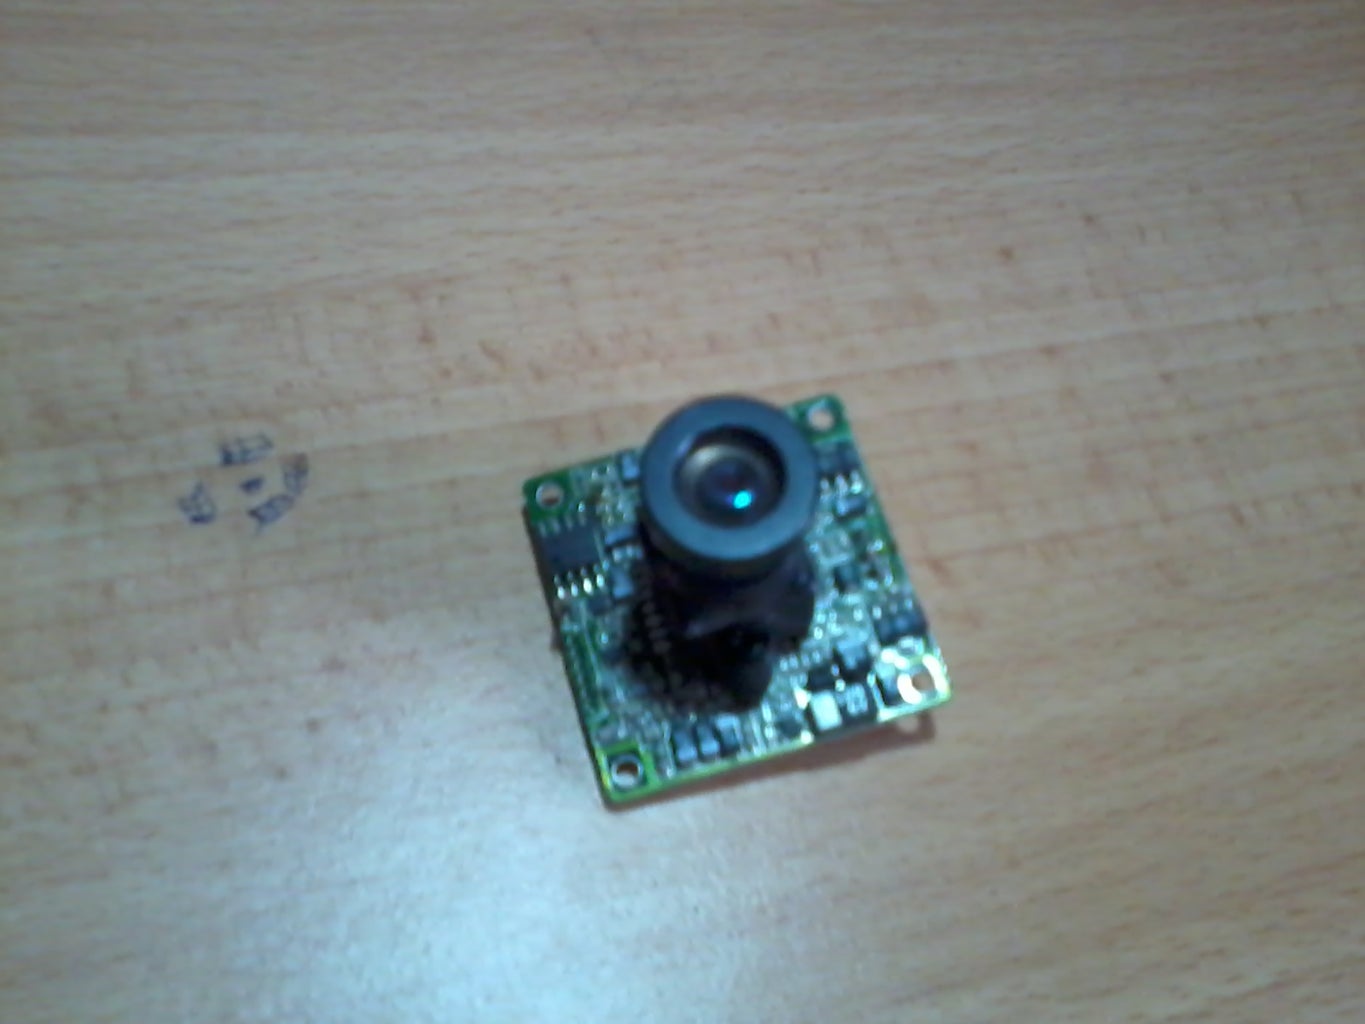
You could use a wifi camera from ebay or buy a cheap web cam from the internet then build a vhf circuit . If you use an ip camera then use your laptop wifi and find it or enter the ip mentioned in the manual.
To view the camera on your android download tiny monitor from the play store.

Participated in the
Battery Powered Contest

Participated in the
Arduino Contest


