

Introduction: Arduino Powered by Your SmartPhone (using SERIAL ) - Part 1 - Sound and Vibration Actions


Welcome to the first part of this series.In this series we will try take out as much as we can from you smartphone ( android currently ) to your microcontroller using serial cable ( OTG cable ) .
In this part we will explain how you can play some sounds/songs (any mp3 file ) as well as using vibration from your device controlled by your microcontroller ( Arduino ) using only a serial cable ( OTG cable ).
NOTE: No need for Audio shield neither the vibration only your smart phone .this is the purpose of the app.
The Result of this tutorial will be :
So What you will learn from this instructable :
-Serial Communication between Arduino and android ( No Shield !! )
-Using Terminal to view the data ( Serial Inspector in your Mobile )
-Play Audio Files (Mp3 ) controlled from your arduino using serial communication
-Vibrate your device from your arduino using serial communication
-Theory behind the push button (looks simple ha ? :D ) and using of the bounce2 library
To support this project please :
Like our page : https://www.facebook.com/pages/BlueAct/55984237746...
Rate our app : https://play.google.com/store/apps/details?id=ram....
Difficulty : easy
Expected Time : 1 hour
Step 1: Tools You Need


Here is the things you need to have before start with this instructable :
1-Arduino Uno (or any type of arduino even you can choose any microcontroller !! with serial support ) with its usb cable : You should have this already :D.
2-Android Device (running 3.1 and higher ) .
2-OTG cable : This one can be found in any store for computers or electronics .If you have no idea what is OTG cable then check this image .Simply , It allows USB devices such as mobile phones to act as a host, allowing other USB devices like a USB flash drive, digital camera, mouse, keyboard or microcontroller ( e.g arduino ) to be attached to them.
So they will be powered from this host ( smartphones ) as well as receive and send data from the host (smartphones )
3-push buttons (5 items)
4- 10K Ohms resistors ( 5 items)
5- wires
6-cup of juice :D
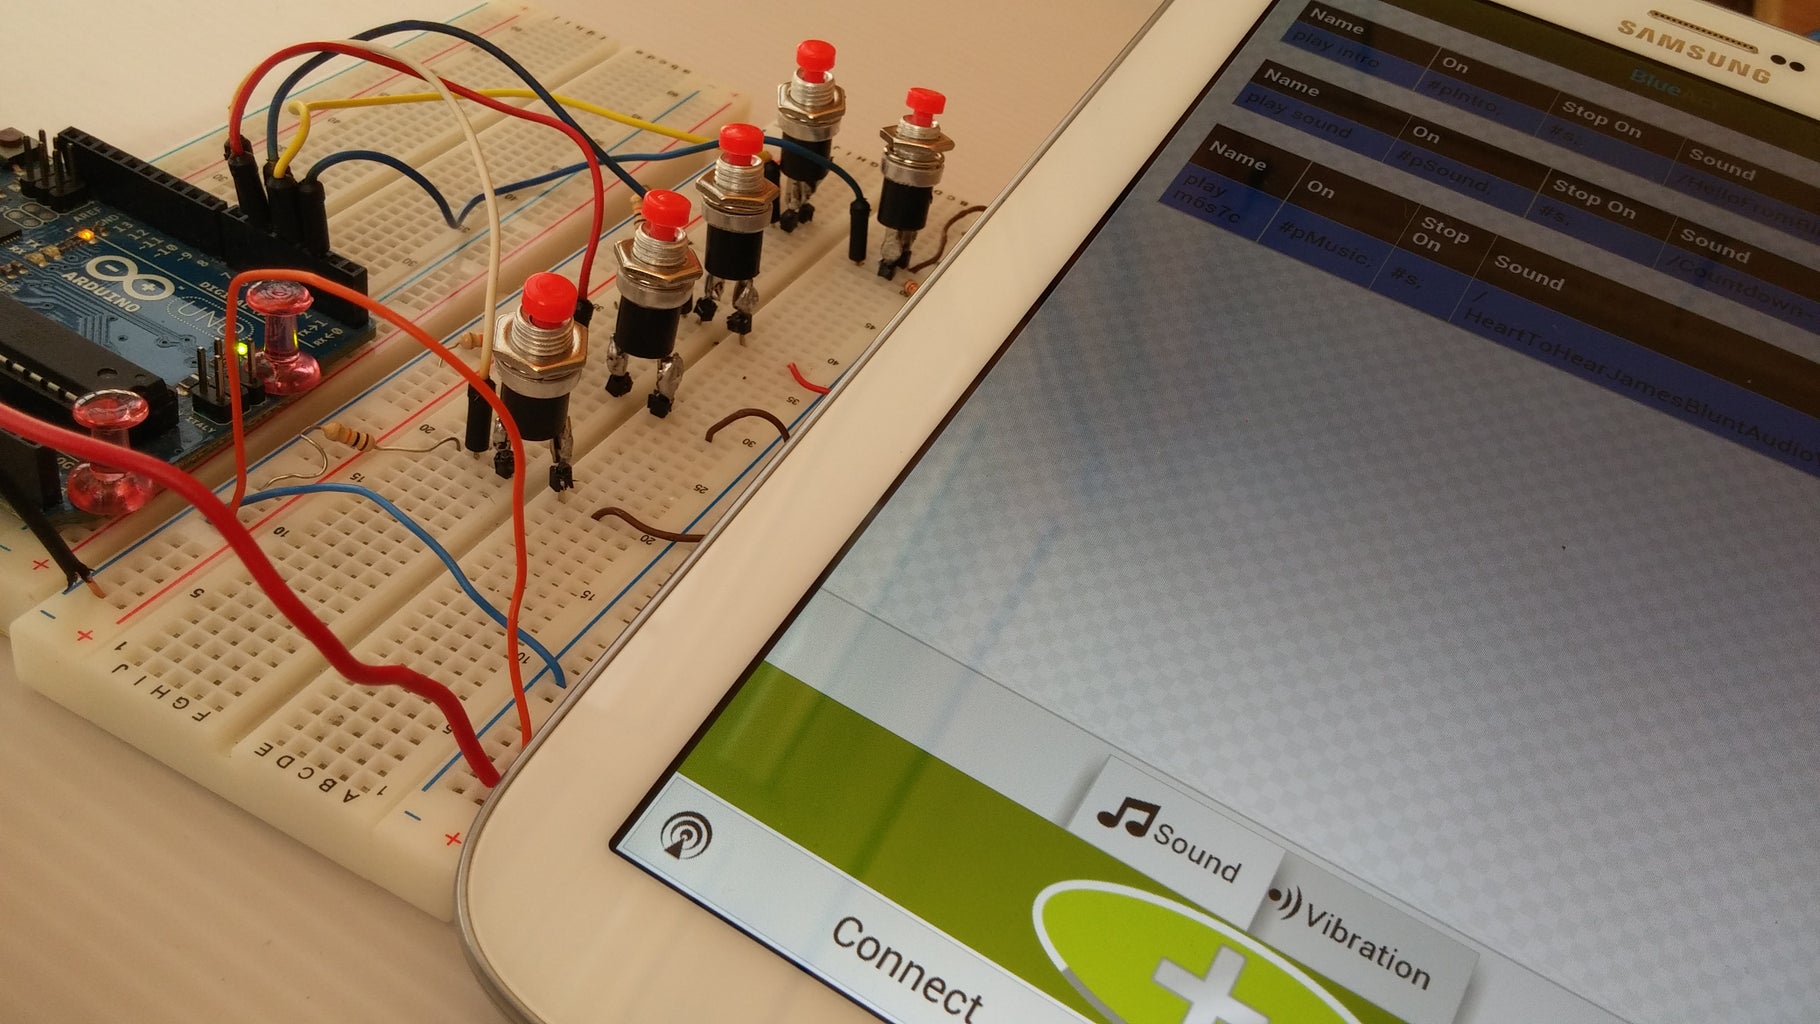
Step 2: Connecting and Testing (Terminal)
First of all download the application from here.Then connect the OTG cable form one side with the arduino and from other side with you android device .
Before we start adding some actions ( playing sound ,vibration ..etc ) we will start with the testing that everything is going fine .To do that watch the next video :D :
Yes this is a Serial inspector in your device !!
Step 3: Connecting the Components
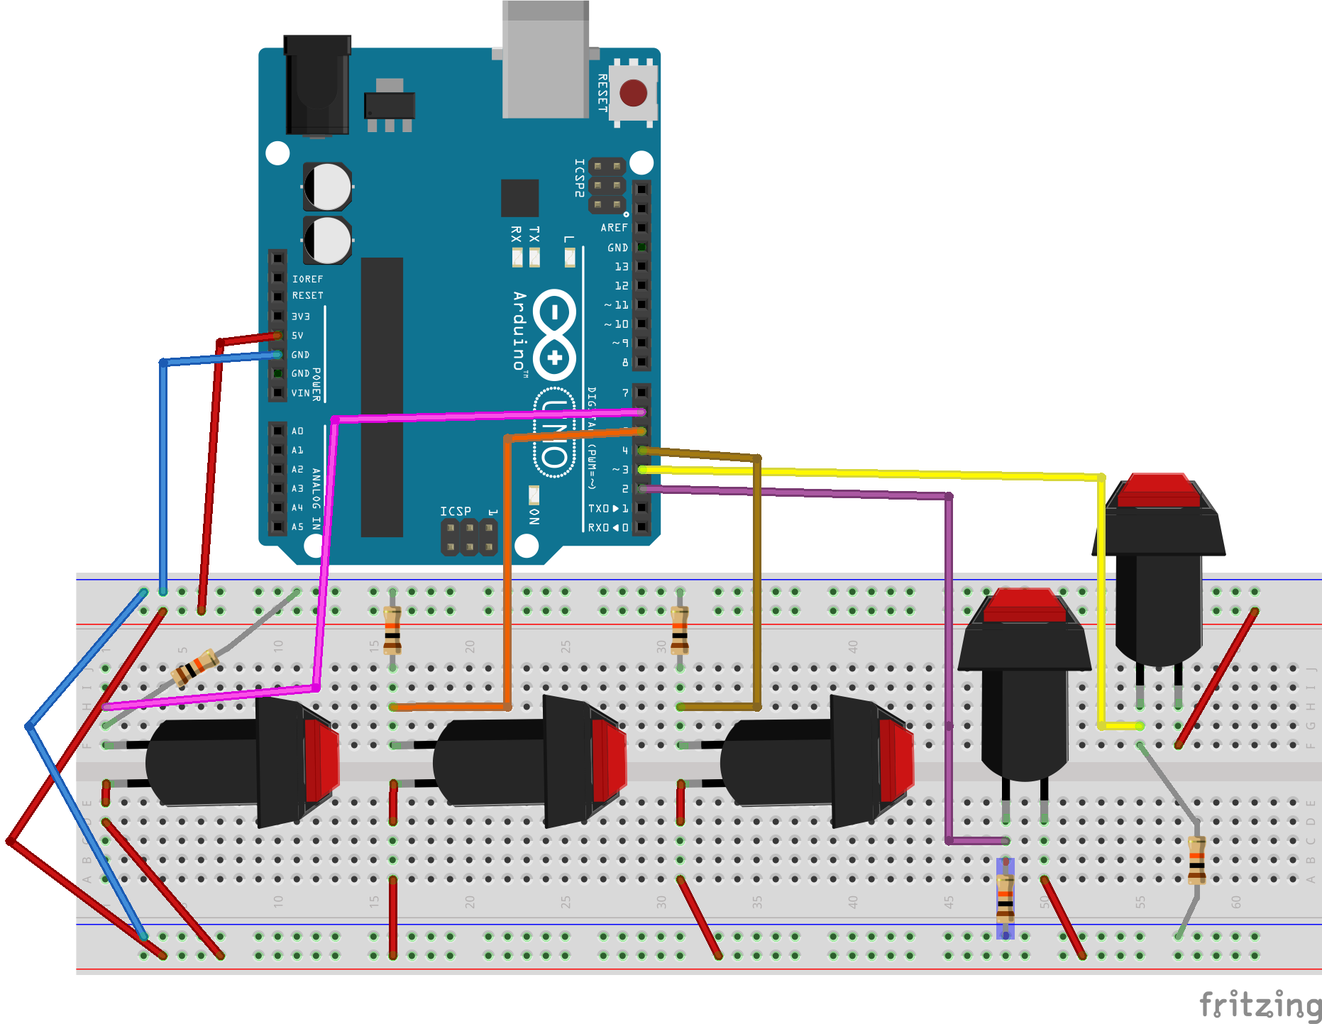
If you have the previous mention items then connecting them is fairly simple see the Next video :
The Sketch above give a good idea on how the connection can be made.
In general the button has two legs ( or fours ) the first one leg ( or first pair of leg ) are connected to 5 voltage while the other is connected to ground through 10K resistor as well as to the one of I/O pin from arduino.
Don't worry there is no risk in this tutorial :D .
Step 4: Arduino Code - Push Buttons Theory
Upload the attachment (thie code ) in this step to your arduino.
For The code now . Actually it is a simple one I have attached the code and it is well documented.
However,I will go through some basic stuff that may seems a bit difficult :
The idea of this code is whenever you press a button a data ( you can change it ) will be sent from Arduino through serial to your device.there is no problem right ?
Ok the only the problem is that when you push the button it will not go from low state to the high state immediately (or the opposite ) .There will be a period of time where it will hesitate between high to low state so in a nutshell when you press the push button it may send the data twice or more !! .
There are two solutions for this issue one by hardware (using capacitor ) and the other through Software .
In this part we only using software one ( the easy one ) .Now the idea of software solution is to wait a period of time ( the hesitation time ) while the button settle in (become stable) .But we have 5 buttons !! cool down we don't have to write that much of code there is a library for that called bounce2 :D.See this link to download.
So how to use this library, that's the easy part :
// Instantiate a Bounce object
Bounce debouncer1_On = Bounce();
// initiate the button
pinMode(sound1On,INPUT);
// Activate internal pull-up
digitalWrite(sound1On,HIGH);
// After setting up the button, setup debouncer
debouncer1_On.attach(sound1On);
debouncer1_On.interval(10)
Now you are ready whenever you want to read the status of the button just do :
debouncer1_On.update();
then read the status :
btn1On = debouncer1_On.read();
after that, depending on the btn1On value ,you send the data.For example when the state is low btn1On==LOW then send #pIntro; ( this string will be translated by the app and it will play specific sound later on this subject )
You may notice we have a variable called preStatus for each button this one is to save the previous status of the button .
If you have more questions about the code please contact me on :
blueactapp@gmail.com
Or discuss it on fb page :
https://www.facebook.com/pages/BlueAct/55984237746...
Reference : For more information about Debouncing this video explain a lot :

Step 5: Adding Actions ...
If you didn't yet download the application then download it from here :
https://play.google.com/store/apps/details?id=ram....
what we mean by action is the thing that will handle the data you send from arduino and then will do an action.So for example if you defined a sound action that will be played when the app receive the string #pIntro; from arduino then when the arduino send #pIntro; string the app will pass this string to the action that can handle it in our case is the sound action.
The next video will explain how to add these actions in detail :
Step 6: The Result : Lets Play Some Music !
The result of your work will be in this Video :D as in the introduction
Step 7: In the End :D
Hope you enjoyed this instructable for more info please contact us on blueactapp@gmail.com.
To support this project please :
Like our page : https://www.facebook.com/pages/BlueAct/55984237746...
Rate our app : https://play.google.com/store/apps/details?id=ram....
Future Parts will include :
- Controlling a motor ( direction + speed ) using configurable buttons.
- Accelrometer (from your device ) controlling 3 leds through Arduino
-Light up a lamp at specific time of day.
-Sending SMS when the light is off or the temperature is high :D
-some cool stuffh
Thanx :D
BlueAct Team.

Participated in the
Tech Contest


