

Introduction: Automatic Watering System


Some plants require much care and attention. This can be difficult if you're about to leave your home for a longer period of time.
This issue could be solved with an innovative automatic plant watering system, which also measures the moisture level of the soil, regulating the amount of water received by the plant.
The system could be manufactured by using a 3D printer, but we will focus on using items commonly found in most households, since not so many people own a 3D printer.
The items you will need are: an Arduino Uno (or any other Arduino compatible board), jumper wires, a breadboard, two nails, a push button, 30cm of IV tube, a servo motor (doesn't need to have much torque), a 10k resistor, a 4.7k resistor and a 10nF ceramic capacitor. The 10k resistor and ceramic capacitor are used to hardware debounce the push-button. The button is used more for debugging purposes, by actuating the system manually, by the push of a button.
Step 1: How to Make the HW Setup:


1.Connect the push button to the Arduino as shown in the wiring sketch, in a pull-down configuration.
2.Connect the servo's signal pin to pin 9 on the board.
3.For measuring the humidity of the soil, we'll build a voltage divider:
- Wrap a string of wire around each nail (wires in blue in the wiring sketch).
- Push both nails in the soil, at about 1 centimeter distance of one another.
-Wire #1 coming from one of the nails will be connected to a digital pin on the Arduino.
-Wire #2 to be connected to ground through a 4.7k resistor.
-The board will measure the voltage between ground and where the wire coming from the nail connects to the resistor. Depending on your type of soil and it's composition, the best resistance value could differ.
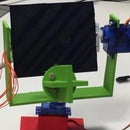
4.The servo motor will move a stick which lowers or raises a rubber tube, allowing the water to flow or not. When the tube is raised at its maximum, the tip must be above the top of the water bottle.
Step 2: How to Make the SW Setup:

1.Install Arduino IDE, from following link: https://www.arduino.cc/en/main/software
2.Click on Windows installer
3.Click on JUST DOWNLOAD
4.After download is complete, click on RUN button
5.Click on I Agree button (Arduino IDE is a free software)
6.Select all components from the list and click on Next button
7.Proceed with the installation after selecting the desired location
8.Install driver “Adafruit Industries LLC Ports”, by clicking on Install button
9.Install driver Arduino USB Driver” by clicking on Install button
10.Install driver “Linino Ports (COM&LPT)” by clicking on Install button
11.Press CLOSE button when installation is complete.
12.Download application file : PlantWatering.ino.
If all the hardware set-up is connected properly, you can simply compile and upload the software to the board. You can test the system by pushing the button once. If the arm lowers and water starts flowing, the system is a success. Also follow the serial output on the serial monitor or serial plotter to observe any changes it the humidity value.
Attachments

Step 3: How to Configure Your Setup
1.After code file (“PlantWatering.ino”) has been downloaded, double click on it and press OK button to create a folder named “PlantWatering”.
2.Select type of board from Arduino IDE menu: Tools\Board: “Arduino/Genuino Uno”
3.Identify the communication port on which the Arduino board will communicate, by accessing Device Manager
4.Set communication port (identified at step 3), from Arduino IDE menu: Tools\Port : COM7
Step 4: How to Configure Your Application

Depending on your set-up, you'd want to adjust the open and close position of the servo.
In order to find the threshold for the soil moisture, you can probe the soil in different spots with the nails at the same length apart and check the resistance with a multi-meter.
Check the value for dry, normal and moist soil.
After knowing this data you can change the resistor used for the voltage divider accordingly.
The best resistor value would be of the same resistance as the normal soil.
Also the time during water is pouring is adjustable, and the minimum time between watering.
Test it out and have fun with it :)


